Advertisement
Quick Links
Download this manual
See also:
Owner's Manual
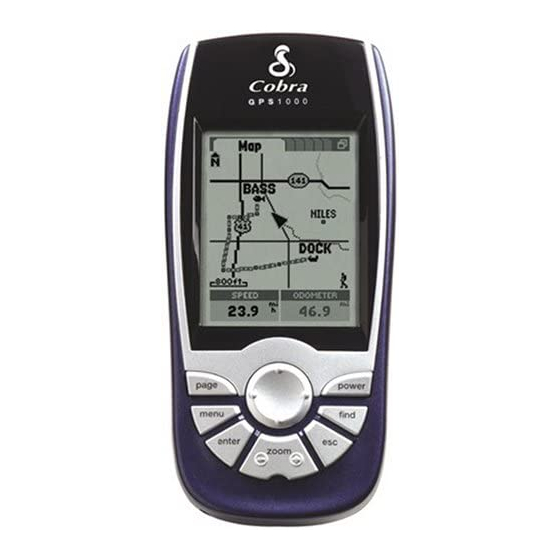
P R O D U C T F E AT U R E S
ROCKER PAD
• Scrolls through menus and options.
• Moves or pans around the Map Page.
PAGE Button
• Cycles through the six pages.
• Returns to main page.
• Displays the "Page List" menu (press and hold
for 2 seconds).
MENU Button
• Brings up a menu of selections related to the current screen.
ENTER Button
• Accepts a highlighted selection.
• Marks a new waypoint using current location (press and
hold for 2 seconds).
I N S TA L L AT I O N
Batteries
Your GPS receiver operates on two standard AA batteries (not
included). Always use high quality alkaline batteries.
To install batteries:
1. Twist the D-ring connector counterclockwise.
2. Remove the battery compartment door.
3. Insert two AA batteries, ensuring correct polarity alignment.
4. Replace the battery compartment door.
5. Twist the D-ring clockwise to lock.
As an optional power source, a vehicle power adapter (see
"Optional Accessories," in the Owner's Manual) can be used
with your GPS receiver.
S TA R T U P
Power
To turn your GPS receiver on or off:
1. Press and hold the POWER button for 2 seconds.
A start-up screen appears for a few seconds
attempting to lock onto signals from GPS satellites
the screen will automatically switch to the Map Page
You can jump to the Map Page while the receiver continues to acquire satellite signals by
selecting "Continue Acquiring? – YES." On the Map Page, a pointer arrow
appear in the middle of the display once three signals have been acquired
the non-navigational features of your receiver, select "Continue Acquiring? – No."
CAUTION: For optimum use, when you use this GPS receiver for the first time, have not used
the receiver for over 3 months or have changed geographic regions:
• It will take approximately 50 seconds to lock onto the GPS satellites
• Keep the receiver turned on for at least 15 minutes after locking onto the GPS satellites.
NOTE: The receiver must be outside with a clear view of the sky to acquire satellite signals for navigation.
I N S T R U M E N TAT I O N I N F O R M AT I O N
Map Page
Stop Navigation –
Stops your current type of
navigation.
Map Setup –
Allows you to set the parameters used by
the Map Page.
Measure Distance –
Shows the distance between any two
points you select.
Gauges Page
Set Data Field –
Sets the data that is to be in the information
fields at the bottom of the screen.
Restore Defaults –
Restores all Gauges Page default
settings.
Trip Meter Page
Stop Navigation –
Stops your current type of
navigation.
Set Data Field –
Sets the data that is to be displayed in the
information fields.
S Y S T E M PA G E
Alerts Screen
On the Extras Screen (from the System Page), select "Alerts" to turn the Alert Alarm (an
automatic alarm sound when you come within a certain distance or Alarm Radius from the
following) for the Anchor Drag Alert, Approach Alert, Arrival Alert or Off Course Alert to "On" or
"Off" and to set the individual Alarm Radius for each alert.
Anchor Drag Alert – sounds when you drift more than the specified distance from a
particular location.
Approach Alert – sounds when you reach the specified distance from the next point in
your current navigation.
Arrival Alert – sounds when you reach the specified distance from your final destination.
Off Course Alert – sounds when you deviate the specified distance from you course.
Proximity Screen
On the Extras Screen (from the System Page), select "Proximity" to automatically sound an
alarm when you come within a certain distance or Alarm Radius of any point you choose. To
use Proximity, you must add points you wish to use to the Proximity List and select an Alarm
Radius for each one.
page
menu
enter
Lanyard Connector Loop
External Power/PC Interface Connection
SD Memory Card Slot
Battery Compartment Door
D-Ring Fastener
, followed by a screen that shows the receiver is
. Once three satellite signals have been acquired,
and the receiver is ready to use.
will
. To use
power
find
esc
zoom
Base Map Includes:
• Locations of hundreds of worldwide cities
• U.S. state, Canadian provincial and European country boundaries
• Continental U.S. interstate freeways, highways and exits
• Land cover (inland bodies of water)
With optional computer software, interface cable and SD Memory
Card (needed for map downloading) download more detailed
mapping data from a computer database. With this additional
information, the receiver could include local roads and streets,
additional waypoints and points of interest.
Additional Features:
• Stores up to 500 navigational waypoints
• Automatically tracks your travel and shows you how to return
along the same track (up to 10 separate tracks can be stored)
• Lets you program and store up to 50 different navigational
routes, using up to 50 points in each route
• Over 100 map datums to choose from
• Is waterproof to IPX7 standards and can operate in
temperatures from 5°F to 158°F (-15°C to 70°C)
power
p
p
ter
esc
enter
zoom
p
menu
enter
Data Fields –
Shows or hides data fields at the bottom of the map. Sets the
data that is to be displayed in each information field.
p
menu
enter
p
menu
enter
Backlit Display Screen
POWER Button
• Turns the device on or off (press and hold for 2 seconds).
• Turns display backlight on or off.
FIND Button
• Displays the Find Screen, which allows you to search for
various navigation points: waypoints, points of interest,
cities, addresses, intersections or exits.
ESCAPE Button
• Allows you to "back up" to previous screens/menus one at
a time.
• Allows you to cycle through the six pages in reverse order.
ZOOM IN/OUT Button
• Zooms in or zooms out on the image of the map.
SD Memory Card
Your GPS receiver's memory is expandable with use of an
optional SD memory card. A SD memory card is required
when using the optional mapping software.
To install a SD memory card:
1. Twist the D-ring connector counterclockwise.
2. Remove the battery compartment door.
3. Insert SD memory card according to illustration inside the
battery compartment.
4. Replace the battery compartment door.
5. Twist the D-ring clockwise to lock.
Startup Screen
Startup Screen
Map Page
Restore Defaults –
Restores all Map Page default
settings.
Stop Navigation –
Stops your current type of
navigation.
Bearing Pointer –
Shows your direction of travel.
Course Pointer –
Shows the direction to your next
destination.
Reset –
Resets any or all Trip Meter values to
zero.
Display –
Sets the number of fields displayed.
Restore Defaults –
Restores all Trip Meter Page default
settings.
Advertisement

Related Manuals for Cobra GPS1000


Summary of Contents for Cobra GPS1000
-
Page 1: Additional Features
“Continue Acquiring? – No.” CAUTION: For optimum use, when you use this GPS receiver for the first time, have not used the receiver for over 3 months or have changed geographic regions: •... -
Page 2: Routes Page
To test your knowledge of the receiver basics by taking a walk around the block: 1. Load batteries per instructions and take your GPS receiver outdoors. Be sure you have a clear, unobstructed view of the sky. Turn your unit on by pressing and holding the POWER button for 2 seconds.
Need help?
Do you have a question about the GPS1000 and is the answer not in the manual?
Questions and answers