
Subscribe to Our Youtube Channel
Related Manuals for Ernest Sports TOUR PLUS

Summary of Contents for Ernest Sports TOUR PLUS
- Page 1 For The First Time Quad Doppler Radar and Dual Photometric Cameras in One Launch Monitor » User Manual...
-
Page 2: Table Of Contents
TABLE OF CONTENTS ES TOUR PLUS GETTING STARTED Package Contents Installing the Battery Selecting a Club Positioning the Ball 10-23 ERNEST SPORTS APP Installation for Windows Bluetooth Connection Windows Pairing Home Screen Navigation Bar... - Page 3 Connecting Bluetooth in the App Course View 15-16 Data Provided Outdoor Mode Chip & Putt Mode Sessions Selecting a Club Course and Distance Selection Club Averages Session Data 24-25 TROUBLESHOOTING WARRANTY / REPAIR...
-
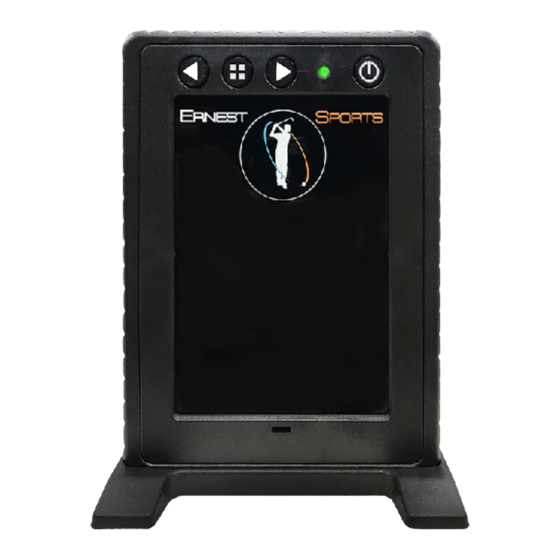
Page 4: Es Tour Plus
ES TOUR PLUS Rubber Boot LCD Display Ball Placement LED Club Selection Power Button Buttons Doppler Covers Camera Location Base... -
Page 5: Getting Started
GETTING STARTED Package Contents Power Adapter Lithium Ion Battery For The First Time Quad Doppler Radar and Dual Photometric Cameras in One Launch Monitor » User Manual User Manual... -
Page 6: Installing The Battery
Installing the Battery • Remove the battery panel on the ES TOUR PLUS with a phillips screwdriver • Attach the battery cable to the 3 pin connector located in the upper left corner of the battery compartment • The red wire should be toward the bottom as shown above •... -
Page 7: Selecting A Club
2 HYB 6 Iron 6 IR the top front of the ES 3 Hybrid 3 HYB 7 Iron 7 IR TOUR PLUS or using the 4 Hybrid 4 HYB 8 Iron 8 IR app (see page 19). 5 Hybrid 5 HYB... -
Page 8: Positioning The Ball
ES TOUR PLUS just off the back foot of the unit. Note: Allow at least 10 feet between the ES TOUR PLUS and any screens or nets (if hitting indoors). 12 inches Reverse set-up for left-handed golfers... - Page 9 Place the ball with the logo parallel to the ground and facing the ES TOUR PLUS. The LED on the front will change from red to green when the ball is in the correct Logo facing device Reverse set-up for left-handed golfers...
-
Page 10: Ernest Sports App
All Apps tab under the Windows start menu. Bluetooth Connection The ES TOUR PLUS uses a Bluetooth connection to send shot data to the app. This will require you to go into the Bluetooth settings on your Windows Device. - Page 11 Windows Icon. Select Settings, Devices, and Bluetooth. Turn Bluetooth On. Scan for devices. Once found, select ES TOUR PLUS and Pair. A password prompt will appear, enter 1234, and click next. The device will show connected at first, then show paired after the connection is completed.
-
Page 12: Bluetooth Connection
After installation, the app will be avaliable from the homescreen of your iPad ® Bluetooth Connection The ES TOUR PLUS uses a Bluetooth connection to send shot data to the app. This will require you to go into the Bluetooth settings on your iPad. - Page 13 Once found, the ES TOUR PLUS should appear under Other Devices. Click on ES TOUR PLUS, and your iPad will pair to the device after a few seconds. The ES TOUR PLUS will be displayed under My Devices and show connected.
-
Page 14: Home Screen
Home Screen Quick Start - Select this option if you do not need the data to be saved. This is a good option to use for a demo of the device. Active User - Select this option if the current user already has a profile. -
Page 15: Navigation Bar
Navigation Bar On the left edge of the app are icons that allow movement between the main sections: • Range Session • View Logs • User • Settings Clicking on the icon in the top left corner with 3 parrallel lines expands the navigation bar to show names along with the icons. -
Page 16: Connecting Bluetooth In The App
A window listing paired Ernest Sports devices will appear below the connection icon. If ES TOUR PLUS is not an option, click REFRESH at the bottom of the window. NOTE: If the device is still missing from the list, check the Bluetooth pairing in the Windows settings. -
Page 17: Course View
Course View Shot Path Additional Navigation Navigation Menu Previous Shot Shot Data Club Data Shot Data... - Page 18 Course View cont’ The ES TOUR PLUS app displays flight path and shot data. Course view is represented by the flag icon in the top left.
-
Page 19: Data Provided
Data Provided Initial launch statistics immediately populate the screen and are followed by real time animated flight statistics. • Angle of Attack • Spin Loft • Ball Speed • Spin Rate • Spin Axis • Carry Distance • Total Distance •... -
Page 20: Outdoor Mode
Mode a green light is no longer required to gather shot data, and you do not have to face the logo towards the Tour Plus. However, if you do still face the logo you may still get a green light based on your specific outdoor conditions. Launch direction and spin axis are no longer displayed as you can visually verify these by watching your shot and shot shape. -
Page 21: Chip & Putt Mode
PTT as your club manually on your ES TOUR PLUS. You do not need to face the logo towards the ES TOUR PLUS in this setting, and we suggest its use for shots under 20yd and putting. (have a Picture of the ES TOUR PLUS with PTT displayed) -
Page 22: Sessions
Sessions From the top center of the screen select Session. To begin a new session, name your range session and select Start Session. To join a previous session, select an existing session from the list and click Join Session. Pro Tip: Session name can be used to identify specific clubs or... -
Page 23: Selecting A Club
From the top center of the screen select Club. Scroll through the list and select the club you would like to use. That club will then appear on the ES TOUR PLUS. Appropriate club selection is needed for storing accurate club statistics. -
Page 24: Course And Distance Selection
Course and Distance Selection From the top center of the screen, select Hole. Under Location, select the course you would like to view. Under Distance to Hole, use the slider to select distance to the pin. Then select Set Distance. Under Rotation, the target line can be aimed to the left or right. -
Page 25: Club Averages
Club Averages Select View Logs from the navigation bar. From the box on the left, select Averages with the toggle button, then the session to be viewed. To change the club data being viewed: • Select club from list at bottom of the page •... -
Page 26: Session Data
Session Data Select View Logs from navigation bar. From the box on the left, select Raw with the toggle button, then choose the session to be viewed. - Page 27 Best Practices Spin and Spin Axis The ES Tour requires that the balls used have a straight line logo. This means that the software treats the logo like a line, measuring the rotation from one picture to the next picture. It also tracks the displacement of the line for spin axis.
- Page 28 Best Practices Launch Direction and Launch Angle The ES Tour converts pictures into 3D system coordinates to determine the Launch Direction and Launch Angle. Below are some tips to help with these measurements. Ball Placement Tips • White balls should be used as they provide the best contrast for detection •...
- Page 29 Tour Plus in for more accurate calibration due to lighting. 1. Place the calibration template on a flat stable surface. 2. Place the Tour Plus in the outlined area labeled Tour Plus, ensure you can see some red outline all the way around the Tour Plus.
- Page 30 9. While standing to the side of the unit place your hand on top of the Tour Plus to ensure the Tour Plus does not move during this process and press the center 4square button.
- Page 31 TIPS & TRICKS We recommend fully charging the battery overnight before use. The ES Tour Plus has a 7 hour battery life when fully charged. The calibration template has a green area displayed, this area is where you should place the ball to get a proper recognition and a green light.
-
Page 32: Troubleshooting
The ES TOUR PLUS is designed for both left and right-handed golfers. Mirror the setup so that downrange is to the right of the ES TOUR PLUS The ES TOUR PLUS is not showing up in the Bluetooth settings for the computer or in the app •... - Page 33 • Click on Privacy, choose Other Devices • Scroll down until you see ES TOUR PLUS and make sure it is enabled Set Up Tips in video format at https://www.ernestsports.com/set-up-tips/...
-
Page 34: Warranty / Repair
The warranty applies only to the original purchaser of this product. Warranty work may be completed only by Ernest Sports. If the device is not found to be defective, no warranty work will be performed. - Page 36 855.354.GOLF » www.ernestsports.com » 4955 Avalon Ridge Parkway, Ste 200 Peachtree Corners, GA 30071 www.FACEBOOK.com/ernestsports www.TWITTER.com/ernestsports...
Need help?
Do you have a question about the TOUR PLUS and is the answer not in the manual?
Questions and answers