Table of Contents
Advertisement
Quick Links
Advertisement
Table of Contents

Related Manuals for jbc WSB


Summary of Contents for jbc WSB
- Page 1 INSTRUCTION MANUAL High-Temperature Wire Stripper Station...
-
Page 2: Table Of Contents
Index Page Packing List ............................3 Features and Connections ......................4 Changing Cartridges ........................5 Stripping a Wire ..........................6 Adjustable Strip Gauge ........................6 Control Process ..........................7 Operation ............................8 Material Mode ........................... 9 Cartridge Range ..........................10 Sealing Plug Replacement ...................... -
Page 3: Packing List
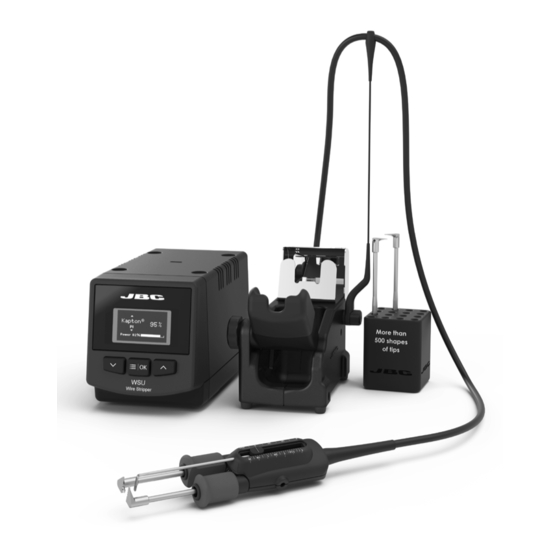
This manual corresponds to the following references: WSB-9A (100V) WSB-1A (120V) WSB-2A (230V) Packing List The following items are included: Control Unit ...... 1 unit Stand ........1 unit High-Temperature Wire Ref. WSBT-SA Stripper Tweezers ..1 unit Ref. -
Page 4: Features And Connections
Features and Connections Control Unit USB Connector Stand cable Ref. 0024227 Main Switch Equipotential connector Power Socket Fuse W440 Cartridges (not included) High-Temperature Wire Stand Strippers Tweezers Ref. WSBT-A Ref. WS440-A... -
Page 5: Changing Cartridges
Connection Screw Cartridge aligner Align the cartridges in working position using Fix the cartridges in its working position. by a fl at pliers (JBC Ref. PLR-195). tightening the screw. The conical cartridge aligner helps centering both cartridges and ensure a good Important: It is essential to tighten the screws functionality. -
Page 6: Stripping A Wire
Stripping a Wire 1. Align Wire 2. Close Cartridges Place the wire touching the strip gauge. Choose cartridges according to the wire diameter. Pinch the wire with the blades. The pinched area will be melted by heat. 3. Remove Wire Pull the wire stripper toward to stripp off the wire end. -
Page 7: Control Process
w w w.jbctools.com Control Process Work Screen Selected Material Power Level ® Kapton Instant Power Next Material Previous Material P o w e r 7 5 % P o w e r 7 5 % Work Mode WSS offers two different working modes. Switch the power on choose between Material Mode and Custom Mode by pressing the button. -
Page 8: Operation
Operation Depending on where the tool is located, the soldering station switches between three different statuses: Work, Sleep and Hibernation. 1. Work 2. Sleep 3. Hibernation When the wire stripper is lifted When the wire stripper is in the After longer periods from the stand, the cartridges... -
Page 9: Material Mode
w w w.jbctools.com Material Mode WSS incorporates predeterminated power levels and it also features a customized work mode. It allows you to work on wire insulations made of thermoplastics and thermostable materials such as Tefl on , Kapton , silicone, rubber, etc. Options included: Insulation Material Symbol... -
Page 10: Cartridge Range
Cartridge Range WS440-A is compatible with W440 Blade Cartridge Range. Find the model that best suits your soldering needs on www.jbctools.com. If an application requires a special tip design, contact JBC by mail customtips@jbctools.com. Cartridge Tip Hole ø Solid Ref. -
Page 11: Sealing Plug Replacement
w w w.jbctools.com Sealing Plug Replacement The Sealing Plug is meant to prevent undesirable flux vapors or particles from entering inside the tool. Its usage is highly recommended for intensive applications when soldering is exposed to FOD environments or for applications where the soldering iron works close to vertical position. Before replacing the seal, unplug the power supply and make sure the device is not hot. -
Page 12: Accessories
Accessories Flat Screw Driver* To open or fi x the wire stripper srews use JBC Flat Screw Driver Ref. 0023511. Cartridge Extractor Pliers* To manipulate the cartridges use JBC Cartridge Extractor Pliers Ref. PLR195. More Information at www.jbctools.com Removing Inserting and Positioning Remove cartriges with JBC pliers. - Page 13 w w w.jbctools.com Pedal Kit for Control Units Pedal P305 can be used to activate/deactivate the Wire Stipper. Previously the Hibernation delay has to be set to 0 min. Lift the wire stripper from the stand, press and hold the pedal to activate them and strip the wire. Once the pedal is relaesed the wire stripper enters in Hibernation.
-
Page 14: Maintenance
If necessary use a tool to lever it off. replace it in the station. Fuse - Replace any defective or damaged pieces. Use original JBC spare parts only. - Repairs should only be performed by a JBC authorized technical service. -
Page 15: Safety
w w w.jbctools.com Safety Warning - Do not touch the blade or the metal parts arround. - Do not allow the blade be close to flammable materials. - Keep your workplace clean and tidy. Wear appropriate protection glasses and gloves when working to avoid personal harm. -
Page 16: Specifications
Specifications High-Temperature Wire Stripper Station Ref.: WSB-9A 100V 50/60Hz. Input Fuse: T1.6A. 5x20mm Output: 15V Ref.: WSB-1A 120V 50/60Hz. Input Fuse: T1.25A. 5x20mm Output: 15V. Ref.: WSB-2A 230V 50/60Hz. Input Fuse: T0.63A. 5x20mm Output: 15V. - Temperature Max : 800 ºC /1472 °F...
Need help?
Do you have a question about the WSB and is the answer not in the manual?
Questions and answers