Table of Contents
Advertisement
Quick Links
Advertisement
Table of Contents

Related Manuals for AMobile K430


Summary of Contents for AMobile K430
- Page 1 K430 Mobile Computing Device User's Manual Version 1.0 2021.03...
- Page 2 This page is intentionally left blank. - II -...
- Page 3 Revision History Version Release Time Description 2021.03 Initial release - i -...
- Page 4 We recommend that you keep one copy of this manual for the quick reference for any necessary maintenance in the future. Thank you for choosing AMobile products. - ii -...
-
Page 5: Table Of Contents
Contents Contents Preface......................v Declaration of Conformity..................v Emergency call....................vi RoHS ......................vi SVHC / REACH ..................vii Safety Symbols ....................vii Important Safety Instructions ................vii Laser Safety ...................... viii Rechargeable Battery Pack Safety ..............ix General Cleaning Tips..................x Cleaning Tools .....................xi Recommended Cleaning Procedures ............xi Disposing of the Equipment ................ - Page 6 Contents 3.2.2 Extending Home Screen ..............24 3.3 Using Cellular Network.................25 3.3.1 Making/Receiving Calls ..............26 3.3.2 Data Connection ................26 3.3.3 Data Roaming ...................27 3.4 Using the Wi-Fi Feature ................28 3.4.1 Enabling Wi-Fi and Connecting to a WLAN ........29 3.4.2 Adding a Wi-Fi Network..............30 3.4.3 Connecting to a Wi-Fi Network by WPS ...........31 3.4.4 Forgetting/Modifying a Wi-Fi Network ..........33 3.4.5 Making Your Device a Wi-Fi Hotspot..........33...
-
Page 7: Preface
Environmental Conditions Device Operating Temperature: -10° C to 50°C Hereby, Hong Kong AMobile Intelligent Corp. Limited Taiwan Branch, declares that this Mobile Computing Device/ K430, is in compliance with the essential Requirements and other relevant provisions of Radio Equipment Directive 2014/53/EU. -
Page 8: Emergency Call
(PBDE) in electrical and electronic products. Member states of the EU are to enforce by 7/1/2006. AMobile Intelligent Corporation hereby states that the listed products do not contain unintentional additions of lead, mercury, hex chrome, PBB or PBDB that exceed a maximum concentration value of 0.1% by weight or for cadmium exceed 0.01% by weight, per homogenous material. -
Page 9: Svhc / Reach
SVHC / REACH To minimize the environmental impact and take more responsibility to the earth we live, AMobile hereby confirms all products comply with the restriction of SVHC (Substances of Very High Concern) in (EC) 1907/2006 (REACH --Registration, Evaluation, Authorization, and Restriction of Chemicals) regulated by the European Union. -
Page 10: Laser Safety
Preface 9. If the device will not be used for a long time, disconnect it from the power source to avoid damage by transient overvoltage. 10. Never pour any liquid into openings. This may cause electrical shock. 11. Never open the device. For safety reasons, the device should be opened only by qualified service personnel. -
Page 11: Rechargeable Battery Pack Safety
Preface Rechargeable Battery Pack Safety With very little care, you can optimize the battery life and maximize the lifespan of the battery. Most importantly, use only the device in its ideal operating temperature (refer to 1.6 Specifications on page 10) – do not leave it in a hot trunk during the summer. -
Page 12: General Cleaning Tips
Preface Don’t disassemble the battery, or the battery leakage might cause skin or eye • injury. If electrolyte leaking from the battery contacts your skin or clothing, immediately flush it with running water. If it splashes into eye, rinse the eye at least 15 minutes with clean water and then seek medical attention. -
Page 13: Cleaning Tools
Preface Cleaning Tools Although many companies have created products to help improve the process of cleaning your devices and peripherals, users can also use household items to clean their devices and peripherals. Below is a listing of items you may need or want to use while cleaning your devices or peripherals. -
Page 14: Disposing Of The Equipment
You can download the related technical documents such as datasheet and user’s manual as well as driver on our website. Please do not hesitate to call or e-mail our customer service when you still cannot get the information you need. http://amobile-solutions.com/web_en/contact.php E-mail: support@amobile. com.tw - xii -... -
Page 15: Warranty
Preface Warranty This product is warranted to be in good working order during the warranty period. Should this product fail to be in good working order at any time during this period, we will, at our option, replace or repair it at no additional charge except as set forth in the following terms. - Page 16 Preface <NCC警語> 根據 NCC 低功率電波輻射性電機管理辦法規定: 第十二條 經型式認證合格之低功率射頻電機,非經許可,公 司、商號或使用者均不得擅自變更頻率、加大功率或變更原設計 之特性及功能。 第十四條 低功率射頻電機之使用不得影響飛航安全及干擾合 法通信;經發現有干擾現象時,應立即停用,並改善至無干擾時 方得繼續使用。前項合法通信,指依電信法規定作業之無線電通 信。低功率射頻電機須忍受合法通信或工業、科學及醫療用電波 輻射性電機設備之干擾。 減少電磁波影響,請妥適使用 <NCC注意事項> 使用過度恐傷害視力。 使用30分鐘請休息10分鐘 未滿2歲幼兒不看螢幕,2歲以上每天看螢幕不要超過1小 時。 SAR 標準值2.0W/Kg;送測產品實測值為:0.521 W/Kg <注意> 行動電話業務(2G)於106年6月停止提供服務後, 本設備2G功 能在國內將無法使用 應避免影響附近雷達系統之操作 - xiv -...
- Page 17 Preface <警告> 1.請使用原廠使用的G60/G67電池,避免產生爆炸。 2.都器電池時請遵守當地法規。 3.請勿拆解、打開、短路或破壞電池。 4.請避免將電池置於熱或火旁和避免陽光直射之環境。 5.當電池漏液時,避免接觸到皮膚或眼睛,如果不小心接觸到, 請用大量清水沖洗並尋求醫療協助。 6.請依照說明書上的指示對G60/G67充電。 7.請避免將雷射光源對準眼睛。 <警告使用者> 此為甲類資訊技術產品,於居住環境中使用,可能會造成射頻擾 動,在此種情況下,使用者會被要求採取某些適當的對策。 - 1 -...
- Page 18 This page is intentionally left blank. - 2 -...
-
Page 19: Chapter 1 Introduction
Chapter 1 Introduction Chapter 1 Introduction - 3 -... -
Page 20: Product Highlights
Introduction 1.1 Product Highlights Adopting MediaTek Octa processor with Android 9.0 OS • 1D/2D barcode scanning with fast scan speed • Easy-to-Use touch screen with keypad • Ruggedized design with IP65 rating and 1.5m drop resistance • • World mode communications with 2G/3G/4G Field replaceable 4850mAh Li battery for long working hours •... -
Page 21: Package Contents
Introduction 1.2 Package Contents Upon opening the package, carefully inspect the contents. If any of the items is missing or appears damaged, contact your local dealer or distributor. The package should contain the following items: 4” Rugged Android™ Mobile Computing Device USB Cable USB Cable Adapter... -
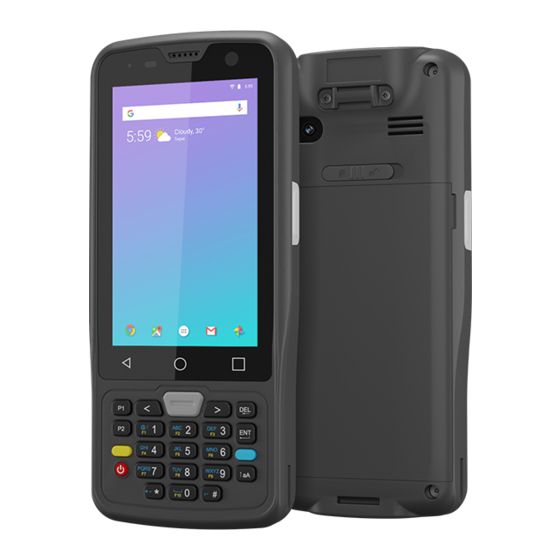
Page 22: Parts Of The Device
Introduction 1.3 Parts of the Device 1. Barcode Scanner 6. Barcode Trigger Key (Left) 2. Power Key 7. Rear Camera 3. Function Key 8. Battery Cover Lock 4. Function Key 9. USB Port 5. Barcode Trigger Key (Right) - 6 -... -
Page 23: Dimensions
Introduction 1.4 Dimensions - 7 -... -
Page 24: Keyboard Of The Device
Introduction 1.5 Keyboard of the Device < > - 8 -... - Page 25 Introduction Programmable Function Key Removes characters Switch to F1-F10 Function Key Barcode Trigger Key Power Key Arrow Keys (Left/Right) Number pad Recent App Button Switch uppercase/lowercase/number Home button keyboard Switch to English /Number Keyboard 13 Back button To perform an action or start a new line of writing Note1: "Programmable Function Key"(1) and "Function Key"(2) need to be settle and programmed before shipping.
-
Page 26: Specifications
Introduction 1.6 Specifications System MTK6762 Octa Processor Cortex Quad-Core A53 2.0GHz / Quad Core xA53 1.5GHz Operating System Android 9.0 32GB (up to 64GB) RAM Memory 3GB (up to 4GB) ROM Flash Expansion microSD card, up to 128GB Peripherals and Devices Barcode Scan Module CR8900 (CODE decoding) - Page 27 Introduction Bottom 1 x USB 2.0 OTG, Micro 5-pin 4 x Pogo pin Side 10 x Numeric keys (0~9); 2 x Symbol key; 1 x Barcode scanner trigger; 1 x Power key; 5 x Switch key; 1 x Enter key; 1 x Delete key; 2 x Arrow key LCD Display Resolution...
- Page 28 This page is intentionally left blank. - 12 -...
-
Page 29: Chapter 2 Installation
Getting Started Chapter 2 Getting Started Chapter 2 Installation - 13 -... -
Page 30: Installing Microsd And Sim Card
Micro SIM/microSD card first as described below. 1. Turn off the K430. Move the battery cover lock button to the unlock position at right. 2. Gently pry off the battery cover from the grooves on the sides. - Page 31 Getting Started 3. Follow the direction arrows to unlock the card slot cover(s) and open the cover(s). 4. Insert your SIM/MicroSD card and close the cover. Follow the direction arrows to lock the card slot cover(s). Micro SIM card slot Micro SIM卡槽...
-
Page 32: Charging The Battery
Be sure to charge the battery to full when you are charging it for the first time. Caution: If you charge the K430 via computer USB connection due to that the voltage output from computer USB is not enough to charge the device. -
Page 33: Checking The Battery Level
Getting Started 2.2.2 Checking the Battery Level When the charging is in process, a battery indicator will appear in the status bar showing the charging percentage. Unplug the USB cable from the device when the battery is fully charged 2.3 Installing/Replacing the Battery Please contact qualified service personnel for battery replacement. - Page 34 Getting Started To view the battery usage by access settings-> Battery. Disconnect USB devices such as USB flash drive if it is not in use. • - 18 -...
-
Page 35: Chapter 3 Using The Device
Using the Device Chapter 3 Using the Rugged Mobile Computing Device Chapter 3 Using the Device - 19 -... -
Page 36: Using Touch Screen
3.1 Using Touch Screen The K430 comes with a projected capacitive multi-touch screen. Touch control is the main way to interact with the K430. Users are able to manipulate icons, graphic buttons, menus, the onscreen items or keyboard with touch control. This chapter will walk you through the basic operations. -
Page 37: Text Input
An "onscreen keyboard" is a virtual keyboard with most of the standard keys. The Physical keyboard of the K430 with 1~9 number keys, English letters and function keys can assist users in using the physical to enter all necessary information. -
Page 38: Home Screen
Using the Device To specify the period of inactivity, swipe down the Status Bar in the upper right corner and tap Settings | Display | Sleep. Then select a time of inactivity before the device enters sleep mode 3.2 Home Screen The Home screen provides you with an instant access to device status, notifications, application shortcuts, folders and widgets. - Page 39 Tap it to open the "App Launcher" where all applications installed App Launcher on the K430 can be viewed and launched. The dock is visible across the home screens. It shows the most commonly used App icons for quick access. You can change the Bottom Dock icons as needed.
-
Page 40: Using The Quick Settings Panel
Using the Device 3.2.1 Using the Quick Settings Panel Swiping down the Status Bar will bring up a Quick Settings panel where you can quickly access some most commonly used settings and features. To enable/ disable a feature or switch between available options , simply tap the intended tile. -
Page 41: Using Cellular Network
Using the Device 3.3 Using Cellular Network After you insert the SIM card(s) to the K430 for the first time and power on the K430, depending on your mobile network carrier you might be guided to activate the account and connect to your mobile network. If you are asked for a PIN to unlock the SIM card when powering on the K430, contact your cellular network carrier for the default PIN. -
Page 42: Making/Receiving Calls
Using the Device 3.3.1 Making/Receiving Calls After you activate your SIM card(s), the K430 auto-connects to your cellular network when it powers on. You can start to use the phone service. Using phone service, e.g., making or answering a call, is similar to the way you use a mobile phone. -
Page 43: Data Roaming
Using the Device 3.3.3 Data Roaming When the K430 moves to where your cellular network is not available, data roaming connects the K430 to other service providers. This is often useful abroad if you want to keep receiving data across networks. However, the mobile rates can substantially increase as the costs for accessing the Internet are particularly high. -
Page 44: Using The Wi-Fi Feature
The K430 needs to be configured including such key to connect to a hotspot. Follow the guide below to connect the K430 to your wireless local area network: Note: Turn off Wi-Fi when it isn’t used to extend battery life. -
Page 45: Enabling Wi-Fi And Connecting To A Wlan
(Ask your network administrator for details.) If the K430 detects a network previously connected to, the K430 auto- connects to it. Once a Wi-Fi network is connected, it displays as “connected” on the Wi-Fi settings screen. -
Page 46: Adding A Wi-Fi Network
When a Wi-Fi network doesn’t broadcast its name (SSID) • • When a Wi-Fi network is out of range and you want the K430 to remember it and auto-connect to it as soon as it gets in range. To add a Wi-Fi network: 1. -
Page 47: Connecting To A Wi-Fi Network By Wps
Using the Device 3.4.3 Connecting to a Wi-Fi Network by WPS Wi-Fi Protected Setup (WPS) is a feature that allows WPS-compliant devices to connect to each other instantly in a secure way. As the WPS devices automatically configure the SSID and WPA security key, it eliminates the need for users to manually enter the SSID and password. - Page 48 Using the Device 4. WPS authentication process will start. When the authentication is done, you will be prompted that connection is successful. - 32 -...
-
Page 49: Forgetting/Modifying A Wi-Fi Network
Using the Device 3.4.4 Forgetting/Modifying a Wi-Fi Network When you don’t want the K430 to "auto" connect to a Wi-Fi network or when it is a network that you no longer use, remove the Wi-Fi network by the steps below: 1. -
Page 50: Using The Bluetooth Feature
Bluetooth-capable to synchronize data with other Bluetooth-capable devices such as PCs, laptops, hands-free, headsets, printers, PDAs and cell phones. Before the K430 can connect a Bluetooth device, it needs to pair with that device. Such “pairing” involves the authentication between them to justify their accesses to each other. -
Page 51: Enabling Bluetooth And Pairing With Bluetooth Device
3. If the Bluetooth device you want to pair with is not displayed in the AVAILABLE DEVICES list, tap Pair new device. The K430 proceeds to scan for any Bluetooth device in range. Then it displays the names of the device(s) found. -
Page 52: Configuring Bluetooth Features To Use
Using the Device On the device to pair with, a dialog box appears requesting to enter or verify the pairing code. The passkey entered or shown on the K430 and the Bluetooth device must be the same. If you’re prompted to enter a pin code, try entering 0000 or 1234 (the most common pin code), or look up in the documentation that came with the other Bluetooh device to learn its pin code. -
Page 53: Disconnect From A Bluetooth Device
From the Bluetooth settings page, tap the menu icon on to get the following options: 1. Device name: Allows you to edit the Bluetooth name of the K430 that will be shown to others when they try to search for it. -
Page 54: Using The Location Feature
Using the Device 3.6 Using the Location Feature The K430 features positioning function to identify your location. It allows location- based Apps to collect and use your location information to provide location-related service. For example, a third-party App might want to pinpoint a vehicle’s location so as to provide a more efficient route for the driver upon traffic congestion. -
Page 55: Using Camera
Using the Device Battery saving: This mode uses Wi-Fi and cellular networks to determine • your location. Select this mode if you need to extend the battery life. Device only: This mode determines your location using GPS only. Without • using Wi-Fi and cellular networks to improve the startup process, it takes longer to determine the location. - Page 56 Using the Device When taking a photo: To zoom in and out, place two fingers apart or together. • • When you frame your subject on the screen, the camera will Auto Focus on the center of the screen with a focus indicator. To manually make a focus, tap the target or area that you want to focus on.
-
Page 57: Using The Nfc Feature
4 centimeters. The NFC detection area is at the back side of the K430. When you tap other NFC devices, tags, or readers, the NFC areas of both devices should be close to one another so that the connection can be established. -
Page 58: Exchanging Data With Nfc-Enabled Device
3. Make sure the screen of both devices are unlocked, then touch the devices together, back to back. 4. On the K430, you will hear a sound and be prompted a message "Touch to beam". Touch the screen of the K430 to begin the beaming process. -
Page 59: Using The Barcode Scanner
3.9.1 Using the Barcode Scanner As of the time of time of release, the K430 may not have the barcode scanner software installed. If this is the case, you must install the APK file on your K430 first in order to activate the scanner function. -
Page 60: Scanning The Barcode
Using the Device 3.9.2 Scanning the Barcode Generally a third-party barcode application will be used to process the data read by the scanner. This user manual will not cover these applications. The following steps serve as an example only to show the basic operation of the barcode scanner. -
Page 61: Supported Barcode Formats
Using the Device 3.9.3 Supported Barcode Formats 2D Model Type Formats Code 39, Code 128, Linear PDF417, QR Code, Aztec, Codablock-F, 2D Stacked Data Matrix 2D Matrix 100% UPCA Product code Australian Post Standard Customer, Planet Code 12, Royal mail 4-State, Postal USPS PostNet 5, USPS PostNet 9, USPS PostNet 11, UPU S10, - 45 -...
Need help?
Do you have a question about the K430 and is the answer not in the manual?
Questions and answers