
Related Manuals for Vertex PWC-450


Summary of Contents for Vertex PWC-450
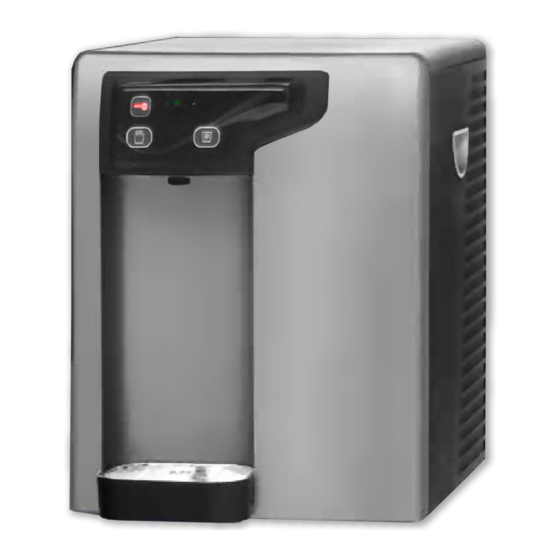
- Page 1 PWC – 450 PureWaterCooler SERVICE MANUAL PureWaterCooler ™ by Vertex Model PWC-450 P/N man-7012 Copyright 2011 Vertex Water Products...
-
Page 2: Table Of Contents
Remove Front Panel Remove/Replace Hot Tank Thermal Sensors 10. Cold Temperature Adjustment 11. Draining Cooler Tanks 12. Remove/Replace Cold Tank Sensor 13. Sanitization Procedure 14. Trouble Shooting 15. Specifications 16. Cooler Exploded View 17. Parts List Copyright 2011 Vertex Water Products... -
Page 3: Introduction
PWC-450 Cooler 1. Introduction The PWC-450 line of point of use counter-top coolers are designed to give years of reliable Service. The cooler has a single spigot that dispenses water at 2 different temperature levels – hot and cold temperature water. The main (cold-temp) tank holds 1 gallon of water and is constructed of stainless steel. -
Page 4: Cooler Set-Up
2.1 Remove feed water plug (orange) from back of cooler. 2.2 Connect tubing to feed connector on back of cooler. 2.3 WARNING: Do not turn on cooler hot power until cooler tanks are full of water. Copyright 2011 Vertex Water Products... - Page 5 Hot water will be ready quickly, but cold water may take a few hours. 2.7 The cooler is ready for use. Copyright 2011 Vertex Water Products...
- Page 6 3.1 Remove (2) screws on back of cooler top cover 3.2 Slide cover back and lift off. 3.3 Cold tank is now accessible for cleaning and servicing other parts of the cooler. 3.4 Reinstall top cover in reverse order Copyright 2011 Vertex Water Products...
- Page 7 3.6 Slide side cover back about half way off until tab in side cover lines up with slot in cooler frame. 3.7 Once slot and tab are lined up, pull side cover away from cooler. 3.8 Reinstall side panels in reverse order Copyright 2011 Vertex Water Products...
-
Page 8: Access Cold Tank
4.3 Remove tape from top of tank foam (3 plcs). Leave tape attached to lower foam section. 4.4 Remove top foam of cold tank. Slide cold temperature sensor vertically out of top cover while keeping sensor through foam top. Copyright 2011 Vertex Water Products... - Page 9 Work around the edge until the lid is loose. 4.7 Remove lid. The cold tank is now accessible. 4.8 Reinstall in reverse order. Copyright 2011 Vertex Water Products...
- Page 10 5.1 Drain water from hot tank by removing bottom drain cap. 5.2 Remove top cover and left side cover (sec. 3) 5.3 Remove (4) electrical connectors from hot tank temperature sensors. 5.4 Remove (2) electrical connectors from hot tank heater coil leads. Copyright 2011 Vertex Water Products...
- Page 11 5.6 Remove (2) mounting screws. 5.7 Remove hot tank from cooler. 5.8 Remove inlet tubing. 5.9 Assemble hot tank in reverse order. 5.10 Remove thermal sensors from hot tank. Save and install on new hot tank. Copyright 2011 Vertex Water Products...
-
Page 12: Remove/Replace Circuit Board
6.2 Remove circuit board cover, by removing (2) screws from the back and pulling the cover off. 6.3 Disconnect (5) electrical connectors from board. 6.4 Remove (2) screws holding circuit board to panel. 6.5 Re-assemble in reverse order Copyright 2011 Vertex Water Products... - Page 13 Water flow through the solenoid is directional. There is an arrow molded in the side of the solenoid body showing water flow direction. Make sure the solenoid is oriented correctly. Water can leak from the solenoid if not installed correctly. Copyright 2011 Vertex Water Products...
-
Page 14: Remove Front Panel
8.7 Pass all wiring and the control panel through the opening in the front panel. 8.8 Lift front panel off of the two pins on the base. Remove the panel. 8.9 Re-assemble in reverse order. Copyright 2011 Vertex Water Products... - Page 15 10.4 To change either sensor, disconnect (2) electrical terminals from sensor. 10.5 Remove (2) screws holding sensor to tank. 10.6 Install new thermal sensor, replace screws, reconnect electrical terminals to sensor. 10.7 Replace right side cover. Copyright 2011 Vertex Water Products...
-
Page 16: Cold Temperature Adjustment
There are stops on the adjustment shaft. DO NOT force the control shaft over the stop. If this happens, it will be necessary to replace the temperature controller 270º Travel STOP WARMEST COLDEST STOP Normal Travel is 270º Copyright 2011 Vertex Water Products... -
Page 17: Draining Cooler Tanks
Remove drain caps. Water will pour from the ports. 11.2 Drain any remaining water in the system by pressing the hot and cold dispense buttons. 11.3 Replace Drain Cap(s). Copyright 2011 Vertex Water Products... -
Page 18: Remove/Replace Cold Tank Sensor
11.5 Remove (2) screws on back of cooler that hold temperature switch to cooler. 11.6 Pull temperature switch out of cooler and remove (2) electrical connectors. 11.7 The Cold Tank Sensor is now free of the cooler. 11.8 Re-assemble in reverse order. Copyright 2011 Vertex Water Products... -
Page 19: Sanitization Procedure
Fill the cooler completely with water. Let a few pints of water drain out of the spigot while pressing the hot button and then the cold button. Drain the cooler completely. Repeat steps 12-13, 2-3 times. The cooler is now sanitized and ready for normal use. Copyright 2011 Vertex Water Products... -
Page 20: Trouble Shooting
2. Adjust temperature control The thermostat temperature control adjustment is located on the back of the cooler. (see section 9) 3. All cold water has been used Cooler needs time to recover. wait 10-15 minutes until water cools Copyright 2011 Vertex Water Products... - Page 21 Disconnect one of the connector at the heating element terminals (at bottom of tank). Using an ohm meter, check for continuity across the 2 terminals. If there is no continuity (open), the tank must be replaced. Copyright 2011 Vertex Water Products...
- Page 22 This is a safety device to prevent the heating element from burning itself out due to dry heating. Once the hot tank cools off the switch will be reset automatically to operating condition. See section 7. Copyright 2011 Vertex Water Products...
-
Page 23: Specifications
Hot tank .5 gallons Cold tank 1.0 gallons Room tank Power Consumption Total 600 Watts Hot Tank 500 Watts Cold Tank 100 Watts Temperature 180 ºF average Cold (adjustable) 38 ºF average Refrigerant R134a 36 mg. Copyright 2011 Vertex Water Products... - Page 24 PWC – 450 PureWaterCooler 16. Exploded View Copyright 2011 Vertex Water Products...
- Page 25 PWC – 450 PureWaterCooler Copyright 2011 Vertex Water Products...
- Page 26 PWC – 450 PureWaterCooler Copyright 2011 Vertex Water Products...
- Page 27 PWC – 450 PureWaterCooler Copyright 2011 Vertex Water Products...
Need help?
Do you have a question about the PWC-450 and is the answer not in the manual?
Questions and answers