Table of Contents
Advertisement
Available languages
Available languages
Advertisement
Chapters
Table of Contents

Related Manuals for mabe HMM110SIZ


Summary of Contents for mabe HMM110SIZ
- Page 1 For the English version, go to page 21 lea este instructivo antes de instalar su horno de microondas/ read this owner's manual before installing your microwave oven modelos/models: HMM110SIZ PM01...
-
Page 3: Table Of Contents
índice Instrucciones importantes de seguridad ..........4 Precauciones para evitar una posible exposición excesiva a energía de microondas ..................... 6 Guía de instalación ................6 Instrucciones de conexión a tierra ............7 Partes de su horno de microondas ............8 Instalando la tornamesa ............... -
Page 4: Instrucciones Importantes De Seguridad
instrucciones importantes de seguridad Cuando se usan aparatos eléctricos, se deben seguir precauciones básicas de seguridad, incluyendo las siguientes: ADVERTENCIA: PARA REDUCIR EL RIESGO DE SUFRIR QUEMADURAS, CHOQUE ELÉCTRICO, INCENDIO Y LESIONES A LAS PERSONAS O UNA EXPOSICIÓN EXCESIVA A LAS MICROONDAS: •... - Page 5 - No sobrecaliente los líquidos. - Mezcle los líquidos antes y a mitad del proceso de calentamiento. - No use contenedores de paredes rectas que tienen cuellos angos- tos. - Después del calentamiento, permita que el contenedor repose en el horno de microondas durante un periodo corto de tiempo an- tes de sacarlo.
-
Page 6: Precauciones Para Evitar Una Posible Exposición Excesiva A Energía De
precauciones para evitar una posible exposición excesiva a la energía de microondas 1. No trate de operar este horno con la puerta abierta ya que la operación con la puerta abierta puede resultar en exposición da- ñina a la energía de microondas. Es importante no anular ni mani- pular indebidamente los entrecierres de seguridad. -
Page 7: Instrucciones De Conexión A Tierra
• Asegúrese de que el cordón eléctrico no esté dañado y que no pase por debajo del horno ni encima de superficies calientes o filo- sas. • El contacto eléctrico que alimenta al horno debe estar en un lugar accesible para que pueda desconectarse fácilmente en caso de una emergencia. -
Page 8: Partes De Su Horno De Microondas
• Si se usa un cordón eléctrico largo o una extensión eléctrica enton- ces: - La clasificación eléctrica marcada del cordón o extensión eléctrica debe ser por lo menos tan grande como la clasificación eléctrica del aparato. - La extensión eléctrica debe estar fabricada con un cordón de 3 ca- bles tipo conexión a tierra y debe acomodarse de manera que no cuelgue de la cubierta o mesa de donde pueda ser jalada por los niños o pueda causar un tropiezo accidental. -
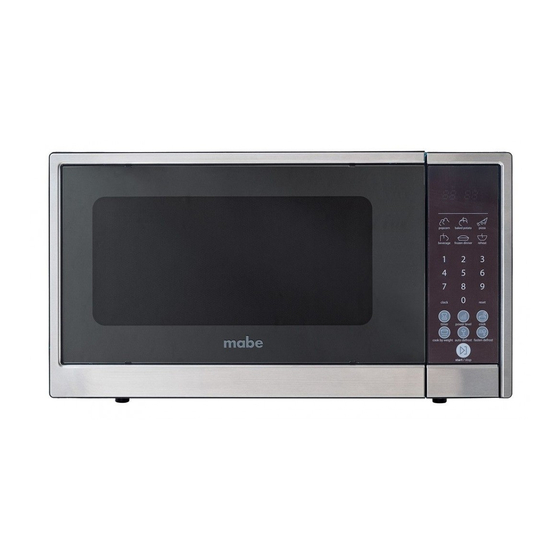
Page 9: Panel De Controles
panel de controles Pantalla Muestra el tiempo de cocción, ni- vel de potencia seleccionado, los indicadores y la hora actual. Botones de cocción rápida Ajustes prestablecidos para coci- nar alimentos populares. Botones numéricos Presiónelos para ingresar tiem- pos y cantidades. POWER LEVEL (POTENCIA) Úselo para programar un nivel de potencia diferente a alto. -
Page 10: Instrucciones De Operación
instrucciones de operación ajustando el reloj 1. Presione el botón CLOCK (RELOJ). 2. Use los botones numéricos para ingresar la hora correcta del día. 3. Presione el botón CLOCK (RELOJ) de nuevo. Nota: Este es un reloj de 12 horas. Cuando se conecta por primera vez el horno o cuando regresa la energía eléctrica después de un apagón, la pantalla muestra "ENTER CLOCK TIME"... -
Page 11: Fast Defrost (Descongelado Rápido)
B. Cocción en dos etapas Algunas recetas requieren diferentes etapas de cocción a diferentes temperaturas. 1. PROGRAME LA ETAPA 1: Siga los pasos 1 y 2 bajo el subtítulo "Cocción en una etapa". NO PRESIONE EL BOTÓN START/STOP (INICIO/DETENER). 2. PROGRAME LA ETAPA 2: Presione el botón COOK (COCINAR) y después ingrese el tiempo apropiado de cocción así... -
Page 12: Cocinar Por Peso
COOK BY WEIGHT (COCINAR POR PESO) 1. Presione el botón COOK BY WEIGHT (COCINAR POR PESO). 2. Ingrese el código de un solo dígito presionando el botón numéri- co correcto (1 a 3). 3. Ingrese el peso presionando los botones del teclado numérico. 4. -
Page 13: Auto Defrost (Descongelado Automático)
AUTO DEFROST (DESCONGELADO AUTOMÁTICO) 1. Presione el botón AUTO DEFROST (DESCONGELADO AUTOMÁTI- 2. Ingrese el peso presionando los botones del teclado numérico. 3. Presione el botón START/STOP (INICIO/DETENER). Notas: • El peso debe ingresarse en libras y onzas. Un peso inferior a 10 on- zas debe estar precedido por un 0. -
Page 14: Cocción Rápida
funciones de cocción rápida Las funciones COCCIÓN RÁPIDA le permiten cocinar o recalentar ali- mentos automáticamente sin la necesidad de ingresar niveles de po- tencia ni tiempos de cocción. Para porciones pequeñas, simplemente presione el botón correspon- diente y después el botón START/STOP (INICIO/DETENER). Para por- ciones más grandes, presione dos veces el botón correspondiente. -
Page 15: Beverage (Bebidas)
BEVERAGE (BEBIDAS) Para tazas de 148 ml a 207 ml: 1. Presione el botón BEVERAGE (BEBIDAS) una sola vez. 2. Ingrese el número de tazas presionando los botones numéricos del 1 al 4. 3. Presione el botón START/STOP (INICIO/DETENER). Para tazas más grandes, de 266 ml a 325 ml: 1. -
Page 16: Guía De Utensilios
guía de utensilios Esta sección enlista los utensilios que se pueden usar en el horno de microondas, cuáles tienen un uso limitado durante periodos cortos, y cuáles no deben usarse en el horno de microondas. recomendados Platón dorador para microondas: Úselo para dorar el exterior de alimentos pequeños como bisteces, chuletas, o pastelillos. -
Page 17: Técnicas De Cocción
no recomendados Frascos y botellas de vidrio: El vidrio normal es demasiado delga- do para ser usado en el microondas. Puede astillase causando daños y lesiones. Bolsas de papel: Son un riesgo de incendio, a excepción de las bol- sas para palomitas de maíz las cuales están diseñadas para usarse en el microondas. - Page 18 Voltear los alimentos: Voltee los alimentos a la mitad de la coc- ción para exponer todas las partes a la energía de las microondas. Esto es especialmente importante con alimentos grandes como por ejemplo los asados. Tiempo de reposo: Los alimentos cocinados en el horno de micro- ondas acumulan calor interno y continúan cocinándose por unos po- cos minutos después de que el calentamiento se detiene.
-
Page 19: Cuidado Y Limpieza
cuidado y limpieza • Antes de limpiar el horno, apáguelo y desconecte el enchufe del contacto eléctrico de pared. • Mantenga el interior del horno limpio. Cuando las salpicaduras de alimentos o los líquidos derramados se adhieren a las paredes del horno, limpie con un trapo húmedo. -
Page 20: Antes De Llamar Al Servicio
antes de que llame al servicio • Revise para asegurarse de que el horno esté bien conectado. Si no es así, retire el enchufe del contacto, espere 10 segundos, y conéc- telo de nuevo. • Revise buscando un fusible quemado o un disyuntor de circuitos disparado. - Page 21 contents Important Safety Instructions ............. 22 Precautions to Avoid Possible Exposure to Excessive Microwave Energy ....................... 24 Installation Guide ................24 Grounding Instructions ............... 25 Parts of your new microwave oven ............ 26 Installing the turntable ................ 26 Control Panel ..................27 Operation Instructions ................
-
Page 22: Important Safety Instructions
important safety instructions When using electric appliances, basic safety precautions should be followed, including the following: WARNING: TO REDUCE THE RISK OF BURNS, ELEC- TRIC SHOCK, FIRE AND INJURIES TO PERSONS, OR EXPOSURE TO EXCESSIVE MICROWAVE ENERGY: • Read all instructions before using the microwave oven. •... - Page 23 - After heating, allow the container to stand in the microwave oven a short time before removing. - Use extreme care when inserting a spoon or other utensil into the container. • Do not heat oil or fat for deep-frying in this microwave. It is diffi- cult to control the temperature of oil in the microwave.
-
Page 24: Precautions To Avoid Possible Exposure To Excessive Microwave Energy
precautions to avoid possible exposure to excessive microwave energy 1. Do not attempt to operate this microwave with the door open. Door open operation can result in harmful exposure to microwave energy. It is important not to defeat of tamper with the safety in- terlocks. -
Page 25: Grounding Instructions
• Make sure the power supply cord is undamaged and does not run under the microwave oven or over any hot or sharp surface. • The socket must be readily accessible so the appliance can be easily unplugged from power in an emergency. grounding instructions This appliance must be grounded. -
Page 26: Parts Of Your New Microwave Oven
radio or tv interference Should there be any interference caused by the appliance to your radio or TV, check that the microwave oven is on a different circuit, relocate the radio or TV as far away from the oven as possible or check position and signal of the receiving antenna. -
Page 27: Control Panel
control panel Display Shows cooking time, power level, indicators and present time. Quick Cook Pads Instant settings to cook popular foods. Number Pads (0-9) Touch to set times or weights. POWER LEVEL Use to set the power level. To check power level during cook- ing, touch POWER pad. -
Page 28: Operation Instructions
operation instructions setting the clock 1. Touch CLOCK pad. 2. Use the number pads to enter the correct time. 3. Touch CLOCK pad again. NOTE: This is a 12 hour clock. When the oven is first plugged in or when power resumes after a power interruption, the display will show "ENTER CLOCK TIME". -
Page 29: Fast Defrost
B. Two-Stage Cooking Some recipes require different stages of cooking at different tem- peratures. 1. SET STAGE 1: Follow steps 1 and 2 under "One-stage Cooking". DO NOT TOUCH THE START/STOP PAD. 2. SET STAGE 2: Touch the COOK pad then enter proper cooking time and (lower) power level. -
Page 30: Cook By Weight
COOK BY WEIGHT 1. Touch the COOK BY WEIGHT pad. 2. Enter the one digit code by touching the correct number pad (1~3). 3. Touch the proper number pads to enter weight. 4. Touch the START/STOP pad. Number Code Type of food Maximum Weight Beef 5 lb 16 oz (2 700 grams) -
Page 31: Auto Defrost
AUTO DEFROST 1. Touch the AUTO DEFROST pad. 2. Touch the number pads to enter weight. 3. Touch the START/STOP pad. NOTES: • Weight must be stated in pounds and ounces. Ounce weights less than 10 must be preceded by a 0. If label shows weight in pounds only, change the fraction of a pound to ounces using the conver- sion chart. -
Page 32: Quick Cook Settings
quick cook The QUICK COOK settings allow you to cook or reheat food auto- matically without entering power level or time. For small portions, simply touch the applicable pad and then START/ STOP. For larger portions, touch the pad twice. FROZEN DINNER, BAKED POTATO and BEVERAGES allow you to cook multiple amounts of the same food. -
Page 33: Beverages
BEVERAGE For small cups (5~7 oz./cup): 1. Touch BEVERAGE pad once. 2. Enter the number of cups by touching number pads from 1 to 4. 3. Touch the START/STOP pad. For larger cups (9~11 oz./cup): 1. Touch BEVERAGE pad twice. 2. -
Page 34: Cooking Utensils Guide
cooking utensils guide This section lists which utensils can be used in this microwave oven, which have limited use for short periods, and which ones should not be used in this microwave oven. recommended Microwave browning dish — Use to brown the exterior of small items such as steaks, chops, or pancakes. -
Page 35: Cooking Techniques
not recommended Glass jars and bottles — Regular glass is too thin to be used in a microwave. It can shatter and cause damages and injuries. Paper bags — These are a fire hazard, except for popcorn bags that are designed for microwave use. Styrofoam plates and cups —... - Page 36 Turning Over: Turn foods over midway through cooking to expose all parts to mi- crowave energy. This is especially important when cooking large foods such as roasts. Standing Time: Foods cooked in a microwave oven build up internal heat and con- tinue to cook for a few minutes after heating stops.
-
Page 37: Care & Cleaning
care & cleaning • Turn off the microwave oven and unplug the power cord from the wall socket before cleaning the oven. • Keep the inside of the microwave oven clean. When food splatters or spilled liquids adhere to microwave walls, wipe the interior with a damp cloth. -
Page 38: Before Calling For Service
before calling for service • Make sure the microwave oven is securely plugged in. If it is not, remove the plug from the outlet, wait 10 seconds, and plug it in again securely. • Check for a blown circuit fuse or a tripped main circuit breaker. If these seem to be operating properly, test the power outlet with another appliance.
Need help?
Do you have a question about the HMM110SIZ and is the answer not in the manual?
Questions and answers