Table of Contents
Advertisement
Quick Links
Advertisement
Table of Contents

Related Manuals for AODELAN E3+


Summary of Contents for AODELAN E3+
- Page 1 Wireless Flash Trigger Transmitter 无线电引闪发射器...
- Page 3 The product is classified as Class 3R laser product, according to the following standards IEC/EN 60825-1 "Radiation Safety of Laser Products." Class 3R: A Class 3R laser is considered safe if handled carefully, with restricted beam viewing. With a class 3R laser, the MPE can be exceeded, but with a low risk of injury.
- Page 4 Note: Before using the E3 Wireless Trigger for Canon, please read this instruction manual carefully. Please also note to upgrade its firmware to the latest version following the instructions provided on www.aodelan.net. (To check the firmware version, please see page 10). Warnings 1.
- Page 5 triggered, move its location slightly. FCC Interference Statement: This device complies with part 15 of the FCC Rules. Operation is subject to the followingtwo conditions: (1) This device may not cause harmful interference, and (2) this device must accept any interference received, including interference that may cause undesired operation.
- Page 6 -- Increase the separation between the equipment and receiver. -- Connect the equipment into an outlet on a circuit different from that to which the receiver is connected. -- Consult the dealer or an experienced radio/TV technician for help. Wireless Trigger for Canon/Transmitter transmitter is a transmitter for wireless flash shooting.
-
Page 7: Table Of Contents
Table of Contents I. Parts---------------------------------------------------------------------------------------------6 II. Preparation Before Use------------------------------------------------------------------7 III. The LCD Display-------------------------------------------------------------------------15 IV. Wireless Flash Shooting: Radio Transmission-------------------------------18 1. Wireless Flash Setting----------------------------------------------------------------19 2. ETTL: Fully Automatic Wireless Flash Shooting-------------------------------23 3. Using Fully Automatic Wireless Flash--------------------------------------------24 4. ETTL: Wireless Multiple Flash Shooting with Flash Ratio-------------------28 5. -
Page 8: Parts
I. Parts 1. <LINK> indication light: Radio transmission confirmation lamp 2. LCD panel 3. Function Button 3 4. Function Button 2 5. Function Button 1 6. <MODE>: Flash mode button 7. < >: Charge lamp/Test flash button 8. < >: Select/Set button 9. -
Page 9: Preparation Before Use
II. Preparation Before Use Installing the Batteries 1. Press the battery compartment cover and slide it down as shown to open the battery cover. (See Picture 1) Picture 1 Picture 2 2. Insert the batteries as shown. Make sure the “+” and“-”battery contacts are correctly oriented as shown. - Page 10 3. Slide the E3 transmitter all the way into the camera’s hot shoe mount. 4. Lock the E3 transmitter by sliding the mounting foot lock lever to the right until the lock lever clicks in place.(See picture 3) Picture 3 Detaching the E3 transmitter 1.
- Page 11 Turn On/Off the E3 Transmitter 1. Turn On: Press and hold the power button until MENU interface is displayed on screen. 2. Turn off: Press and hold the power button until the LCD screen goes blank. Note: When is displayed, please replace the batteries with new ones. USB Port The firmware of E3 transmitter can be upgraded via the USB port, so as to...
- Page 12 Click "Icon" icon, locate and double click on the FIF file from the pop-out window. Then it starts loading the new firmware. 3. The status of the upgrade will be displayed in the process bar. When completed, an “Updata OK”will be displayed at the bottom of the upgrade software window, and a “Download OK”...
- Page 13 Remote Release from Slave Unit When performing wireless shooting, E3 transmitter supports remote release (remote control shooting) from a flash set or E3 receiver as a slave unit. For operations, see the flash or E3 receiver’s instruction manual. Note: When using the remote release function, the slave unit camera might need a shutter release cable(available separately) depending on the camera models.
- Page 14 continuously for 1 sec. This is called the modeling flash. It enables you to see the shadow effects of the flash on the subject and the lighting balance. Besides, you can also fire the modeling flash by pressing the charge lamp/ test flash button on E3 transmitter (the operation required to be enabled in advance by setting C.Fn 02).
- Page 15 Press function button 3 corresponding to , and then press function button 1 corresponding to , the settings are saved (stored in the memory). Press function button 2 corresponding to , the settings that were saved are set. Clearing Transmitter Settings You can return the settings for wireless shooting to their default settings.
- Page 16 MENU Functions FEB level ±3EV(in 1/3-stop increments) Flash exposure ±3EV(in 1/3-stop increments) compensation C.Fn function C.Fn 01~22, P.Fn 01~08 RATIO A:B C A:B ratio setting: RATIO A:B 1:8, in 1/2-stop ETTL RATIO OFF increments Flash ratio RATIO A:B:C M/Multi RATIO A:B RATIO OFF Scan the radio reception status and set the master Scan function...
-
Page 17: The Lcd Display
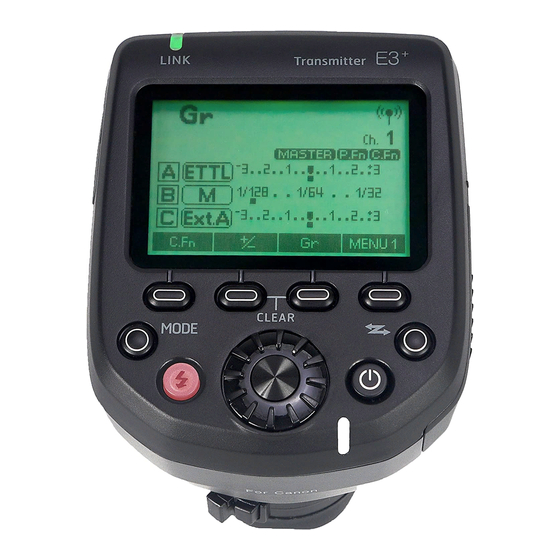
III. LCD Display transmitter’s LCD display comes with five modes: ETTL, M, MULTI, Gr and LINKED SHOT. You can cycle through “ETTL, M, MULTI, Gr” by pressing < > button. And by pressing and holding < >button, you can switch the LCD to display LINKED SHOT. - Page 18 2. Manual Flash M: Manual Manual Flash Output 3. Stroboscopic Flash MULTI: Multi (Stroboscopic) Flash frequency Number of flashes...
- Page 19 4. Group Firing Gr: Firing Group Three flash modes optional: ETTL、M、Ext.A 5. Linked Shooting LINKED SHOT: : SLAVE, Slave unit; Linked Shooting MASTER, Master unit;...
-
Page 20: Wireless Flash Shooting: Radio Transmission
Note: 1) The display will show only the settings currently applied. 2) The functions displayed above function buttons 1 to 4, such as , change according to the settings’ status. 3) When a button or dial is operated, the LCD panel illuminates. IV. -
Page 21: Wireless Flash Setting
The slave units can be speedlites that is compatible with radio transmission wireless shooting and set on slave mode, and also, by using with E3 receiver, other Canon ETTL flashes that are incompatible with the radio transmission wireless function. Note: 1) When using E3 receiver as slave unit, restrictions will apply to parts of its functions. - Page 22 3. Transmission Channel/Wireless Radio ID Settings: To avoid interference with wireless multiple flash systems using radio transmission that are used by other photographers or with other devices that use radio waves (wireless), you can change the transmission channel and wireless radio ID. Use the following procedures to set the master unit’s transmission channel and wireless radio ID.
- Page 23 3.5 When the transmission between the master unit and slave unit is established, the < > lamp lights green. 4. Scanning the Master Unit Transmission Channels to Set transmitter is able to scan the radio reception status and set the master unit’s transmission channel automatically or manually.
- Page 24 4.2 Scanning while Ch.1 to 15 is set: Press function button 4 to display , and then function button 3 corresponding to . The radio reception status is displayed in a graph. The higher the peak of the channel in the graph, the better the radio reception signal.
-
Page 25: Ettl: Fully Automatic Wireless Flash Shooting
ETTL: Fully Automatic Wireless Flash Shooting transmitter attached to the camera (master) and a wirelessly controlled flash (slave) can perform fully automatic wireless shooting. 1. Autoflash Shooting Using One Slave Unit 1.1 Set the flash as the slave unit: For the slave unit setting, see the flash or the E3 receiver’s instruction manual. -
Page 26: Using Fully Automatic Wireless Flash
When the recycling of all the flash units is completed, the master units’ charge lamp lights on. 1.6 Check the operation: Press the master unit’s test flash button (charge lamp). The slave unit flash will fire. If not, check that it is placed within the operation range. - Page 27 1. Flash Exposure Compensation In the same way as normal exposure compensation, you can set exposure compensation for flash. The flash exposure compensation amount can be set up to ±3 stops in 1/3-stop increments. 1.1 Press function button 4 until is displayed.
- Page 28 2) If the camera’s exposure compensation is set to 1/2-stop increments, flash exposure compensation will be up to ±stops in 1/2-stop increments. 2. FEB With FEB (Flash Exposure Bracketing) function, you can take three shots while automatically changing the flash output. The settable range is up to ±3 stops in 1/3-stop increments.
- Page 29 Note: 1) You can choose whether or not to cancel FEB automatically after shooting three shots with FEB by setting C.Fn03. 2) You can change the order of FEB sequence by setting C.Fn04. 3. High-speed Sync With the high-speed sync function, the flash can synchronize with all shutter speeds.
-
Page 30: Ettl: Wireless Multiple Flash Shooting With Flash Ratio
3.3 Press function button 2 will disable 4. FEL: FE Lock FE (Flash Exposure) lock locks the correct flash exposure setting for any part of the scene. Perform FE lock by operating the camera. For the operation, see the camera and flash’s instruction manual. 5. - Page 31 receiver’s instruction manual. 1.2 Set the ratio mode: Press the master unit’s function button 4 to display . Press function button 2 corresponding to to set to < >. 1.3 Set the flash ratio: Press function button 3 corresponding to and again press the function button 3 while it is corresponding to turn <...
- Page 32 1.4 Take the picture: the slave unit flash at the set flash ratio. 2. Autoflash Shooting with Thee Slave Groups You can add firing group C to firing groups A and B. C is convenient to set lighting so as to eliminate the subject’s shadow. The setting method is the same as “Autoflash Shooting with Two Slave Groups”...
- Page 33 Press function button 3 corresponding to , turn < > and press function button 3 corresponding to . Again turn < > and press < > button to set the flash exposure compensation amount for group C. Press function button 4 corresponding to to return to shooting- ready state.
-
Page 34: M:wireless Multiple Flash Shooting With Manual Flash Output
units are controlled as a single firing group A with a large flash output. M: Wireless Multiple Flash Shooting with Manual Flash Output When doing multiple flash shooting with manual flash output, you can shoot with a different flash output setting for each slave unit (firing group). Set all the parameters on the master unit. -
Page 35: Multi
turn< > to select the group for which you want to set the flash output, and press < > button. 4.Set the flash output: Press function button 3 , turn < >to set the flash output and press < > button. Repeat step 3and 4 to set the output of all groups. 5.Take the picture: Each group fires at the set flash output. - Page 36 1. Press master unit’s < >button to set the flash mode to< >. 2. Set the number of firing groups and flash output for each group by referring to manual flash on the preceding page. 3. Set the flash frequency and number of flashes: When is displayed, press function button 2 corresponding to turn<...
-
Page 37: Gr: Shooting With A Different Flash Mode For Each Group
Gr: Shooting with a Different Flash Mode for Each Group When using an EOS digital camera released since 2012, you can shoot with a different flash mode set for each firing group, with up to 5 groups(A/B/C/D/E). The flash modes that can be set are E-TTL II/E-TTL autoflash, Manual flash and... - Page 38 Repeat step 3 to set the flash mode. 4. Set the flash output or flash exposure compensation amount While a firing group is selected, press function button 3, turn < > to set the flash function corresponding to the flash mode, and press< >...
-
Page 39: Linked Shooting
5. Take the picture: Each slave units fires in the flash mode set for each group. Linked Shooting Linked shooting is a function that automatically releases the shutter of a slave unit camera by linking it to a master unit camera. You can shoot with linked shooting for up to 16 units, including both master units and slave units. - Page 40 Slave Slave Master Linked shooting setting 1. Set to linked shooting mode Press and hold linked shooting button until is displayed. Linked shooting mode’s “Slave unit” is set; Press linked shooting button again to set “Master unit” of linked shooting mode.
- Page 41 2. Set the channel and ID Set the channel by pressing function button 2 corresponding to turn < > to select the channel and press < >button. You also choose to scan the radio reception status and set the master unit’s transmission channel automatically or manually.
- Page 42 6. Take the pictures Check that the < > lamp of the master unit lights green and take the picture. The slave unit cameras are released in coordination with the master unit camera. After shooting with linked shooting, the < >...
-
Page 43: Setting Transmitter Functions With Camera Operations
V. Setting Transmitter Functions with Camera Operations When using EOS digital camera released since 2007, you can set flash functions, transmitter functions or Custom Functions from the camera’s menu screen. For the camera operations, see the camera’s instruction manual. (Examples displayed are EOS 6D menu screen) 1. - Page 44 2.Settings Available in [Flash function settings]...
- Page 45 3. Transmitter Custom Function Settings The displayed contents vary depending on the camera. If C.Fn-20 and 22 are not displayed, set them by operating the transmitter. 3.1 Select[Flash C.Fn settings]or[External flash C.Fn setting] 3.2 Select the Custom Function number and set function 3.3 To clear all the Custom Function settings, select [Clear all Speedlite C.Fn’s] or [Clear ext.
-
Page 46: Customizing The Transmitter
Note: [Auto power off] under [Flash C.Fn settings] is corresponding to transmitter’s C.Fn 01: Auto IDLE. You can enable or disable Auto IDLE for E3 transmitter by operating the Camera menu option. VI. Customizing the Transmitter Transmitter supports Custom function (C.Fn) and Personal Function ( P.Fn) setting. - Page 47 Custom Functions Chart Custom Functions Setting No. Setting and descriptions Function No. Enable Auto IDLE when the E3 transmitter is not operated for 5min., C.Fn 01 : Auto IDLE Disable Auto IDLE when the E3 transmitter is not operated for 5min., Press the camera’s depth-of-field preview button to fire the modeling flash Press E3...
-
Page 48: P.fn: Setting Personal Functions
P.Fn: Setting personal functions 1. When Custom Function screen is displayed, press function button 1 corresponding to to display Personal Function screen. 2. Set the personal function in the same way as step 3 and 4 for the custom function. 3. - Page 49 Personal Functions Chart Personal Functions Setting No. Setting and descriptions Function No. : LCD panel You can adjust the contrast of the LCD panel P.Fn 01 in 5 levels. display contrast When the E3 transmitter is set as master unit(radio transmission wireless shooting, linked shooting), select green as color of the LCD panel illumination.
-
Page 50: Trouble Shooting Guide
VII. Trouble Shooting Guide 1. Power does not turn on 1.1 Make sure the batteries are installed in correct orientation. 1.2 Check battery contacts are in good contact and that the batteries are sufficient with power. 2.The Slave unit doesn’t fire 2.1 Check if the slave unit supports radio transmission wireless flash 2.2 Set the slave unit to <... -
Page 51: Technical Specification
VIII. Technical Specification Type On-camera wireless flash trigger EOS type-A camera compatible with E-TTL II/E-TTL Compatible cameras autoflash E-TTL II/E-TTL auto, manual flash, stroboscopic flash, auto external flash metering(only when the Exposure control system flash mode is set to <Gr>). Frequency 2405~2475Hz Primary modulation: OQPSK, secondary modulation:... - Page 52 On the master unit’s LCD panel, the < >icon lights, Slave battery check the slave unit’s AF assist beam emitter blinks and charge the lamp lights Flash exposure Flash exposure confirmation lamp lights confirmation Modeling flash Fired with camera’s depth-of-field preview button Linked Shooting Provided Custom functions...
- Page 53 2. The main unit of product comes with a 1 year warranty from the date of purchase. 3. New firmware will be available for download on aodelan.net. Customer can look for firmware upgrades on the website. 4. For other terms, please refer to details of the Three Guarantees policy.
- Page 54 1. Log in www.aodelan.net and contact AODELAN Customer Service Center to confirm whether the product needs to be returned for repair. The shipping cost to send back the product will be at customer’s expense (AODELAN Customer Service Center’s reply shall prevails).
- Page 55 Accessory List Aodelan E3 Transmitter 1 PC AA Battery 2 PCS USB Cable 1 PC Manual 1 PC QC Certificate 1 PC *Please check the package according to the accessory list.
Need help?
Do you have a question about the E3+ and is the answer not in the manual?
Questions and answers