
Related Manuals for AODELAN E4

Summary of Contents for AODELAN E4
- Page 1 Wireless Flash Trigger User Manual Shenzhen Aodelan Technology Co., Ltd. Printed in China...
- Page 2 Thank you for purchasing an AODELAN product. AODELAN E4 is a TTL transmitter compatible with AODELAN radio system. It can be used to wirelessly synchronize the AODELAN flashes with the camera, combining TTL (Through-The-Lens) exposure control mode with the option to manually adjust the exposure brightness.
-
Page 3: Declaration Of Conformity Ec
RED 2014/53/EU Declaration of Conformity EC Hereby, Shenzhen Aodelan Technology Co., Ltd. declares that this product is in compliance with essential requirements and other relevant provisions of Directive 2014/53/EU. This product can be used across EU member states. A copy of the Declaration of Conformity can be found at www.aodelan.net. - Page 4 BATTERIES ACCORDING TO THE INSTRUCTIONS. ISED Statement This device complies with Industry Canada license‐exempt RSS standard(s).Operation is subject to the following two conditions: (1) This device may not cause interference, and (2) This device must accept any interference, including interference that may cause undesired operation of the device. The digital apparatus complies with Canadian CAN ICES‐3 (B)/NMB‐3(B).
- Page 5 Canada. End Product Labeling The final end product must be labeled in a visible area with the following: Contains IC: 25192-E4. Plaque signalétique du produit final Le produit final doit être étiqueté dans un endroit visible avec l'inscription suivante: Contient des IC: 25192-E4.
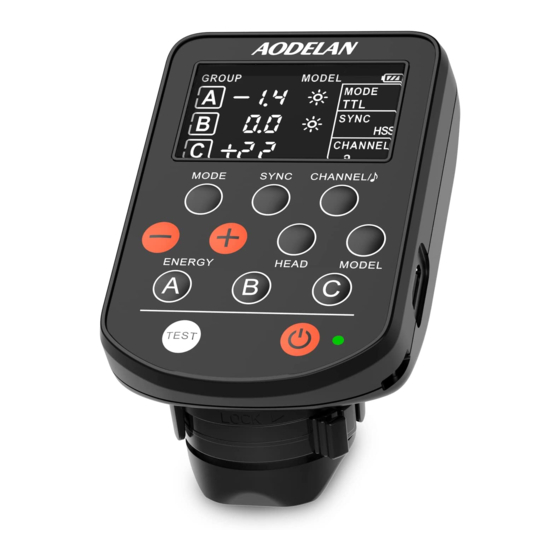
- Page 6 I. Parts Display Channel Button Mode Button Model Button Energy Adjustment Buttons 10. Indicator (<+> Increase, <-> Decrease) 11. Power Button Group Buttons (A, B, C) 12. USB Port Test Button 13. Mounting Foot Lock Lever Sync Button 14. Battery Compartment Head Button 15.
-
Page 7: Getting Started
Display [1], replace the batteries with new ones. Turning E4 on/off Turn on: Press the Power Button [11] to turn on the E4, the Display [1] lights up and contents are displayed. Turn off: Press and hold the Power Button [11] until the Display [1] lights off. -
Page 8: Channel Selection
Group Selection Groups are used to allow remote radio control of selected flashes. All flashes that are assigned to the same group under the same channel will be controlled by E4 simultaneously. Press the Group Button [4] A / B or C to select the group. -
Page 9: Test Function
Beep 1. Press and hold the Channel Button [8] until the E4 makes two short beeps to turn on or off the E4 button beep. 2. There will be a long beep when E4 is turned on regardless of whether the beeper is turned on or not. -
Page 10: Factory Settings
Factory Settings Ensure that the E4 is turned off. To reset the E4 to factory settings, press and hold down the Mode Button [2] and then press and hold the Power Button [11] simultaneously until the Display [1] shows “rES”. - Page 11 Precautions for Use Before starting all of the following operations please turn off E4 as well as the camera and flashes which work with E4, and turn on all units after the connection is completed. The following operations are all based on E4 is in standard state, the Indicator [10] blinks green.
- Page 12 If an Aodelan-raido-system compatible flash is set to group D, E or F under the same channel, it will be synchronized but not be part of the TTL calculation. The flash outputs of these flashes are added to the total...
- Page 13 Operation in M mode (Manual mode) With the E4 set to M mode, the light output for groups A, B and C can be adjusted manually. By alternating between TTL and M mode, you can test your way to the perfect light.
-
Page 14: Specifications
V. Specifications Indicator [10] State and operation on E4 Indicator Standby in standard state Blinks in green Standby in relay state Blinks in red Communicating with the camera Keeps on in green Sent a flash synchronization command Lights up in red for approx. 0.3 seconds Notes ... - Page 15 FCC Warning This device complies with part 15 of the FCC rules. Operation is subject to the following two conditions: (1) this device may not cause harmful interference, and (2) this device must accept any inte rference received, including interference that may cause undesired operation. Changes or modifications not expressly approved by the party responsible for compliance could void the user's authority to operate the equipment.
- Page 16 ISED Statement ‐ English: This device complies with Industry Canada license ‐ exempt RSS standard(s). Operation is subject to the following two conditions: (1) This device may not cause interference, and (2) This device must accept any interference, including interference that may cause undesired operation of the device.
Need help?
Do you have a question about the E4 and is the answer not in the manual?
Questions and answers
Sigo las instrucciones segun las indicaciones pero no he logrado que funcione el flash Profoto A10 **** el Aodelan E4 sobre mi camara Nikon
The AODELAN E4 is designed to work with flashes that have a built-in AODELAN radio system. The Profoto A10 flash does not use the AODELAN radio system, which means the E4 cannot wirelessly synchronize with it. Compatibility issues between different radio systems prevent proper communication between the trigger and the flash.
This answer is automatically generated
No he podido hacer que trabaje **** Profoto A10 en mi camara Nikon D800
NECESITO MANUAL EN ESPAÑOL - spanish manual