Table of Contents
Advertisement
Advertisement
Table of Contents

Subscribe to Our Youtube Channel
Related Manuals for VTech Get Ready for School Learning Desk


Summary of Contents for VTech Get Ready for School Learning Desk
- Page 1 Instruction Manual...
-
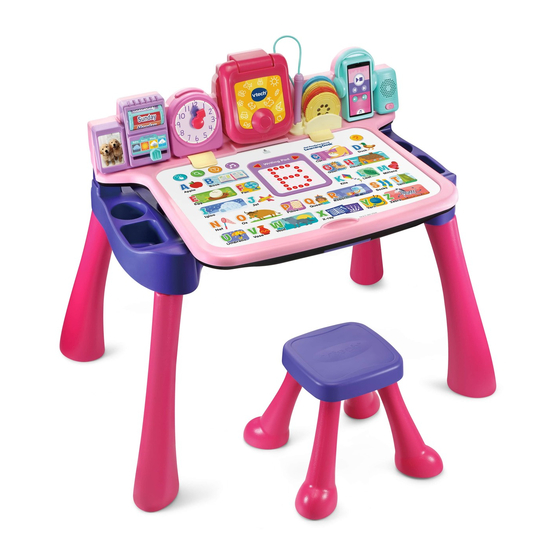
Page 2: Included In The Package
INTRODUCTION Thank you for purchasing the Get Ready for School Learning Desk™! The Get Ready for School Learning Desk™ features an interactive desk top with five interactive activity pages that introduce letters, writing, numbers, music and more. Practice telling time with the play clock, or use the interactive projector to learn about the weather, the human body, shapes, colors and matching. -
Page 3: Product Features
PRODUCT FEATURES 13 14 15 16 Projection Focus Adjustor Roller & Slider Interactive Projector Photo Frame Activity Page Mode Icons Stylus Letter and Number Selection Buttons Projection Reels LED Display / Writing Pad Music Player Controls Touch Panel Volume Buttons Activity Card Slot Speaker Stool Seat... - Page 4 ASSEMBLY INSTRUCTIONS With the Get Ready for School Learning Desk™ safety comes first. To ensure your child’s safety, adult assembly is required. For the Desk 1. Place the base on a flat surface. Insert the touch panel into the base and press down on the hinges until you hear a click.
- Page 5 Transforms from Desk to Art Station or Chalkboard. To use the Activity Desk as an Art Station, flip up the touch panel and use the clip to hold paper on the chalkboard surface. You can also draw directly on the Chalkboard surface by using chalk. Art Station Chalkboard Use a cloth to erase the chalk and wipe away any remaining chalk dust on...
- Page 6 FEATURES ACTION Roller & Slider Learn about days of the week and the weather (this part has no audio responses). Activity Page Mode Icons Use your finger to touch any of the Mode Icons on the activity page to play. Pretend Clock Turn the Clock Hand or press the Clock Button to explore and practice time concepts.
-
Page 7: Getting Started
GETTING STARTED BATTERY REMOVAL AND INSTALLATION • Make sure the main unit is turned Off. • Find the battery cover located on the back of the unit, use a coin or screwdriver to loosen the screw and then open the battery cover. •... -
Page 8: Touch Panel
TO BEGIN PLAYING Press the Power Button to turn on the main unit. Touch Panel Touch any object on the activity page to explore. Touch any of the Activity Page Mode icons in the upper left corner of the page to play additional activities. -
Page 9: Writing Pad
Writing Pad To play the Writing Pad, ensure the activity pages are removed. Remove the Stylus from the stylus holder and touch the Writing Pad or the arrow buttons. To quit the Writing Pad, place the Stylus back in the stylus holder. When the Stylus is not in use, place it back in the stylus holder. - Page 10 Projector The projector has two activity modes, Picture Tracing and Projector Games. The Projection Reels are required. Picture Tracing Learn to draw by tracing the outline of the projected image. Tips: Place a piece of paper over the Touch Panel using the Clips to hold it in position.
- Page 11 Projector Game To play in Projector Game mode,open the projector and insert a red or blue projector reel into the Projector Reel Slot. Insert the corresponding color matched Activity Page in the Activity Card Slot (i.e. the red framed Shapes & Colors Activity Page should match to the red projector reel).
-
Page 12: Music Player
Music Player There are 22 playful and 11 classical melodies on the Music Player. The Music Player will play each melody one by one. The Music Player will stop after all songs have played. You can pause/play or go forward/back by using the controls on the Music Player. -
Page 13: Battery Status
Battery Status When the batteries are almost exhausted, the unit will show an empty battery icon on the LED Display for a few seconds and then may automatically power off. New batteries should be inserted before further use. Automatic Shut-Off To preserve battery life, the main unit will automatically turn off after about two minutes without input. - Page 14 There are five fun interactive pages that cover fundamental skills such as letters, numbers, music, shapes, colors, the human body and more. Refer to the table below for details. Alphabet & Letter Sounds Touch & Learn Touch the letters and objects to learn the alphabet, words and letter sounds.
- Page 15 Music Jammer Touch & Learn Touch the page to learn about instruments and different music styles. Searching Fun Listen to the clues and find the correct instrument on the page. Jam Session Play along and create your own music. Touch a music style to select the type of music to be played, and touch an instrument in the third row to change the sound...
-
Page 16: Troubleshooting
Dress Your Body Touch & Learn Touch the page to learn about the human body, clothes and accessories. Searching Fun Listen to the clues and find the correct part of the body or object on the page. Head, Shoulders, Knees and Toes Play the song. - Page 17 Make sure you are not playing the Writing Pad or Picture Tracing. The Touch Panel (except the Mode icons and the Help icon) will not be responsive to touch while playing the Writing Pad. The Touch Panel (except the Help icon) will not The main unit is ON but be responsive to touch while using the Projector the Touch Panel does...
- Page 18 Make sure the Projection Reel is fully inserted. The Projection Reel inserted is not Make sure nothing other than the Projection recognized. Reels are inserted into the slot. To play the Picture Tracing activity, make sure no Activity Page is inserted and the Yellow Projection Reel is fully inserted.
-
Page 19: Care And Maintenance
If for some reason the unit stops working or malfunctions, please follow these steps: 1. Turn the unit Off. 2. Interrupt the power supply by removing the batteries. 3. Let the unit stand for a few minutes, then replace the batteries. 4. -
Page 20: Technical Support
Canada, or by going to our website vtechkids.com and filling out our Contact Us form located under the Customer Support link. Creating and developing VTech products is accompanied by a responsibility that we take very seriously. We make every effort to ensure the accuracy of the information, which forms the value of our products. - Page 21 47 CFR § 2.1077 Compliance Information Trade Name: VTech ® Model: 5409 Product Name: Get Ready for School Learning Desk Responsible Party: VTech Electronics North America, L.L.C. Address: 1156 W. Shure Drive, Suite 200 Arlington Heights, IL 60004 Website: vtechkids.com THIS DEVICE COMPLIES WITH PART 15 OF THE FCC RULES.
- Page 22 Visit our website for more information about our products, downloads, resources and more. vtechkids.com vtechkids.ca Read our complete warranty policy online at vtechkids.com/warranty vtechkids.ca/warranty TM & © 2021 VTech Holdings Limited. All rights reserved. Printed in China.
Need help?
Do you have a question about the Get Ready for School Learning Desk and is the answer not in the manual?
Questions and answers