
Related Manuals for Nogueira PRN 2.0D


Summary of Contents for Nogueira PRN 2.0D
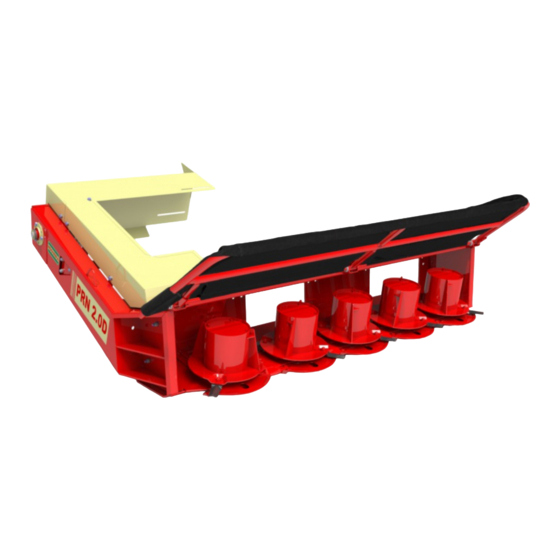
- Page 1 Grass Head - Plataforma de pasto PRN 2.0D Instructions Manual Manual de Instrucciones...
- Page 3 This is the highest quality in this kind of products, especially designed to meet your needs. This manual contains operating instructions that must be followed in order to provide good operation, safety, and durability for your PRN 2.0D Nogueira. We recommend reading it first carefully before starting to operate the machine.
-
Page 4: Table Of Contents
Guarantee certificate Guarantee form Note: 1- Nogueira aim is the constant update and improvement of its products, keeping itself the right of introduce changes without advice. 2- The figure used in this manual are merely as illustration. Operation Technical Manual... -
Page 5: Safety Instructions
Fastenings and torques Note: In the bolts fastening operations presented in this manual, use the torques and wrenches presented in the tables - Additional information. Protections, covers and shields Attention: Never operate the harvester without the protections, covers and shields. PRN 2.0D... -
Page 6: When Operating The Machine
When operating the machine 1- Avoid grease, oil or dust building-up on the machine. 2- Never feed the equipment manually. 3- Never attempt to adjust or repair components with the machine in movement. 4- Do not start the equipment without the protecting covers or structures. -
Page 7: When Making Maintenance In The Machine
Refer to the traffic department for regulations and laws in your region about the possibility of transporting the machine with the tractor on certain parts of the roads. Request guidance authorizations and written procedures. Displace the tractor in compatible speed according the ground or streets. PRN 2.0D... -
Page 8: Transport On Truck
Transport on truck Whenever you have to transport the machine for longer distances, when there is need for using public roads, the transport must be done on truck or trailer. The harvester must be fully inside the body of the truck or trailer that carries it, attached by cords or cables. -
Page 9: Machine Presentation
900 or 950 mm between lines (the opening of the harvester is defined at the time of purchase thereof). Components identification 1- Cut discs; 2- Protective canvas; 3- Diverters; 4- Support wheel; 5- Protection cover; 6- Transmission cardan shaft; 7- PTO shaft drive cardan; 8- Multiplier Box Transmission; PRN 2.0D... -
Page 10: Running
Whenever the terms “right” and “left” are used, it is considered the tractor’s operating cab as reference point. The grass head PRN 2.0D was developed to harvest and collect grass. While the machine goes, the grass passes through the protective cover (1), and is cut by the cutting discs (2), and immediately to the rolls of the harvester forage harvesters (3). -
Page 11: Technical Specifications
Technical specifications Main machine ............... Forage harvester New Pecus Duo Nogueira Traction and drive ....................... by tractor Tractor required power ................Minimum: 90 hp (66,2 kW) Maximum: 120 hp (88,3 kW) Approximated weight ....................... 530 kg Work width ......................... 2.000 mm PTO Rotation ........................ -
Page 12: Preparation Of The Machine
Screw the pin (T) in the rolls boxes of the forage harvester, in the positions shown in the figures below. The pin (T) are part of the "kit" of separate items accompanying the PRN 2.0D grass head. ATTENTION! OBSERVE IN THE FIGURES BELOW THAT THE PINS MOUNTING POSITION (T) IS DIFFERENT IN HARVESTERS WITH SPACING OF 900 AND 950 MM. - Page 13 Placing the cap on the bottom of the rollers box. The bottom cap is part of the "kit" of separate items accompanying the PRN 2.0D grass head. Placed CAP Remove the lower counter knife (F) and put in its place the cover (G).
-
Page 14: Mounting Of The Grass Head On The Machine
Mounting of the GRASS HEAD on the machine a) Mount the grass head on the harvester, matching the openings in the pin (T). OPENING PIN ‘T’ b) Attach the grass head on the harvester putting the eight screws and washers indicated in the figure above. - Page 15 Note that one side of the two brackets must be placed the shim (E). The shims are part of the "kit" of separate items accompanying the PRN 2.0D grass head. d) Remove the protective covers A and B. PRN 2.0D...
- Page 16 Mounting of the GRASS HEAD on the machine (continuation) e) Remove the shaft protection (G). f) Mount the support (H), fixing it with 4 screws (J). g) Mount the gear box (K) on the support (H) and secure it with two screws (L). h) Attach the strap (M) and extend it.
- Page 17 Place the PTO (P), coupling it on the gearbox shaft and the shaft of the pulley. k) Remove the plug of the multiplier box (A) and replace it with the vent that accompanies the machine. l) Replace the gearbox plug (B) with the vent that accompanies the machine. PRN 2.0D...
-
Page 18: Adjustments To Start Operating
Mounting of the GRASS HEAD on the machine (continuation) m) Replace the protective covers (A) and (B). Secure with screws and washers indicated on the figure beside. Never use the machine without the protective covers. The images below show the grass head coupled with the New Pecus Duo harvester. Adjustments to start operating PTO speed During operation, the PTO speed must be constant at 540 rpm. -
Page 19: Harvest Ground Speed
After you have defined the motor rotation, select the gear that provides proper speed to the harvest, following this rule: 1- For bulky crops, taller and/or for thin triturated fodder, you should use low speeds. 2- For non-bulky crops, shorter and/or for gross triturated fodder, higher speeds may be used. PRN 2.0D... -
Page 20: Description Of The Operation
Description of the operation 1- It is up to the operator to fit these procedures to his reality; 2- Be aware of all the safety measures before operating the machine for the first time. 1- Before starting the engine, check all the harvest conditions, machine preparation and initial adjustments - Check its operational manual. -
Page 21: Maintenance Instructions
Check the oil level on the gear box in each 50 work hours or weekly, and fill it with the right quantity when needed. RECOMMENDED OIL Recommended oil: Only use oil 150/CLP Oil level The capacity of the gear box is 0,4 liters. GEAR BOX PRN 2.0D... - Page 22 Always uses the IPE. Maintenance of the cutting system The cutter bar is the heart of the PRN 2.0D grass head. Keep the right quantity of oil on it, as the instructions above.
-
Page 23: Machine Preservation
1- Re-tighten the nuts and bolts general; 2- Lubricate the points indicated in the chapter “Lubrication points”; 3- Check the adjustments for operation described from the chapter “Maintenance”; 4- If possible, make a full revision in a Nogueira dealer or authorized workshop. PRN 2.0D... -
Page 24: Technical Assistance
(1). Whenever replacing parts, use always Nogueira genuine items. Only genuine spare parts are made according to the drawings, materials and specifications with great quality control. -
Page 25: Stickers Found On The Machine
Stickers found on the machine PRN 2.0D... - Page 26 Do not use the driveshaft without safety protection and shielding. Keep your distance while it is operating. Touching the moving driveshaft can cause a serious accident. Do not open or remove covers and safety shields on the machine while operating. Keep the hands away from gears and other moving parts, as their movement can catch them and cause injuries.
- Page 29 Felicitaciones por la adquisición de la Plataforma de pasto PRN 2.0D Nogueira. Un producto de la más alta calidad, especialmente desarrollado para atender a sus necesidades. Este manual contiene instrucciones de operación y mantenimiento, que debidamente observadas serán la garantía del buen funcionamiento, con seguridad y durabilidad, de su Plataforma de pasto PRN 2.0D Nogueira.
- Page 30 Certificado de garantía Control de garantía Notas: 1- Nogueira tiene por objetivo la constante actualización y mejoramiento de sus productos, reservándose el derecho de introducir modificaciones en sus componentes y accessorios sin previo aviso. 2- Las ilustraciones contenidas en este manual son meramente ilustrativas.
-
Page 31: Instrucciones De Seguridad
Durante los procedimientos de fijación de tornillos que se describen en éste manual, emplear los pares de apriete y las herramientas que constan en la tabla - Informaciones adicionales. Defensas, tapas y carenado Atención: Jamás opere la máquina sin las defensas, tapas y carenado. PRN 2.0D... -
Page 32: Al Operar La Máquina
Al operar la máquina 1- Evite la formación de acumulación de grasa, aceite o suciedad sobre la máquina. 2- Jamás alimente el equipo manualmente. 3- Nunca intente ajustar o reparar su equipo con la máquina en movimiento. 4- No accione el equipo sin estar con todas sus protecciones. -
Page 33: Al Hacer El Mantenimiento De La Máquina
Pida orientaciones, autorizaciones y procedimientos por escrito. En superficies planas, podrá ser utilizada una velocidad mayor del tractor. En superficies irregulares, reduzca la velocidad de modo que las condiciones de seguridad sean satisfechas. PRN 2.0D... -
Page 34: Transporte Sobre Camión
Transporte sobre camión Siempre que sea necesario transportar la máquina en distancias mayores, donde haya la necesidad de la utilización de vías públicas, el transporte debe ser realizado con camión o trailer. La máquina debe estar completamente en el interior de la carrocería del camión o trailer que la transporta, sujeta por cuerdas o cables. -
Page 35: Presentación De La Máquina
Presentación de la máquina La plataforma de pasto PRN 2.0D se puede acoplar en la cosechadora de forrage NEW PECUS DUO, en versiones para 900 o 950 mm entre líneas (la abertura de la cosechadora se define en el momento de la compra de la misma). -
Page 36: Funcionamiento
La plataforma de pasto PRN 2.0D fue desarrollada para segar y cortar pasto. Mientras la máquina camina, el pasto pasa a través de la tapa de protección (1), y es cortado por los discos de corte (2), e inmediatamente lanzado a los rodillos recogedores de la cosechadora de forrajes (3). -
Page 37: Especificaciones Técnicas
Especificaciones técnicas Donde es acoplada............. Cosechadora New Pecus Duo Nogueira Tracción y accionamiento....................Via Tractor Potencia Requerida del tractor..............Mínima: 90 cv (66,2 kW) Máxima: 120 cv (88,3 kW) Peso Total Aproximado......................530 kg Anchura del trabajo ......................2.000 mm Rotación de la toma de potencia .................. -
Page 38: Preparación De La Máquina
Atornille los pasadores (T) en las cajas de rollos de la cosechadora de forraje, en las posiciones mostradas en las figuras siguientes. Los pasadores (T) son parte del "kit" de elementos sueltos que acompañan la plataforma de pasto PRN 2.0D. ATENCIÓN! OBSERVE EN LAS FIGURAS ABAJO QUE LA POSICIÓN DE MONTAJE DE LOS PASADORES (T) ES DIFERENTE EN LAS COSECHADORAS CON ESPACIAMIENTO DE 900 Y 950 MM. - Page 39 (paleta sí, paleta no). Monte las cuchillas en esos agujeros siguiendo las siguientes instrucciones: Las 12 cuchillas son parte del "kit" de elementos sueltos que acompañan la plataforma de pasto PRN 2.0D. Agujero para la montaje de la cuchilla Nota: Tenga en cuenta que hay una posición...
-
Page 40: Montaje De La Plataforma En La Máquina
Montaje de la PLATAFORMA en la Máquina A) Monte la plataforma en la cosechadora, haciendo coincidir las aberturas en el pasador (T). ABERTURAS PASADOR “T” B) Coloque la plataforma en la cosechadora poniendo los ocho tornillos y arandelas que se indican en la figura anterior. - Page 41 Tenga en cuenta que uno de los lados de los dos soportes deben ser colocados el calce (E). Los calces son parte del "kit" de los elementos sueltos que acompañan la plataforma de pasto PRN 2.0D. D) Retire los carenados A y B. PRN 2.0D...
- Page 42 Montaje de la PLATAFORMA en la Máquina (continuación) E) Retire la protección del eje (G). F) Monte el soporte (H), fijándolo con los 4 tornillos (J). G) Monte la caja de transmisión (K) en el soporte (H) y fijelo con los dos tornillos (L). H) Coloque la correa (M) y estírela.
- Page 43 Retire el tapón de la caja de cambios (A) y substituirlo por el respiradero que acompaña la máquina. h) Substituya el tapón de la caja de cambios (B) con un respiradero que acompaña la máquina. PRN 2.0D...
-
Page 44: Reglajes Iniciales
Montaje de la PLATAFORMA en la Máquina (continuación) Reemplace los carenados (A) y (B). Fije con tornillos y arandelas que se indican en la figura. Nunca utilice la máquina sin carenados y protecciones de seguridad. Las imágenes a continuación muestran la plataforma acoplada con la cosechadora NEW PECUS DUO. -
Page 45: Velocidad De Desplazamiento En La Cosecha
Definida la rotación en el motor, escoja la marcha que proporcione la velocidad adecuada a la cosecha, observando las siguientes reglas: 1- Para cultivos voluminosos, más alto y/o para picado fino, deben ser utilizadas velocidades menores. 2- Para cultivos no voluminosos, más bajos y/o para picado grueso, pueden ser utilizadas velocidades mayores. PRN 2.0D... -
Page 46: Descripción De La Operación
Descripción de la operación 1- Cabe al operador de la máquina adecuar las instrucciones abajo a su realidad. 2- Conozca todas las instrucciones de seguridad antes de operar la máquina por la primera vez. Vea el item 2 de este manual. 1- Antes de iniciar el trabajo, verifique las condiciones de cultivo, preparación y reglajes iniciales de la cosechadora - vea el manual de la misma. -
Page 47: Manutención
Verifique el aceite en las cajas de transmisión en 50 horas de trabajo o semanalmente, y complete con la cantidad correcta caso sea necesario. ACEITES RECOMENDADOS Aceite recomendado Use apenas aceite 150/CLP Capacidad de aceite La capacidad de aceite es de 0,4 litro. CAJA DE TRANSMISIÓN PRN 2.0D... - Page 48 Siempre utilice EPI’s. Manutención de la regla de corte La regla de corte es el corazión de la plataforma de pasto PRN 2.0D. Mantenga la cantidad de aceite conforme las instrucciones a seguir: Aceite recomendado:...
-
Page 49: Preservación De La Máquina
2- Lubrique todos los puntos descritos en el ítem “Puntos de lubricación”; 3- Verifique todos los ajustes descritos en el ítem “Mantenimiento”; 4- Si es posible, haga una revisión completa en un revendedor Nogueira o en algún distribuidor autorizado. PRN 2.0D... -
Page 50: Asistencia Técnica
Anote aquí el número de serie de la plataforma: Al enviar comunicaciones o solicitar auxilio de la asistencia técnica Nogueira, siempre informe el número de serie y el modelo de la máquina, presentes en la plaqueta de identificación. -
Page 51: Adhesivos Encontrados En La Máquina
Adhesivos encontrados en la máquina PRN 2.0D... - Page 52 No utilice el cardán sin la protección de seguridad. Mantenga distancia durante el funcionamiento. El contacto con el cardán en movimiento puede provocar un grave accidente. No abrir o quitar las tapas y cubiertas de seguridad con la máquina en marcha.
-
Page 53: Certificado De Garantía
09 (nueve) últimos meses - garantía adicional concedida por Nogueira Máquinas Agrícolas. 2- Consiste en la presente garantía, en el compromiso de Nogueira en reparar o sumi- nistrar gratuitamente, en su fábrica, las piezas que a su exclusivo juicio presentan defectos de fabricación. - Page 54 1. Llene el TÉRMINO DE RECIBO con la información solicitada y fi rme; 2. Dispare el TÉRMINO DE RECIBO completado y la factura de venta; 3. Acceder al sitio www.nogueira.com.br y haga clic en la pestaña “TÉRMINO DE RECIBO” o acceda nogueira.industriasnb.com/entrega ;...
- Page 56 NOGUEIRA Ind. Com. Impl. Máquinas Agrícolas S.A. St./R: Fernando de Souza, 533 - Distrito Industrial - CEP 13877-775 Tel/Phone.: (19) 3638.1500 - Fax: (19) 3638.1556 nogueira@nogueira.com.br - www.nogueira.com.br CNPJ: 08.510.974/0001-27...
Need help?
Do you have a question about the PRN 2.0D and is the answer not in the manual?
Questions and answers