
Related Manuals for Nogueira EN-9F3B


Summary of Contents for Nogueira EN-9F3B
- Page 1 Silage Choppers / Ensiladoras EN-9F3B / EN-12B / EN-12F4 EN-6180 / EN-6400 EN-6500 / EN-6600 EN-6700F4 / EN-6800 Instructions Manual Manual de Instrucciones...
- Page 3 This information is extremely important for identifying your machine. Nogueira S/A is always at your disposal to answer any questions or doubts and supply efficient and permanent technical support. The images displayed in this manual are only for illustrative purposes. Thus to facilitate your viewing, the images show cutaway or the safety shielding removed to display it more clearly.
- Page 4 Warranty control Notes: 1- Nogueira seeks to constantly and improve its products; it reserves the right to introduce modifications in its components and accessories without previous notice. 2- The illustrations contained in this manual are merely illustrative. All safety instructions must be abided by for both machine configurations.
- Page 5 Introducing the ensiling machine Model EN-6180 UNLOADER NOZZLE-CHUTE ROTOR BLAST DEFLECTOR PICK-UP ROLLERS PICK-UP CUTTING NOZZLE-CHUTE CHANGE BELT STAND ROTATION fig.01 DIRECTION Model EN-6400 / EN-6500 / EN-6600 / EN-6700F4 / EN-6800 UNLOADER NOZZLE-CHUTE BLAST DEFLECTOR ROTOR PICK-UP ROLLERS PICK-UP NOZZLE- CHUTE CUTTING...
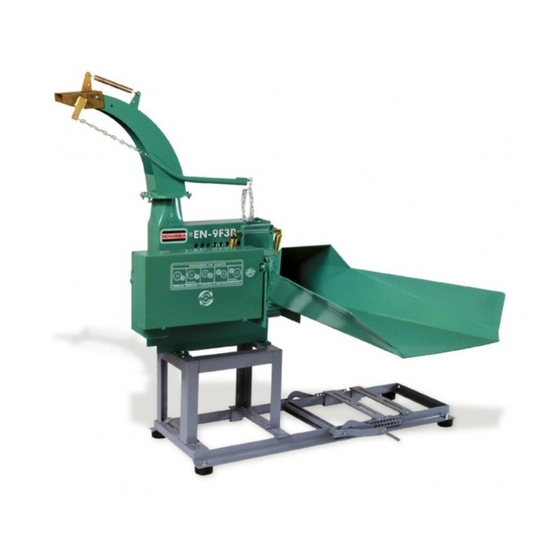
- Page 6 Introducing the ensiling machine Model EN-9F3B / EN-12B / EN-12F4 UNLOADER NOZZLE-CHUTE ROTOR BLAST DEFLECTOR PICK-UP ROLLERS PICK-UP NOZZLE- CHUTE CUTTING CHANGE GEARBOX STAND fig.03 ROTATION DIRECTION Instruction manual...
- Page 7 Remember, keeping people healthy and their physical integrity must always be considered to the upmost. We recommed carefully reading it before operating the machine the first time. If you have any doubts or questions, please get in touch with us at your Nogueira reseller or our Technical Support Department. SAFETY WARNINGS Safety warnings alert on situations that can be dangerous in some way.
- Page 8 Safety - Keep the safety labels in good condition and SAFETY PRECAUTIONS legible. Replace them whenever necessary. - Read the instruction manual before turning on the machine. Pay close attention and respect all - Keep the shielding and protections in the the operating and safety recommendations proper places and do not operate the machine while operating.
- Page 9 Safety - Never operate the machine in closed - Be prepared for any possible accident. Keep a surroundings and without any ventilation, the first-aid kit on hand and easily accessible and gases released from the tractor motor (diesel or know how to use it. gasoline) are highly poisonous to your health.
- Page 10 Safety adhesive labels Read the instruction manual before Turn off the tractor and remove the key turning on the machine. Pay close from the ignition before performing any attention to all the operating and safety maintenance, adjustment, lubrication, recommendations, in order to avoid any cleaning jobs etc., on the machine.
- Page 11 - PTO Driveshaft (only for tractor actuated NEVER OPERATE THE ENSILING MACHINE models); WITHOUT THE PROTECTIVE COVER. - Number 8 and 16 cutting adjustment gears (only for models EN-9F3B, EN-12B e EN-12F4). ý fig.07 - Do not let anybody remove the protective cover. SILAGE CHOPPERS...
- Page 12 ASSEMBLY ASSEMBLY The pick-up and unloader nozzle-chutes are not Installing the UNLOADER NOZZLE-CHUTE assembled on the machine in order to facilitate (High or Low Nozzle). shipment. Assemble the narrow and wide clamps and Installing the PICK-UP NOZZLE-CHUTES fastening screws in the sequence shown below. Fasten the nozzle-chutes straps to the existing hooks on the machine, as shown in the following figures.
- Page 13 Electric motor actuation - The electric motor must be installed by a specialized professional mechanic. The cabling size and installed devices must comply with the currently enforced safety standards. - We recommend assembling the machine in a flat and clean location, which is free of oil, grease, foreign bodies, and protected from the sun and rain.
- Page 14 Electric motor actuation (continuation) EXTERNAL INTERNAL SHIELD SHIELD MACHINE PULLEY fig.16 fig.18 3- Install the internal shield and replace the 5- Estique as correias utilizando o esticador machine pulley. existente no cavalete. Coloque a blindagem externa das correias. STRETCHER BELTS ADJUSTMENT fig.19 NUTS...
- Page 15 Electric motor actuation (continuation) Models: EN-9F3B / EN-12B / EN-12F4 / EN-6400 / EN-6500 / EN-6600 / EN-6700F4 / EN-6800. The metallic stand for assembling the electric motor in the ensiling machine is equipped with special rubber feet which do away with the need for fastening the assembly to the ground.
- Page 16 Diesel or gasoline motor actuation The metallic stand for assembling the diesel or gasoline motor in the ensiling machine is equipped with special rubber feet which do away with the need for fastening the assembly to the ground. fig.25 MACHINE fig.28 2- Place the motor on the stand rails (as MOTOR...
- Page 17 Tractor actuation The Nogueira ensiling machines can be purchased supplied with agricultural tractor power take-off and the following versions are available: fig.30 fig.29 AT 90: Tractor accessory equipped for 90 AT: Conventional tractor, accessory. degree transmission. fig.31 fig.32 Trailer base: For assembly on trailer.
- Page 18 - The instructions for cutting, lubricating, maintenance, and installing the driveshaft protective cover are found and described in the pamphlet supplied by the manufacturer. - It is the exclusive responsibility of the authorized Nogueira reseller to prepare the driveshaft and try out for the first operation of the machine.
- Page 19 FILL WITH OIL fig.35 Cutting sizes: EN-9F3B / EN-12B Ensiling machines models EN-9F3B and EN-12B, defines the cutting sizes based on a pair of gear wheels. The figure below shows all the possible cutting settings and the pair of corresponding gear wheels.
- Page 20 The gear wheels 4 and 32 (optional) are not supplied with the machine, but they can be purchased from a Nogueira Reseller. How to change the cutting option (models: EN-9F3B, EN-12B e EN-12F4) 1- Remove the gearbox cover B, press upwards.
- Page 21 Cutting sizes: EN-6180 / EN-6400 / EN-6500 EN-6600 / EN-6700F4 Ensiling machines series 6000, models EN-6180 / EN-6400 / EN-6500 / EN-6600, and EN-6700 F4, the cutting sizes are defined by positioning the pulley belts, as displayed in the following figures. CUTTING OPTIONS: fig.39 How to change the cutting setting (models: EN-6180 / EN-6400 / EN-6500 / EN-6600 / EN-6700F4):...
- Page 22 Cutting sizes: EN-6800 Ensiling machine model EN-6800, the cutting sizes are defined by the positioning of the pulley belts, as shown in the following illustrations. CUTTING OPTIONS: fig41 HOW TO CHANGE THE CUTTING SIZE (only in model: EN-6800) Invert the pulley wheel axle to change the cutting sizes (fig.42).
- Page 23 - If the motor rotation direction is correct. - If the belts are properly stretched. In models EN-9F3B, EN-12B and EN-12F4, before the first operation, remember to put oil in the transmission gearbox, as stated in this manual. When the ENSILING MACHINE is properly coupled and completely empty, start the motor (turn on the tractor power take-off, in models actuated by the tractor) and wait for a few moments, until the machine reaches the proper operating rotating speed.
- Page 24 Maintenance Your NOGUEIRA ENSILING MACHINE requires a minimum amount of maintenance in order to achieve perfect operation and maximum durability. Therefore, the following are some important maintenance measures: - Clean the machine routinely. - Keep the machine properly lubricated. - Replace worn or damaged parts.
- Page 25 COUNTER-BLADES, as described in the following item. Blade/ Counter-blade adjustment Models: EN-9F3B / EN-12B / EN-12F4 / EN-6400 / EN-6500 / EN-6600 / EN-6700F4 / EN-6800 There must be about a gap of 0.5 mm, between the blade and the counter-blade.
- Page 26 Always replace the whole set of blades, so that the rotor is not imbalanced. Remove the fastening screws from the blades to take out the blades. Important! Use only original NOGUEIRA blades for replacements. Other models Model EN-6180...
- Page 27 Replacing counter-blades Worn counter-blades make the cutting of forage more difficult and exert more strain on the motor. Whenever, you notice they are worn out, replace the counter-blade. REPLACING THE COUNTER-BLADE After the ensiling machine is turned off: 1- Remove springs C and D. 2- Hold strap E and lift the cover, bring the toothed roller towards the front, as shown in figure 54.
- Page 28 Upper roller springs The upper roller spring of your Ensiling machine is equipped with an articulation system with side springs to facilitate the entrance of the material easier; this is to guarantee uniform and precision cutting. If the machine displays problems in the entrance of material, check the pressure of the springs.
- Page 29 Tightening the cutting adjustment belt Keep the belts tight enough. The tightness must be enough to avoid slippage of the belt. Remember, loose belts slip and wear out prematurely. On the hand, excessively tight belts overload the transmission components, and this can damage them. Parched or damaged belts must be replaced immediately.
- Page 30 Lubrication Routine lubrication is essential to good performance and durability of your ensiling machine. We recommend using good quality grease, special for bearings, made from lithium soap base, classified as NLGI 2 EP. Lubricate the displayed parts using a grease gun every 10 hours of operating. Before lubricating, clean the grease fittings in order to avoid any contamination of the grease and replace any damaged grease fittings.
- Page 31 Models: EN-9F3B / EN-12B / EN-12F4 Models: EN-9F3B / EN-12B / EN-12F4 / EN-6400 / EN-6500 / EN-6600 / EN-6700F4 EN-6800 (Figures 66 a 68). BEARINGS (Grease fittings A, B, C, D, E e F). fig.69 In models EN-9F3B, EN12B and EN-12F4, keep t h e C U T T I N G A D J U S T M E N T G E A R S lubricated (G) fig.69.
- Page 32 TRANSMISSION GEARBOX (A). Models EN-9F3B / EN-12B and EN-12F4. Lubrication: The first time the machine is operated, add 1 liter of oil. First change the oil after 50 hours of operation. The next changes are after 300 hours of operation.
- Page 33 Technical characteristics PRODUCTION Required power (hp) Production Rotor rotation (kg/h) (RPM) Electric Gasoline Diesel EN-9F3B 1500/7500 1600 5 a 10 8 a 10,5 7 a 8 EN-12B 2500/11500 1600 10 a 15 10,5 a 12,5 10 a 13 EN-12F4 3000/15000...
- Page 34 BELTS (MOTOR ACTUATION) ELECTRIC ELECTRIC DIESEL / GASOLINA (High rotation) (Low rotation) EN-9F3B (2) B85 (2) B90 (2) B93 EN-12B (3) B81 (3) B85 (3) B97 EN-12F4 (3) B81 (3) B85 (3) B97 EN-6180 (2) A45 EN-6400 (2) B85 (2) B90...
- Page 35 DIMENSIONS (mm) - Machine with stand, unloader and pick-up nozzle-chutes LENGTH HEIGHT WIDTH EN-9F3B 1540 1430 1100 EN-12B 1580 1560 1210 EN-12F4 1580 1560 1210 EN-6180 1280 1140 1050 EN-6400 1540 1425 1100 EN-6500 1540 1520 1160 EN-6600 1580 1560...
- Page 36 Practical guideline SYMPTOM PROBABLE CAUSE SOLUTION Low production Not enough grain pick-up Pick-up is not constant and not enough quantity. Be careful not to exceed the recommended maximum amperage for the motor Belt(s) slippage Stretch the belt(s) Blockage The product get blocked due to Turn off the machine, remove low rotation of the motor, the excessive product and turn...
- Page 37 Additional information Key gauge table Torque table N.m Torque unit SILAGE CHOPPERS...
- Page 38 Technical Support The EN series is identified by a serial number, engraved on a plate (1), located on the machine housing. Write the serial number of your harvester here: Instruction manual...
-
Page 41: Introducción
En ninguma hipótesis, utilice la máquina sin las respectivas protecciones. La reproducción de este manual no es permitida sin la previa autorización por escrito de Nogueira Indústria e Comércio de Implementos e Máquinas Agrícolas S/A. -
Page 42: Table Of Contents
Certificado de garantía Control de garantía Notas: 1- Nogueira tiene como objetivo la constante actualización y perfeccionamiento de sus productos, reservándose el derecho de introducir modificaciones en sus componentes y accesories sin aviso previo. 2- Las ilustraciones contenidas en este manual son meramente ilustrativas. Todas las instrucciones de seguridad deberán ser tenidas en cuenta para ambas configuraciones de... -
Page 43: Conociendo La Ensiladora
Conociendo la Ensiladora Modelo EN-6180 PICO DE SALIDA ROTOR ROMPE-CHORRO RODILLOS ALIMENTADORES PICO DE CORREA DE ALIMENTACIÓN CAMBIO DE CORTE CABALLETE SENTIDO fig.01 DE ROTACIÓN Modelo EN-6400 / EN-6500 / EN-6600 / EN-6700F4 / EN-6800 PICO DE SALIDA ROMPE-CHORRO ROTOR RODILLOS ALIMENTADORES PICO DE... - Page 44 Conociendo la Ensiladora Modelo EN-9F3B / EN-12B / EN-12F4 PICO DE SALIDA ROTOR ROMPE-CHORRO RODILLOS ALIMENTADORES PICO DE ALIMENTACIÓN CAJA DE CAMBIO DE CORTE CABALLETE fig.03 SENTIDO DE ROTACIÓN Manual de instrucciones...
-
Page 45: Medio Ambiente
Recomendamos que lo lea atentamente antes de utilizar la máquina por primera vez. Si ocurre cualquier duda, por favor, entre en contacto con nosotros a través de su revendedor Nogueira o de nuestro Departamento de Asistencia Técnica. - Page 46 Seguridad - Vistase apropiadamente para operar la PRECAUCIONES DE SEGURIDAD máquina. Prenda el cabello largo y no use ropas - Lea el manual de instrucciones antes de demasiado largas. Remueva anillos, cadenas y arrancar la máquina. Manténgase atento y demás elementos que puedan prenderse en las respete todas las recomendaciones de uso y piezas o mecanismos en movimiento.
- Page 47 Seguridad - No apoye la máquina sobre bloques de - Esté preparado si ocurre un accidente. cemento, ladrillos huecos u otros soportes que Mantenga un kit de primeros auxilios en un lugar puedan desmoronarse bajo el efecto de cargas de fácil acceso. Sepa cómo utilizarlo. prolongadas.
-
Page 48: Adhesivos De Seguridad
Adhesivos de seguridad Lea el manual de instrucciones antes de Apague la fuente de accionamiento (motor encender la máquina. Manteniéndose o tractor) antes de realizar servicios de a t e n t o y r e s p e t a n d o t o d a s l a s mantenimiento, regulado, lubricación, recomendaciones de uso y seguridad, limpieza etc., en la máquina. -
Page 49: Aplicación
NUNCA UTILIZAR LA ENSILADORA SIN accionados por tractor). LA TAPA DE PROTECCIÓN DEL PICO. - Engranajes de cambio de corte números 8 y 16 (solamente en los modelos EN-9F3B, EN-12B y ý EN-12F4). fig.07 - No permita que la tapa de protección sea removida. -
Page 50: Montaje
MONTAJE MONTAJE Para facilitar el transporte, las picos de COLOCACIÓN DEL PICO DE SALIDA (PICO a l i m e n t a c i ó n y d e d e s c a r g a s i g u e n ALTA O PICO BAJA). -
Page 51: Accionamiento Con Motor Eléctrico
Accionamiento con motor eléctrico - La instalación de motores eléctricos debe ser realizada por un profesional especializado. El dimensionamiento de los cables y la utilización de dispositivos de arranque y parada deben estar en conformidad con las normas de seguridad vigentes. - Se recomienda instalar la máquina en un lugar plano, limpio, libre de aceite, grasa, astillas, protegido del sol y de la llubia. - Page 52 Accionamiento con motor eléctrico (continuación) BLINDAJE BLINDAJE EXTERNO INTERNA POLEA DE LA MÄQUINA fig.16 fig.18 3- Coloque el blindaje interno y recoloque la 5- Estire las correas utilizando el estirador polea de la máquina. existente en el caballete. Coloque a blindaje externo de las correas.
- Page 53 Accionamiento con motor eléctrico (continuación) Modelos: EN-9F3B / EN-12B / EN-12F4 / EN-6400 / EN-6500 / EN-6600 / EN-6700F4 / EN-6800. La base metálica para montaje de la ensiladora con motor eléctrico posee apoyos especiales de goma que evitan la fijación del conjunto en el suelo.
-
Page 54: Accionamiento Con Motores A Diesel O Gasolina
Accionamiento con motores a diesel o gasolina La base metálica para montaje de la ensiladora con motores a diesel o a gasolina posee apoyos especiales de goma que evitan la fijación del conjunto al suelo. fig.25 MÁQUINA fig.28 2- Colocar el motor sobre las guías de la base MOTOR (figura arriba). -
Page 55: Accionamiento Por Tractor
Accionamiento por tractor Las ensiladoras Nogueira pueden ser adquiridas con accesorios propios para accionamiento por el toma de fuerza de tractores agrícolas y están disponibles en las siguientes versiones: fig.30 fig.29 Con AT 90: Accesorio para tractor, con Con AT: Accesorio para tractor, convencional. -
Page 56: Acoplamiento Al Tractor Y Colocación Del Cardán
- Las instrucciones para el corte, lubricación, mantenimiento y colocación de la cadena de protección del cardán, se encuentran descritas en el folleto suministrado por el fabricante. - Es de responsabilidad exclusiva del revendedor autorizado Nogueira, ejecutar la preparación del cardán y el primer accionamiento de la máquina. -
Page 57: Antes De Arrancar La Ensiladora
Tamaños de corte: EN-9F3B / EN-12B En las ensiladoras modelo EN-9F3B e EN-12B, los tamaños de corte son determinados por el par de engranajes utilizadas. Las figuras abajo muestran todos los cortes posibles y los pares de engranajes correspondientes. -
Page 58: Tamaños De Corte: En-12F4
Los engranajes 4 y 32 (opcionales) no son suministrados con la máquina, pueden ser adquiridos en un revendedor Nogueira. COMO CAMBIAR EL CORTE (Modelos: EN-9F3B, EN-12B y EN-12F4) 1- Retire la tapa de la caja de engranajes B, presionándola hacia arriba. -
Page 59: Tamaños De Corte: En-6180, 6400, 6500, 6600, 6700F4
Tamaños de corte: EN-6180 / EN-6400 / EN-6500 EN-6600 / EN-6700F4 En las ensiladoras de la serie 6000, modelos EN-6180 / EN-6400 / EN-6500 / EN-6600 y EN6700F4, los tamaños de corte son determinados por el posicionamiento de la correa en las poleas, conforme muestran las figuras abajo. -
Page 60: Tamaños De Corte: En-6800
Tama ños de corte: EN-6800 En la ensiladora modelo EN-6800, los tamaños de corte son determinados por el posicionamiento de las poleas, conforme muestran las ilustraciones a continuación. fig41 COMO CAMBIAR EL CORTE (Solamente en el modelo: EN-6800) Para cambiar el corte de la EN-6800, invierta las poleas de eje (fig.42). -
Page 61: Operación
- Si el sentido de rotación del motor está correcto; - Si las correas están debidamente estiradas. En los modelos EN-9F3B, EN-12B e EN-12F4,antes de primer accionamiento, recuerde poner aceite en la caja de transmisión, conforme indiciado en este manual. -
Page 62: Mantenimiento
Mantenimiento Su Ensiladora Nogueira necesita un mínimo de mantenimiento para su perfecto funcionamiento y máxima durabilidad. Para tanto, algunos cuidados son importantes: - Limpiar la máquina regularmente; - Mantener la máquina debidamente lubricada; - Substituir piezas gastadas o dañadas. Durante las primeras horas de trabajo, reajuste todos los tornillos de fijación y verifique el tensionamiento de las correas. -
Page 63: Regulado De Las Cuchillas Con La Contracuchilla
CONTRACUCHILLA, conforme descrito en el punto a continuación. Regulado de las cuchillas con la contracuchilla Modelos: EN-9F3B / EN-12B / EN-12F4 / EN-6400 / EN-6500 / EN-6600 / EN-6700F4 / EN-6800 Se debe dejar una holgura de 0,5 mm, aproximadamente, entre cuchilla y contracuchilla. -
Page 64: Substitución De Las Cuchillas
Cuchillas dañadas o desgastadas, que no posibiliten el regulado con la contracuchilla, deben ser inmediatamente substituidas. Siempre substituya el juego completo para no desbalancear el rotor. Para retirar las cuchillas, retire los tornillos de fijación. Importante! Utilice solamente las cuchillas originales Nogueira. Demás modelos TORNILLOS DE FIJACIÓN fig.51... -
Page 65: Contracuchilla
Contracuchilla La contracuchilla desgastada dificulta el picado de la forrajera, exigiendo más de la máquina y del motor. Al observar desgaste, substituya la contracuchilla. SUBSTITUCIÓN DE LA CONTRACUCHILLA Con la ensiladora apagada: 1- Retire los espirales C y D; 2- Sujete en el alza y levante la tapa, trayendo el rodillo dentado hacia adelante, conforme muestra la figura 54;... -
Page 66: Espirales Del Rodillo Superior
Espirales del rodillo superior Con vistas a garantizar la uniformidad en la alimentación y precisión en el corte, el rodillo superior de su ensilaldora posee sistema de articulación con espirales laterales que alivian la entrada del producto. Si la máquina presenta dificuldad en la alimentación, verifique la presión de los espirales. Para aumentar la presión de los espirales, proceda como descrito a continuación: fig.59 fig.60... -
Page 67: Tensionamiento De La Correa De Cambio De Corte
Tensionamiento de la correa de cambio de corte Mantenga las correas adecuadamente estiradas. La tensión debe ser solo lo suficiente para evitar que la correa patine (se deslice). Recuerde que correas flojas resbalan y se desgastan prematuramente. Por otro lado, correas excesivamente tensionadas sobrecargan los componentes de la transmisión, pudiendo dañarlos. -
Page 68: Lubricación
Lubricación La lubricación regular es indispensable para el buen desempeño y durabilidad de su ensiladora. Se recomienda la utilización de grasa de buena calidad, especial para rodamientos, a base de jabón de litio, clasificación NLGI 2 EP. Lubricar con el auxilio de una engrasadora, los puntos indicados, cada 10 horas de trabajo. Antes de lubricar, limpie bien las engrasadoras para evitar la contaminación de la grasa y substituya engrasadoras dañadas. - Page 69 Modelos: EN-9F3B / EN-12B / EN-12F4 Modelos: EN-9F3B / EN-12B / EN-12F4 / EN-6400 / EN-6500 / EN-6600 / EN-6700F4 EN-6800 (Figuras 66 a 68). RODAMIENTOS (Engrasadoras A, B, C, D, E e F). fig.69 En los modelos EN-9F3B, EN-12B y EN-12F4, mantener lubricados los ENGRANAJES DE CAMBIO DE CORTE (G) Fig.69.
-
Page 70: Conservación
CAJA DE TRANSMISIÓN(A). Modelos EN-9F3B / EN-12B y EN-12F4. Lubricación: Antes del primer accionamiento de la máquina, cargar con 1 litro de aceite. Cambiar el aceite después de las primeras 50 horas de trabajo. Cambios siguientes cada 300 horas de trabajo. -
Page 71: Características Técnicas
Características técnicas PRODUCCIÓN Potencia necesaria (cv) Producción Rotacción (kg/h) Rotor (RPM) Eléctrico Gasolina Diesel EN-9F3B 1500/7500 1600 5 a 10 8 a 10,5 7 a 8 EN-12B 2500/11500 1600 10 a 15 10,5 a 12,5 10 a 13 EN-12F4 3000/15000... - Page 72 CORREAS (ACCIONAMIENTO POR MOTOR) ELÉCTRICO ELÉCTRICO DIESEL / GASOLINA (ALTA ROTACIÓN) (BAJA ROTACIÓN) EN-9F3B (2) B85 (2) B90 (2) B93 EN-12B (3) B81 (3) B85 (3) B97 EN-12F4 (3) B81 (3) B85 (3) B97 EN-6180 (2) A45 EN-6400 (2) B85...
- Page 73 DIMENSIONES (mm) - Máquina con caballete, picos de salida y alimentación LARGO ALTURA ANCHO EN-9F3B 1540 1430 1100 EN-12B 1580 1560 1210 EN-12F4 1580 1560 1210 EN-6180 1280 1140 1050 EN-6400 1540 1425 1100 EN-6500 1540 1520 1160 EN-6600 1580...
-
Page 74: Guía Practica
Guía practica SÍNTOMA CAUSA PROBABLE SOLUCIÓN Baja producción Alimentación deficiente Alimentar de forma continua y en cantidad suficiente. Tener el cuidado de no superar el amperaje máximo indicado en el motor Correa(s) patinando Estirar la(s) correa(s) Taponamiento El producto se acumula por Apagar la máquina, remover el pérdida de rotación del motor, exceso de producto y arrancar... -
Page 75: Informaciones Adicionales
Informaciones Adicionales Tabla de medidas de las llaves Tabla de Torques Unidad de par de apriete en N.m ENSILADORAS... -
Page 76: Asistencia Técnica
Anote aquí el número de serie de la ensiladora: Al enviar comunicaciones o requerir auxilio de la asistencia técnica Nogueira, siempre informe el número de serie y el modelo de la máquina, presentes en la plaqueta de identificación. Al substituir piezas, utilice siempre artículos orinales Nogueira. Solamente las piezas originales son fabricadas de acuerdo con los diseños, materiales... -
Page 77: Certificado De Garantía
09 (nueve) últimos meses - garantía adicional concedida por Nogueira Máquinas Agrícolas. 2- Consiste en la presente garantía, en el compromiso de Nogueira en reparar o sumi- nistrar gratuitamente, en su fábrica, las piezas que a su exclusivo juicio presentan defectos de fabricación. - Page 78 1. Llene el TÉRMINO DE RECIBO con la información solicitada y fi rme; 2. Dispare el TÉRMINO DE RECIBO completado y la factura de venta; 3. Acceder al sitio www.nogueira.com.br y haga clic en la pestaña “TÉRMINO DE RECIBO” o acceda nogueira.industriasnb.com/entrega ;...
- Page 81 NOGUEIRA Ind. Com. Impl. Máquinas Agrícolas S.A. St./R: Fernando de Souza, 533 - Distrito Industrial - CEP 13877-775 Tel/Phone.: (19) 3638.1500 - Fax: (19) 3638.1556 nogueira@nogueira.com.br - www.nogueira.com.br CNPJ: 08.510.974/0001-27...
Need help?
Do you have a question about the EN-9F3B and is the answer not in the manual?
Questions and answers