Table of Contents
Advertisement
Quick Links
The exclamation point within an equilateral triangle is intended to alert the
user to the presence of important operating and maintenance (servicing)
instructions in the literature accompanying the appliance.
CAUTION
To reduce the risk of electric shock, do not remove the cover (or back). No
1.
user-serviceable parts inside. Refer servicing to qualified service personnel.
The manufacturer should not hold responsibility for the damage caused by any
2.
substitutions and modifications of the product without authorization from the
manufacturer or authorized unit
WARNING
The device should not be exposed to dripping or splashing and no objects filled with
liquids should be placed on the device.
Important Safety
.
EN-1
Instructions
Advertisement
Table of Contents

Subscribe to Our Youtube Channel
Related Manuals for Prestigio GeoVision 5850HDDVR


Summary of Contents for Prestigio GeoVision 5850HDDVR
- Page 1 Important Safety Instructions The exclamation point within an equilateral triangle is intended to alert the user to the presence of important operating and maintenance (servicing) instructions in the literature accompanying the appliance. CAUTION To reduce the risk of electric shock, do not remove the cover (or back). No user-serviceable parts inside.
- Page 2 Accessories Prestigio GeoVision 5850HDDVR–Accessories List ITEM NAME Car Charger USB Cable Car Mount User Manual Warranty Card Document CD EN-2...
-
Page 3: View Of Main Unit
View of Main Unit Prestigio GeoVision 5850HDDVR Front and Side View LCD Touch Screen Tap the screen with touch pen or finger to select menu commands or to enter information. Battery Status Indicator The indicator glows in bright green color when battery is fully charged and in red color when charging. -
Page 4: Rear And Top View
View of Main Unit Prestigio GeoVision 5850HDDVR Rear and Top View Speaker Emit sound, voice or music. Camera lens Take photos or record videos when you’re driving Reset Button Press to reboot the device. Power Button Press to power the device ON/OFF. -
Page 5: Device Connections
Device Connections Inserting microSD Card To insert a microSD card, place the connector towards the device and the card label towards the front side of the device. To remove a microSD card, gently press the edge of the card to release the safety lock and pull the card out of the slot. -
Page 6: Connecting To Car Charger
Device Connections Connecting to Car Charger Insert the USB connector into the appropriate USB port. Insert car charger connector into vehicle 12V accessory/cigarette socket to start charging. NOTE: Please connect the car charger to vehicle 12V accessory/cigarette socket after the vehicle engine is started to protect the device from sudden current impulse. -
Page 7: Cautions On Battery Charging
Cautions on Battery Charging About Rechargeable Battery The device is equipped with a built-in rechargeable battery. Please fully charge the battery (for at least 5 hours) before initial use. The battery status indicator glows in red color when charging and turns bright green color when charging is complete. Charging time is approximately 4 hours. -
Page 8: Getting Started
Getting Started 1. Press and hold Power Button to turn on the device. 2. Shortly after the greeting screen is shown, the main menu will be displayed. 3. Tap the corresponding buttons with touch pen included to navigate through various functions. 4. -
Page 9: Device Settings
Device Settings In the main menu, tap on to enter the device settings. You can scroll on the screen upwards downwards display other settings. Configure the wireless connections, eg: Wi-Fi Wireless & Networks Adjust sound volume, mute device, or enable warning messages. Sound Set the screen brightness, auto-rotate, animation &... -
Page 10: Dvr Function
DVR Function Tap on DVR icon on the main menu to start using DVR function. Tap on to start or stop video recording; Tap on to play the recorded video; Tap on lock key to lock the recording video. Tap on to format the TF card &... - Page 11 Device Settings To set the parameters of car DVR function, tap the icon to enter the setting options interface as follows: Picture- in-Picture function: tap to prompt the dialog box, select open, the car DVR window will appears on other interface when recording, double tap on the window to enter the recording interface.
- Page 12 Connecting to Wi-Fi 1. Select Settings icon to access the list of options. Select Wireless & networks. 2. To turn on/off Wi-Fi, simply slide your finger rightward/leftward on the control bar. 3. The device will scan for available Wi-Fi networks and display them at the bottom of the screen.
-
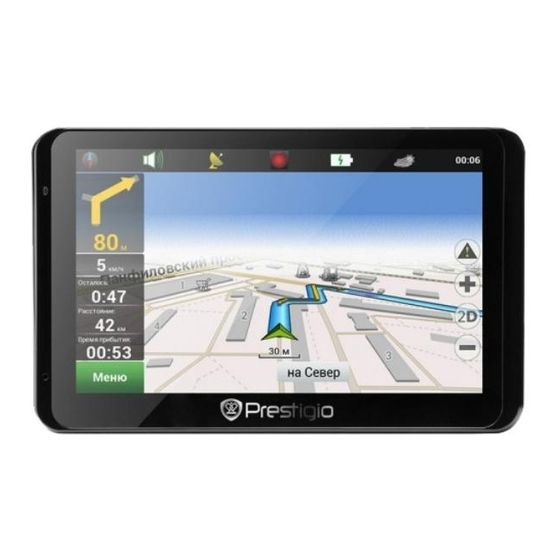
Page 13: Program Interface
Program interface Name Function Sound Sound menu opens by pressing this button Context menu opens by pressing this button. In this menu switches the orientation of the map («North up» - lock icon is next to the compass, «Rotate in accordance with the Compass movement»... - Page 14 Program interface Name Function Progress-bar Bar is filled in as you approach the place of maneuver. Displays the traffic lanes with valid maneuvers at the next Traffic lane intersection. Shows the name of the street you are currently driving along. Information Available only if GPS/GLONASS connection is established.
- Page 15 Program interface Name Function «Save» Saves current marc on map as a waypoint. «Cursor» Shows the point menu. EN-15...
- Page 16 Program interface Name Function You can set the mark by taping on the map. You can save this Mark on the mark as a waypoint, add it to the route or see object’s characteristics the mark was set on. Track record.
- Page 17 Autorouting Route to the objects. To create a route to the object with known address, press the «Menu» button at the lower left corner of the screen [1]. Then select «Find», «By address» [2]. Press the «Select country» button and enter its name [4]. To minimize the keyboard, press the icon at the right top of the screen.
- Page 18 Autorouting Route to the selected point on the map. You can set the route to any point on the map. This point will be the end of the route, your current position will become the start of the route. Create a mark on the route by pressing any place on the map[1].
-
Page 19: Additional Features
Note: For more detailed information regarding the functionality of Navitel software, please, refer to the complete user manual on CD, or to www.prestigio.com. EN-19... -
Page 20: Troubleshooting
Troubleshooting Take the steps described in the tables below to solve simple problems before contacting customer service centers. NOTE: Immediately turn off the device and disconnect the power adapter if the device is not working properly. Never try to repair the unit without authorized personnel for it may damage the unit. - Page 21 PC Connection To establish connection with PC for data access and synchronization, please execute setup file included in the Driver/Documentation CD or download the file from Microsoft website to install: Microsoft Active Sync® software for operating system Microsoft XP or earlier versions (http://www.microsoft.com/windowsmobile/en-us/downloads/microsoft/activesync-dow nload.mspx)
-
Page 22: Technical Specifications
Quick Start Guide. Prestigio hereby states that this GPS Navigator complies to basic requirements and another relevant regulations given by the EU directive1999/5/ES. Full version of the declaration of conformity is available on http://www.prestigio.com/compliance.
Need help?
Do you have a question about the GeoVision 5850HDDVR and is the answer not in the manual?
Questions and answers