
Related Manuals for ePropulsion Evo Control System

Summary of Contents for ePropulsion Evo Control System
- Page 1 Evo Control System Installation Guide 2020.12 Version 1.0 Copyright © 2020 ePropulsion All Rights Reserved...
-
Page 3: Acknowledgement
Acknowledgement Thanks for choosing ePropulsion products, your trust and support in our company are sincerely appreciated. We are dedicated to providing high-performance products and accessories. Welcome to visit www.epropulsion.com and contact us if you have any concerns. Using This Manual Before use of the product, please read this user manual thoroughly to understand the correct and safe operations. -
Page 4: Product Identification
Product Identification Below picture indicates the serial numbers of Evo Remote Control and Evo Tiller. Please note the position of the serial numbers and record them for access to warranty service and other after-sale services. Model: Evo Remote Controller Serial No.: DERCXXXXXXX Figure 0-1 Model: Evo Tiller Serial No.:... -
Page 5: Table Of Contents
Table of content Acknowledgement ..................1 Using This Manual ..................1 Symbols ....................1 Product Identification ................2 1 Product Overview ................... 4 1.1 In the Package ..................4 1.2 Parts and Diagrams ................. 5 1.3 Specification .................... 6 2 Installation ..................... 7 2.1 Mounting the Evo Remote Control ............ -
Page 6: Product Overview
Control) Room 702 Navy 6.0R Kowloon Bldg Fixing Guide 555 Nathan Rd For Remote Controller Kowloon, Hong Kong Plotting Scale - 1:1 www.epropulsion.com Screw Size - M6×12mm User Manual, Warranty Card Warranty Invitation Card 1 set & Invitation Card Kill Switch... -
Page 7: Parts And Diagrams
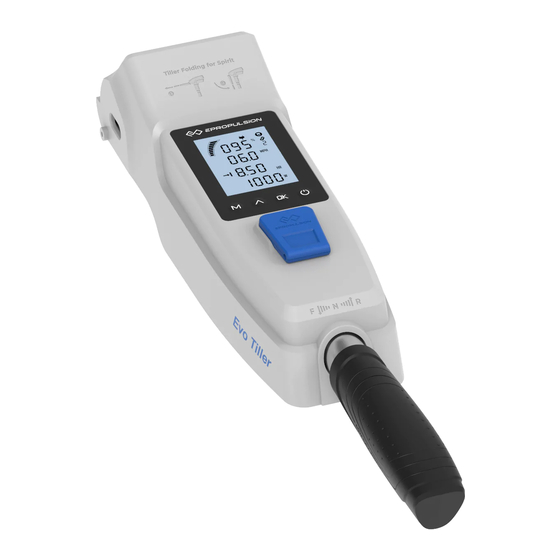
1.2 Parts and Diagrams Throttle Handle Display Panel Buttons Solar Panel Kill Switch Communication Port (Bottom) Figure 1-1 Display Panel Buttons Kill Switch Throttle Handle Communication Port Figure 1-2... -
Page 8: Specification
1.3 Specification Evo Remote Control Communication Wireless / Wired Communication Distance ≤10 m Weight 0.65 kg / 1.43 lbs. 193 mm x 130 mm x 112 mm / Dimension (L x W x H) 7.6” x 5.1” x 4.4” Evo Tiller Communication Wired Weight... -
Page 9: Installation
2 Installation 2.1 Mounting the Evo Remote Control Refer to the remote control fixing guide to punch holes on the ship board, and use the screws to lock the remote control box as shown in Figure 2-1. Hull Screw Figure 2-1 2.2 Mounting the Evo Tiller 2.2.1 Mounting on the SPIRIT 1.0 Evo 1. Install the tiller to the machine (Figure 2-2). -
Page 10: Mounting On The Navy 3.0 Evo/Navy 6.0 Evo
2.2.1 Mounting on the NAVY 3.0 Evo/NAVY 6.0 Evo 1. Install the tiller to the machine (Figure 2-4). 2. Insert the handle shaft into the hole to the end and lock it clockwise (Figure 2-5). Tiller Shaft Figure 2-4 Figure 2-5... -
Page 11: Wiring
3 Wiring 3.1 Connecting the remote control and the outboard If the remote control needs to be connected with the machine by wire, a communication cable is needed to connect the machine and the remote control Communication port (Figure 3-1). Communication Cable Figure 3-1 3.2 Connecting the tiller and the outboard... -
Page 12: Charging
4 Charging The Evo Remote Control has a built-in lithium battery for power supply. The battery will be charged automatically under normal use: get charged by solar power or wired connection. The Evo Tiller does not have a built-in battery and needs to be connected to the machine. - Page 13 Please follow the below steps to charge the Remote Control by wired connection. First, connect the Remote Control to the outboard motor by a communication cable first (Figure 4-3); Then, connect the outboard motor to the battery. * The communication cable needs to be purchased separately.
-
Page 14: Use Of Kill Switch
5 Use of Kill Switch • Locate the kill switch to the right place on the Evo Remote Control / Evo Tiller and tie its lanyard to your wrist or life jacket. • Stop the outboard in emergency by detaching the kill switch. • To run the motor again, first attach the kill switch then start the motor. -
Page 15: Warranty
6 Warranty The ePropulsion limited warranty is provided for the first end purchaser of an ePropulsion product. Consumers are entitled to a free repair or replacement of defective parts or parts which do not conform with the sales contract. This warranty operates in addition to your statutory rights under your local consumer law. -
Page 16: Out Of Warranty
Free warranty is not transferable and will not be reissued. Within the limits of the applicable laws, the warranty policies of ePropulsion may update without prior notice. The latest version is available at our website www. epropulsion.com. 6.2 Out of Warranty Make sure the product is properly packed during delivery, the original ePropulsion package is recommended. - Page 17 4. In case your warranty claim is rejected, an estimated repair charge with round trip delivery cost will be sent for confirmation. ePropulsion authorized service point will conduct maintenance accordingly only after your confirmation. If warranty expires, you can still enjoy maintenance services from authorized...
- Page 20 Thanks for reading this user manual. If you have any concerns or find any problems while reading, please don't hesitate to contact us. We are delighted to offer service for you. Guangdong ePropulsion Technology Limited Website: www.epropulsion.com Email: service@epropulsion.com...
Need help?
Do you have a question about the Evo Control System and is the answer not in the manual?
Questions and answers