
Related Manuals for Rondish Nexus


Summary of Contents for Rondish Nexus
- Page 1 Rondish Company Limited Nexus Call System User Instructions V1.7 (2 March 2021)
-
Page 2: Table Of Contents
1. PRODUCT OVERVIEW ..........................4 1.1 System Layout ..........................4 1.2 Compatible Equipment ........................6 1.3 General Operation .......................... 9 1.3.1 Nexus Behavior Table ......................9 2. USER INTERFACE ............................ 10 2.1 Home Screen ..........................10 2.2 Alarm Screen ..........................11 2.2.1 Display Details ........................ - Page 3 NEXUS CALL SYSTEM by Rondish 4. TROUBLESHOOTING ..........................26 5. FCC & CE warning statements………………………………………………………………………………………………….…26-27...
-
Page 4: Product Overview
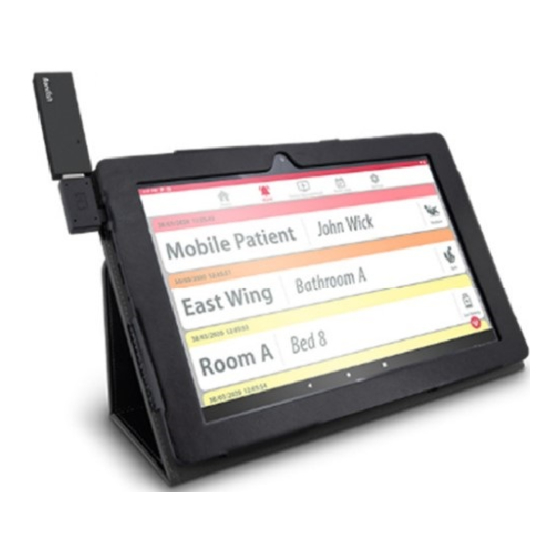
Nexus works using a 10” Android tablet for the display – the tablet comes with a protective folio for placement on a desk, or can be wall-mounted with the use of an optional bracket. - Page 5 NEXUS CALL SYSTEM by Rondish...
-
Page 6: Compatible Equipment
• Includes mounting screws • Available in black or white • TVB-11 TV Box for corridor displays Allows Nexus software to run on a standard • computer monitor Connect with paging receiver for a large • corridor display GP2009TR Paging transmitter Signals to remote displays •... - Page 7 NEXUS CALL SYSTEM by Rondish NEC-12 Patient handset Call button for patient access from the bed • RJ10 plug connects with WCP-11C • USB break connection • Includes wall-mount bracket and screws • WCP-11 Waterproof call/reset point Call and reset buttons •...
- Page 8 NEXUS CALL SYSTEM by Rondish NGM-21 Bed monitor Room controller for integrated falls • management system Pause & Reset alarms • Works with bed/chair/floor sensormats • Uses 3 x AA alkaline batteries • Low battery alert • WMBP-20 Sensorpads Triggers alarm from patient bed or chair exit.
-
Page 9: General Operation
Rondish 1.3 General Operation Nexus follows generally accepted principles of a nurse call system as described in the UL and HTM-08 standards. Patient calls should be reset at location by the nurse or caregiver as soon as can reasonably be achieved. -
Page 10: User Interface
2.1 Home Screen This is the default view of the application, and Nexus will return to this screen after alarms have been reset. Icons at show the Nexus screens... -
Page 11: Alarm Screen
Includes time of the event with priority level, location, and type of alarm. When all alarms have been reset, Nexus will automatically revert to the Home Screen after several seconds. Color band – this indicates the alarm priority, with a time stamp shown on the left side Emergency –... -
Page 12: Admin Reset
Priority 3 Low battery Priority 4 * A bed monitor displays when pairing the device to Nexus. During an alarm Nexus will display either a bed, chair, or floor type alarm (refer to Section 2.3.1 for details) 2.2.2 Admin Reset There may be times when an event needs to be cleared from the central display panel. -
Page 13: Dongle Error
Rondish 2.2.3 Dongle Error An error message will display if the receiver dongle is removed or loses connection while Nexus is active. Your system cannot function without this receiver connected, so Nexus will prompt you to resolve this before any further action can be taken. - Page 14 NEXUS CALL SYSTEM by Rondish If Nexus does not already have this device in memory it will create a new entry with the 6-digit device ID, device type and notification that new hardware has been detected. The device ID will show on the grey color band at the top.
-
Page 15: Device Location
From the Device Management tab, trigger a reset signal on the door sensor to add the device into Nexus memory. This can be done by applying a magnet over the blue dot on the side of the door sensor. (refer to Section 3.4 for additional details) 2.3.2 Device Location... -
Page 16: Delete Device
2.3.3 Delete Device If you need to remove something from memory, swipe left over the device. Nexus will prompt you to confirm or cancel the device removal 2.4 Event Log The Event Log will show the location, event type, time of initiation and duration of all events from the previous 24 hours. -
Page 17: Settings
The Settings tab is where you will set the default name to display on the Home screen, change the Admin PIN, or export the data log. Pressing this tab requires inputting a 6-digit Admin PIN to access. If using Nexus for the first time the default code is 123456 2.5.1 Change Settings This will allow you to add a company name to display on the Home Screen or update the Admin PIN. -
Page 18: Backup/Restore
This will allow you to transfer the Event Log to a CSV file that is openable using MS Excel. Insert a USB storage device and tap the Export Log button. Nexus will prompt you to confirm the data export. After inserting the USB drive into a PC, the file will be stored in Android/data/Nexus/events_date. -
Page 19: Installing Nexus
2. Change PIN and enter name of organization (optional) in the Settings 3. Pair devices with Nexus and define how each should display during a call – refer to Section 2.3 for details of adding and renaming devices. 4. Pair devices with indication lights to extend wireless coverage (optional) 5. -
Page 20: Indication Lights
Corridor lights provide a visual indication when a call is active in the area, have a buzzer with adjustable volume for audible indication, and will expand the wireless range of Nexus. Follow the below steps to configure lights with your Nexus system. - Page 21 NEXUS CALL SYSTEM by Rondish When ON, a reset button paired with this light will reset all active • alarms associated with this light. If multiple calls are active the light will reset all alarms. When OFF, a reset button paired with this light will reset only the •...
- Page 22 NEXUS CALL SYSTEM by Rondish Note: To remove light to change batteries, press the release level at the bottom of the mounting bracket and lift. Light Displays: White – bath, bed/chair/floor, motion sensor Red – bedhead, pendent Flashing – emergency...
-
Page 23: Bed Monitors
Rondish 3.3 Bed Monitors Nexus supports Rondish CordFree (NGM-21) monitors for a wireless fall management solution. These are delivered pre-set for single patient use (F1/t1). Step 1: Power the Device – NGM-21 monitors operate on 3 x AA alkaline batteries Step 2: Select Settings –... -
Page 24: Wall-Mounting The Panel
Set Lock Time – each number represents a multiple of 5s • Step 3: Add to Nexus – Enter Device Management tab on Nexus. Touch a magnet to the blue dot on the DMS-02 to send a pairing signal. Select a display ID for the door. -
Page 25: Updating Nexus
*Battery life assumes volume set to silent, alarm duration is 1min each, and signal bump function turned ON. 3.7 Updating Nexus There may be updates to the Nexus app since your purchase – the version number is displayed at the bottom of the Home screen. If you would like to update the software, visit www.rondish.com/nexus-upgrade... - Page 26 Symptom Possible Solutions No power Check AC input to Nexus. If the NDP-11 tablet has a drained battery, it may need to charge for 1-2 hours before being turned back on again Wireless signals not Check that each device is properly powered •...
- Page 27 Hereby, Rondish Company Ltd declares that the above radio equipment types are in compliance with Directive 2014/53/EU. The full text of the EU declaration of conformity is available at the following internet address: www.rondish.com .
Need help?
Do you have a question about the Nexus and is the answer not in the manual?
Questions and answers