Advertisement
Quick Links
TJERNLUND PRODUCTS, INC.
1601 Ninth Street • White Bear Lake, MN 55110-6794
PHONE (800) 255-4208 • (651) 426-2993 • FAX (651) 426-9547
Visit our web site • www.tjernlund.com
READ OWNERS INSTRUCTIONS CARE-
FULLY PRIOR TO INSTALLATION.
THESE INSTRUCTIONS MUST REMAIN
WITH EQUIPMENT. DO NOT DESTROY.
The AireShare™ Level to Level Ventilators distribute air from one conditioned space to another. Virtually every home has temperature
differentials on different levels of the house. The AireShare™ moves air from one level of the house to a room on another level of the
house that is uncomfortably hot or cold. This air movement helps to destratify stagnant air in homes, improve ventilation rates and make
both rooms more comfortable.
SPECIFICATIONS
Blower:
75 cfm
Motor:
115 Volts ~ 60 Hz
25 Watts ~ 0.50 amps maximum
Impeller:
Transtangental, cross-flow
Sound:
42 db (1.15 Sones)
DIMENSIONS:
White Ceiling Grille:
5 1/2" x 13 1/2" (flush)
Brown Floor Grille:
5 3/4" x 13 3/4" (flush)
Blower Housing Rough-in: 4 1/16" x 12 5/16"
Outer Sleeve Rough-In:
4 5/16" x 12 5/16"
Expansion Depth*
8 3/4" to 16 1/2"
(*top of floor to bottom of ceiling)
Every Tjernlund AireShare™ Level to Level Ventilator is electrically factory line tested before shipment.
After opening carton, inspect thoroughly for shipping damage. Impeller should rotate freely and all electrical wires and connections
should be secured. If any damage is found, notify freight carrier and your distributor immediately and file a concealed damage claim.
The AireShare™ Ventilator must be installed by a qualified installer in accordance with these instructions and all local codes or in their
absence in accordance with the latest editions of the International Residential Code and International Electrical Code. Improper installa-
tion can create a hazardous condition such as fire, electric shock or personal injury. To reduce these risks significantly, use this device
only in the manner intended by the manufacturer. If you have questions about proper usage of this device, call Tjernlund Products.
Always disconnect the AireShare™ Ventilator from its power source before installation and servicing.
IMPORTANT: An in depth investigation of the floor joist/truss layout is required prior to installation. Avoid a floor/ceiling cavity that is a
path for plumbing supply lines, drains, vents or ductwork. Also confirm foundation block and upstairs walls do not obstruct installation.
©2009 TJERNLUND PRODUCTS, INC. ALL RIGHTS RESERVED
TM
AIRESHARE
LEVEL TO LEVEL VENTILATOR
MODEL ASLL
DESCRIPTION
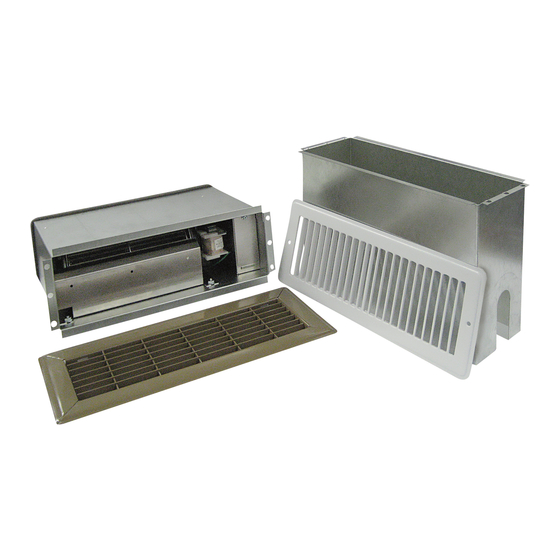
ASLL SPECIFICATIONS & COMPONENTS
GENERAL INFORMATION
INSTALLATION RESTRICTIONS
CEILING GRILLE
FLOOR GRILLE
EXPANSION DEPTH
P/N: 8504156
Advertisement

Subscribe to Our Youtube Channel
Related Manuals for TJERNLUND AIRESHARE ASLL


Summary of Contents for TJERNLUND AIRESHARE ASLL
- Page 1 To reduce these risks significantly, use this device only in the manner intended by the manufacturer. If you have questions about proper usage of this device, call Tjernlund Products.
-
Page 2: Installation
• The AireShare™ may not be used to exhaust hazardous or explosive materials or vapors. • The AireShare™ may not be used in kitchens or move moisture-laden air from sources such as bathrooms and kitchens. • The AireShare™ may not be used to move air from from a utility room containing gas or oil fuel heating equipment. WARNING: Disconnect power to the ASLL before servicing. - Page 3 3. Place ASLL Outer Sleeve template center alignment hole over drill bit or screw driver. Align template cutout lines parallel with baseboard and tape template to floor, (See Diagram C). Use a utility knife and cut out carpeting and pad along Outer Sleeve template lines denoted, (See Diagram D).
- Page 4 10. Using the (4) provided black screws, align holes on ASLL Blower Housing mounting bracket with holes in sheetrock mounting brack- et (utilized if ceiling is sheetrock or ceiling tile). Install the (4) screws straight up. The screws must grip the sheetrock mounting bracket small grip hole.
- Page 5 1. Proceed to step 2 if ceiling is unfinished. If ceiling is finished use a stud finder to locate the inside edges of the joist/truss cavity the ASLL will be installed between. Apply masking tape on ceiling along joist/trusses in the desired location ASLL will be installed in. Make sure a proper analysis as noted above has taken place before cutting hole in ceiling.
- Page 6 DIAGRAM H1 DIAGRAM I1 DIAGRAM J1 SNAP PROVIDED STRAIN RELIEF BUSHING PUSH WIRE UP TIGHT AGAINST ASLL BLOWER INSTALL SHEETROCK BRACKETS ON BOTH INTO ASLL ELECTRICAL BOX WITH 6-8” OF HOUSING AND INSERT THE ASLL THROUGH ENDS OF OPENING WITH LARGER HOLES IN WIRE IN ELECTRICAL BOX.
- Page 7 WIRING WIRING Disrupt power at circuit breaker to outlets within the joist/truss cavity you will be working. 1. Wire Blower into 120 VAC power source as shown in wiring connection diagram. NOTE: Optional 120 VAC wall switch or thermostat may be desired. 2.
-
Page 8: Maintenance
TJERNLUND LIMITED ONE YEAR WARRANTY Tjernlund Products, Inc. warrants to the original purchaser of this product that the product will be free from defects due to faulty material or workmanship for a period of (1) year from the date of original purchase or delivery to the original purchaser, whichever is earlier. Remedies under this warranty are limited to repairing or replacing, at our option, any product which shall, within the above stated warranty period, be returned to Tjernlund Products, Inc.
Need help?
Do you have a question about the AIRESHARE ASLL and is the answer not in the manual?
Questions and answers