Advertisement
Quick Start
LCD Module
Extra
Pins
LCD Panel
Interface
Interface (JA4)
LCD Application board V2
NOTE: This Quick Start Guide covers installation of the e
1. Installation
Do not connect the E1 debugger module until the software support has been installed.
1. Insert the DVD into your computer's DVD-ROM drive. The DVD should automatically run the installation program. If
the installer does not start, browse to the DVD root folder and double click on 'setup.exe'.
2. Windows™ 7 / Vista users may see "User Account Control" dialog box. If applicable, enter the administrator
password and click 'Yes'.
3. The installer welcome screen will open. Follow the on-screen instructions to install the RSK software. This process
will take several minutes.
Note:
When prompted to specify a different location for installing any of the tools, do not change the default location.
During installation of the GNURL78 tools an activation code may be required. The installer will provide instructions to
register for a free activation code.
The Windows driver signing dialog box may be displayed. Please accept the driver to continue.
4. After installation has completed successfully, click 'Finish'.
Renesas Starter Kit
for RL78/L12
Header
Application Headers
Application Headers
LCD Panel
Reset
Serial
Header
Switch
Port
User Switches
Analog Adjust
studio DVD.
2
DC Power
Jack
Power LED
E1
Header
User
LEDs
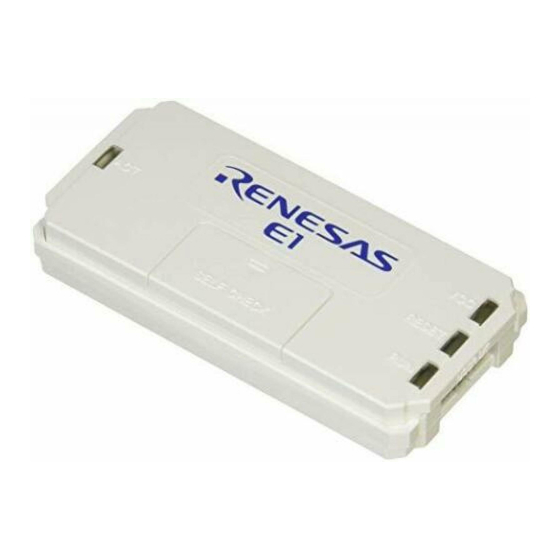
E1 Debugger
Advertisement
Table of Contents

Related Manuals for Renesas e1


Summary of Contents for Renesas e1
- Page 1 DVD. 1. Installation Do not connect the E1 debugger module until the software support has been installed. 1. Insert the DVD into your computer’s DVD-ROM drive. The DVD should automatically run the installation program. If the installer does not start, browse to the DVD root folder and double click on ‘setup.exe’.
- Page 2 6. Connect the E1 debugger module to the connector marked ‘E1’ on the RSK using the ribbon cable. 7. Connect the E1 debugger module to a spare USB port of your PC. The green ‘ACT’ LED on the E1 debugger will flash.
- Page 3 Once this is complete, debugging can be started by clicking the arrow next to the debug button (bug icon), and selecting ‘Debug Configurations…’. 20. Click the arrow next to the entry ‘Renesas GDB Hardware Debugging’ to expand the list. Select the configuration entry ‘Tutorial’.
- Page 4 The version of the compiler provided with this RSK is fully functional with no time restrictions, but requires registration before it can be used. 7. User Manuals User manuals can found in the Windows Start Menu. (Start Menu > All Programs > Renesas Electronics Tools > RSKRL78L12 e2studio > Manuals). 8. Support Online technical support and information is available at: http://www.renesas.com/rskrl78l12...
- Page 5 Mouser Electronics Authorized Distributor Click to View Pricing, Inventory, Delivery & Lifecycle Information: Renesas Electronics YR0K5010RLS000BE...
Need help?
Do you have a question about the e1 and is the answer not in the manual?
Questions and answers