Table of Contents
Advertisement
Quick Links
Owner's Manual
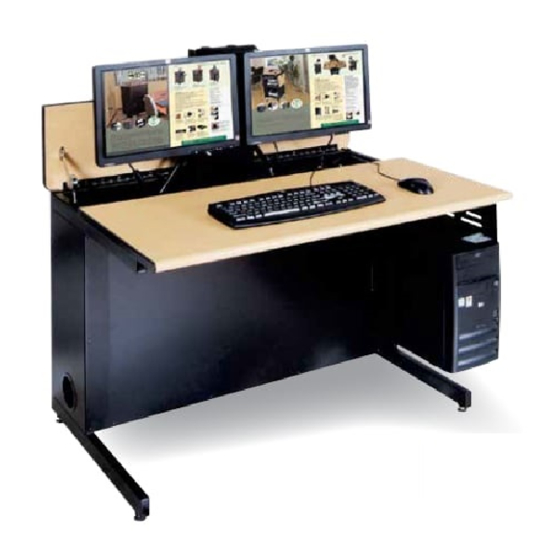
Flex Insight XMS Dual Monitor Computer Workstation
(Single workstation for 2 monitors)
42" Flex Insight XMS Workstation for dual monitors (w/ lock)
38964
42" Flex Insight XMS Workstation for dual monitors
38962
IMPORTANT:
Before you begin, please make sure all parts and proper
quantities are included. Any parts damaged during
shipment must be reported within 15 days of receipt. To
report information regarding damages or if you have any
questions, please call 1-800-235-1262.
CAUTION:
Before using this product, read this manual and follow all
safety and operating instructions.
To purchase parts or accessories, please contact us at
www.spectrumfurniture.com
1-800-235-1262
Thank you for choosing Spectrum products!
Spectrum Industries, Inc.
Chippewa Falls, WI 54729, USA
0110658R1 Page 1 of 9
Advertisement
Table of Contents

Subscribe to Our Youtube Channel
Related Manuals for Spectrum Industries 38964


Summary of Contents for Spectrum Industries 38964
- Page 1 Before using this product, read this manual and follow all safety and operating instructions. To purchase parts or accessories, please contact us at www.spectrumfurniture.com 1-800-235-1262 Thank you for choosing Spectrum products! Spectrum Industries, Inc. Chippewa Falls, WI 54729, USA 0110658R1 Page 1 of 9...
-
Page 2: Hardware Package Contents
Safety ● Read this owners manual before assembling or operating this desk. ● Keep fingers and hands away from the edges of monitor compartment lid and clear of the lift mechanism when raising or lowering to prevent pinching. ● Do not sit or allow students to sit on top of desk or monitor compartment lid. ●... -
Page 3: Installing Cpu
Installing Glides 1. Carefully lift one side of the desk and place a short wooden 4x4 or 2x4 block (or equivalent support) under the leg. Lifting desk may require two people. Figure 1. 2. Thread the two glides into the leg, tighten securely, and remove block. 3. -
Page 4: Installing Monitor
Installing Monitor 1. Attach a swivel VESA mount to each monitor with (4) 4mm PHM screws (not included-normally included with monitor). Figure 3A. 2. Loosen the back panel JC bolts on the desk slightly with a 4mm hex wrench, lift off the back panel, and open the monitor compartment lid. 3. -
Page 5: Cord Management
Cord Management 1. With the back panel removed, connect the necessary monitor, keyboard, and mouse cords above the worksurface. Figure 5A. 2. Position the keyboard as shown approximately 6" from the front edge of the worksurface with the mouse on the opposite side of the CPU as shown. - Page 6 5. With the loom removed, feed the monitor, keyboard, and mouse cords through the sliced opening of the loom to the bottom of the desk as shown. Figure 5D. 6. Split the CPU wires out of loom approximately 3/4 of the way down the loom and plug into CPU. 7.
-
Page 7: Operation
Connecting Desks Together 1. Desks of equal height can be connected together with the included unit-to-unit bracket. Figure 6. 2. To connect, align desks next to each other in their final location and raise monitor compartment lids. 3. Attach desks together with a unit-to-unit bracket and (4) 1/4-20 x 15mm JC bolts. Tighten bolts securely. 4. -
Page 8: Maintenance
Maintenance After approximately 300 cycles of opening and closing, the friction dampener on the worksurface lid should be retightened to 13 in-lbs using a torque wrench with a 4mm hex driver. Note: If a torque wrench is unavailable, tighten the friction damper with a 4mm hex wrench 1/8 turn at a time and test. -
Page 9: Warranty
Warranty WE WILL MAKE IT RIGHT FOR YOU! We guarantee all Spectrum products to be free of all defects in materials and workmanship, for the original owner, for a period of ten years. Any item deemed defective by Spectrum or the original manufacturer, under normal use conditions, will be repaired or replaced at Spectrum’s discretion.
Need help?
Do you have a question about the 38964 and is the answer not in the manual?
Questions and answers