HyperX Cloud II Wireless Quick Start Manual
Hide thumbs
Also See for Cloud II Wireless:
- User manual (210 pages) ,
- Quick start manual (27 pages) ,
- Frequently asked questions (4 pages)
Advertisement
Available languages
Available languages
Quick Links
HyperX Cloud II Wireless
Gaming Headset
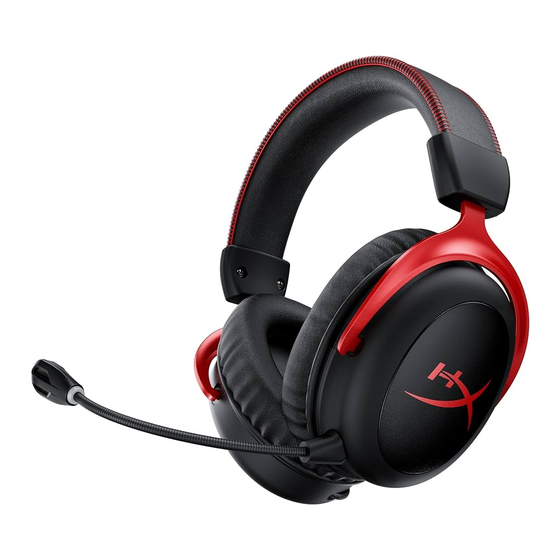
Overview
D
A
B
C
H
G
L
4460275B
E
F
J
I
Quick Start Guide
A
Mic mute/mic monitoring button
B
USB charge port
C
Microphone port
D
Status LED
E
Power button /
7.1 Surround Sound button
F
Volume wheel
G
Detachable microphone
H
Microphone mute LED
I
USB adapter
J
Wireless pairing pin hole
K
Wireless status LED
L
USB charge cable
K
Advertisement

Subscribe to Our Youtube Channel
Related Manuals for HyperX Cloud II Wireless


Summary of Contents for HyperX Cloud II Wireless
- Page 1 HyperX Cloud II Wireless Quick Start Guide Gaming Headset Overview Mic mute/mic monitoring button USB charge port Microphone port Status LED Power button / 7.1 Surround Sound button Volume wheel Detachable microphone Microphone mute LED USB adapter Wireless pairing pin hole...
- Page 2 Usage 1. Connect the wireless USB adapter to your device 2. Power on the headset Setting up with PC Right click speaker icon > Select Open Sound settings > Select Sound control panel Settings Open Sound settings Sound Open Volume mixer Display Related Settings Spatial sound (Off)
- Page 3 1. Set Default Device to “HyperX Cloud II Wireless” Set Default Device to “HyperX Cloud II Wireless” 2. Right click on “HyperX Cloud II Wireless” and click on Con gure. Select 7.1 Surround to con gure your setup and click next.
-
Page 4: Status Led
Status LED Volume wheel Scroll up and down to adjust volume level. STATUS WARNING: Permanent hearing damage can occur if a headset is used at high volumes for extended periods of time. Pairing Flash Green and Red every 0.2s Searching Slow breathing Green 90% —... - Page 5 HyperX NGENUITY Software hyperxgaming.com/ngenuity Questions or Setup Issues? Contact the HyperX support team or see the user manual at : hyperxgaming.com/support/headsets...
- Page 6 Playback Device 1. Set Default Device to “HyperX Cloud II Wireless” Wired Charging 2. Right click on “HyperX Cloud II Wireless” and click on Con gure. HyperX NGENUITY Software 3. Select 7.1 Surround to con gure your setup and click next.
- Page 7 1. Impostare il dispositivo prede nito su "HyperX Cloud II Wireless" Maintenez enfoncé pendant 3 secondes pour activer ou désactiver le contrôle du 2. Fare clic con il pulsante destro su "HyperX Cloud II Wireless" e poi fare clic su micro...
- Page 8 Impostazioni > Dispositivi > Dispositivi audio | Dispositivo di ingresso: Cu e USB D - Mikrofonstatus LED K - Drahtlos-Status LED "HyperX Cloud II Wireless" | Dispositivo di uscita: Cu e USB "HyperX Cloud II Wireless" E - Ein-/Ausschalter / L - USB-Ladekabel Riproduci l'audio tramite cu e: Tutto l'audio Taste für 7.1 Surround Sound...
- Page 9 Pulsowanie kolorem czerwonym < 15% dźwiękowe > wybierz opcję Panel sterowania dźwiękiem. Ładowanie przewodowe Urządzenie do odtwarzania 1. Jako domyślne urządzenie wybierz „HyperX Cloud II Wireless”. Oprogramowanie HyperX NGENUITY 2. Kliknij prawym przyciskiem myszy pozycję „HyperX Cloud II Wireless”, a następnie hyperxgaming.com/ngenuity...
- Page 10 1. Con gurar como Dispositivo Predeterminado el “HyperX Cloud II Wireless” Software HyperX NGENUITY 2. Haz clic derecho en “HyperX Cloud II Wireless” y haz clic en Con gurar. Selecciona 7.1 hyperxgaming.com/ngenuity Surround para con gurar tus ajustes y haz clic en Siguiente.
- Page 11 1. De na o Dispositivo Padrão como “HyperX Cloud II Wireless” Dúvidas ou Problemas na Instalação? 2. Clique com o botão direito em “HyperX Cloud II Wireless” e clique em Con gurar. Entre em contato com a equipe de suporte HyperX ou consulte o manual do usuário em Selecione Surround 7.1 para con gurar suas de nições e clique em próximo.
- Page 12 1. Установіть «HyperX Cloud II Wireless» як пристрій за замовчуванням Podržte 3 sekundy pro zapnutí/vypnutí monitorování mikrofonu 2. Клацніть правою кнопкою миші на «HyperX Cloud II Wireless» та натисніть «Настроїти». Виберіть «Об’ємний звук 7.1» для настроювання пристрою та натисніть Vypínač / Virtuální surround zvuk 7.1 «Далі».
- Page 13 1. Задайте устройство по умолчанию как «HyperX Cloud II Wireless». Пульсирует зеленым цветом 15% — 99% Щелкните правой кнопкой мыши «HyperX Cloud II Wireless» и выберите опцию Пульсирует красным цветом < 15% «Настройка». Выберите «Объемное звучание 7.1» для настройки вашей...
- Page 14 < 15% 使用說明 將 USB 無線接收器插入您的裝置 開啟耳機電源 有線充電 於電腦上進行設定 HyperX NGENUITY 軟體 以右鍵點擊喇叭圖示 > 選擇音效設定 > 開啟音效控制台 hyperxgaming.com/ngenuity 播放裝置 有任何安裝或使用問題? 將預設裝置設定為 HyperX Cloud II Wireless 請聯絡 支援團隊或於以下網址查閱使用手冊: 以右鍵點擊 並點擊[配置]。選擇[ 環場音效]來配置您 HyperX HyperX Cloud II Wireless 的設定,然後按下一步。 hyperxgaming.com/support/headsets 錄製裝置 將預設裝置設定為 HyperX Cloud II Wireless 简体中文...
- Page 15 日本語 输入设备: 耳机“ ” HyperX Cloud II Wireless 输出设备: 耳机“ ” HyperX Cloud II Wireless 概要 输出至耳机:所有音频 マイクミュート/マイクモニターボタン 取り外し可能なマイク 状态 LED 充電ポート マイクのミュート マイクポート アダプター 状态 充電ポート ワイヤレスペアリングピンホール 配对 每 0.2 秒交互闪烁的绿色和红色 電源ボタン / ワイヤレスステータス 正在搜索 缓慢闪烁的绿色 サラウンドサウンドボタン 充電ケーブル...
- Page 16 電源ボタン / バーチャル 7.1 サラウンドサウンド PlayStation 4 에서 설정 電源のオン/オフ - 電源ボタンを3秒間長押しします。 1. USB 무선 어댑터를 장치에 연결합니다. 헤드셋 전원 켜기 押すと、7.1サラウンドのオン/オフを切り替えます。 설정 > 장치 > 오디오 장치 HyperX Cloud II Wireless 입력 장치: 헤드셋 “ ” 音量調整ホイール HyperX Cloud II Wireless 출력 장치: 헤드셋 “...
- Page 17 إﻳﻘﺎف ﺗﺸﻐﻴﻞ ﻣﺆﺷﺮLED – ﻣﻴﻜﺮوﻓﻮن ﻧﺸﻂ اﻟﻀﻐﻂ ﻣﻊ اﻻﺳﺘﻤﺮار ﳌﺪة 3 ﺛﻮان ٍ ﻟﻠﺘﺒﺪﻳﻞ ﺑﲔ "ﺗﺸﻐﻴﻞ/إﻳﻘﺎف ﺗﺸﻐﻴﻞ ﻣﻴﺰة "ﻣﺮاﻗﺒﺔ اﳌﻴﻜﺮوﻓﻮن < "HyperX Cloud II Wireless" HyperX Cloud II Wireless" " 15% – 99% " ". " <15% "HyperX Cloud II Wireless"...
- Page 18 1. Seta i dispozitiv implicit la „HyperX Cloud II Wireless” Pâlpâire verde 15 - 99% 2. Clic dreapta pe „HyperX Cloud II Wireless” și clic pe Con gurare. Pâlpâire roșu < 15% 3. Selecta i 7.1 Surround pentru vă con gura sistemul şi apoi face i clic pe Next (Continuare).
- Page 19 1. Nastavite privzeto napravo na »HyperX Cloud II Wireless« Pulziranje rdeče barve < 15 % 2. Z desno tipko kliknite »HyperX Cloud Flight II Wireless« in kliknite »Kon guriraj«. Wired Charging 3. Izberite Prostorski zvok 7.1, da kon gurirate nastavitve, in kliknite gumb za naprej.
- Page 20 MN: CL002 subject to the following two conditions: (1) this device may not cause interference, and (2) this device must accept any interference, including interference that may cause MN: CL002WA undesired operation of the device. Battery/TX Power Info Avis Canadian Cet appareil numérique de la classe B est conforme à...
- Page 21 DEALER No: DA81684/19 DA81684/19 HyperX is a division of Kingston. THIS DOCUMENT SUBJECT TO CHANGE WITHOUT NOTICE ©2021 Kingston Technology Corporation, 17600 Newhope Street, Fountain Valley, CA 92708 USA. All rights reserved. All registered trademarks and trademarks are the property of their respective owners.
Need help?
Do you have a question about the Cloud II Wireless and is the answer not in the manual?
Questions and answers