Advertisement
Quick Links
Advertisement

Related Manuals for Watts bar switchcontrol SC-M2


Summary of Contents for Watts bar switchcontrol SC-M2
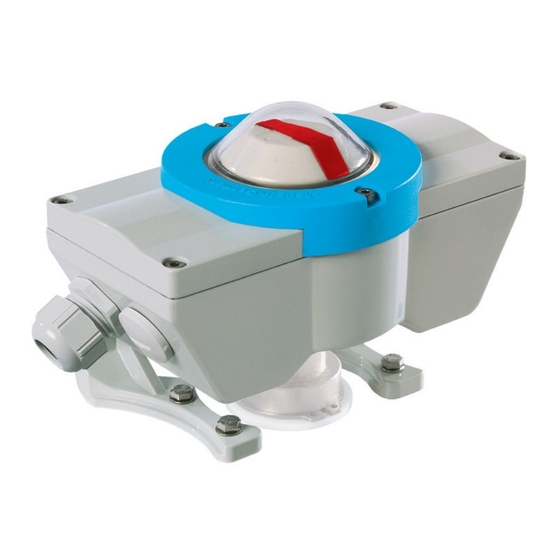
- Page 1 switchcontrol ® Operating, mounting and adjusting instruction Original operating manual bar-gmbh.de...
- Page 2 Safety Regulations: Read these instructions before commis- • Take note of the diagram on the inside sioning the equipment! of the housing. The bar switchcontrol is designed for ope- • A change in the actuator pivoting angle ration as an optical display for intermediary requires renewed adjustment of the unit and end positions from position indicators, described in this documentation.
- Page 3 Safety Regulations: Table of Contents: unit from the overheating effects of too Safety Regulations much direct sunlight. In explosion- pro- Technical Data – general tected areas, only intrinsically safe so- lenoid valves may be connected in the Technical Data – bar-switchcontrol.
- Page 4 Technical Data – General Data: acc. to VDI/VDE 3845 for flange plates 30 x 80 mm Fixing dimensions: and 30 x 130 mm Materials: Housing: Aluminium, resin-coated Viewing glass: Polycarbonat (PC), with ATEX model anti-static coated Screws: stainless steel A2 Blanking plugs and cable glands: Polyamid (PA)
- Page 5 Technical Data – bar-switchcontrol types: Micro-switch: Type SC-M2 Voltage range: to 250 VAC Constant current: Switching function: changer, contacts precious metal-coated Type SC-D2 (Signal „OPEN + CLOSED“); Type SC-DA (Signal Inductive round sensor: „OPEN“); Type SC-DZ (Signal „CLOSED“) Voltage range: 10–30 VDC Operating current IL: 0–100 mA...
- Page 6 Declaration of Conformity: Name and address of the manufacturer: bar pneumatische Steuerungssysteme GmbH Auf der Hohl 1, 53547 Dattenberg/Germany Herewith we declare, that product described below Product denomination: Limit switch box for pneumatic double piston actuator Model/type: bar-switchcontrol type SC-M2 and SC-D2 was manufactured according to the following standards: Where appropriate Harmonised Standards used: Low-voltage switchgear and controlgear EN 60947-5-2...
- Page 7 ATEX-Declaration of Conformity: Name and address of the manufacturer: bar pneumatische Steuerungssysteme GmbH Auf der Hohl 1, 53547 Dattenberg/Germany Herewith we declare, that product described below Product denomination: Limit switch box for pneumatic double piston actuator Model/type: bar-switchcontrol type SC-N2, SC-NS2, SCE-N2 in association with used switches: SC 3,5-N0;...
- Page 8 Mounting the bar-switchcontrol: Adjusting the mounting feet The dimensional width is achieved by ha- The unit described in this documentation ving the feet mounted either inwards or is equipped with mounting feet, which can outwards (Fig. 1 and 2), and the height be mounted onto all actuators fitted with is adjusted by sliding the mounting feet an interface acc.
- Page 9 Mounting on the actuator: Attention! When mounting the limit switch box onto the actuator interface, it is impe- rative to take note of the rotational direction of the actuator pinion, becau- se incor rect mounting of round initiators can lead to damage to the initiator and drive.
- Page 10 Connecting: Electrical connection for the bar-switchcontrol The supply cable must be fixed in positi- on the inside of the housing gives the con- on and protected against rotation! Cable nection system. Take care to observe the and supply lines must comply with DIN EN connection data for the switch and/or in- 60079-14 in Ex-areas! The circuit diagram itiator.
- Page 11 Connecting: Connecting micro-switches (Type SC-M) • The upper operating cam/actuating on the bar bar-switchcontrol (terminal element actuates the higher ranking 1-3), which is preferentially allocated switch on the bar-switchcontrol (termi- the „Closed-Position“ of the valve. nal 4-6), which is preferentially alloca- ted the „Open-Position“...
- Page 12 Connecting: Connecting slot initiators (Type SC-NS) Connection diagram slot initiator onto terminal 3 and 4 (Type SC-NS) Inductive switch, NAMUR slot onto terminal 1 and 2 initiator: (Typ SC-NS) Connection of slot initiators (type SC-NS) – Attention! All types of bar-switchcon- trol ordered...
- Page 13 Adjusting the switching cam: General Instructions – Attention! • Before setting the switching • In the setting instructions, it is assumed cams in actuators with ad- that the valve (looking from above the justable pivoting angle-valve axis) closes in a clockwise direction. and actuator must be adju- sted beforehand.
- Page 14 Setting the round initiators and Position Indicator: Setting the round initiators • According to the General Instructions, • Then set the other actuating device the appropriate actuating device for the slightly less than 90° to the first actua- Open- i.e. Closed-Position in the basic ting device (see picture this page).
- Page 15 Setting the micro-switches and s Setting the micro-switches and slot initiators: Carry out the setting according to Matrix. Attention! In the setting instructions, it is assumed that the valve Carry out the setting according to Matrix. Attention! In the setting instructions, it is (looking from above the axis) closes in a clockwise direction! assumed that the valve (looking from above the axis) closes in a clockwise direction! Micro switches...
- Page 16 Accessories and spare parts: Consisting of: Name: 2 pieces Left feet 2 pieces Right feet Spare part set No. 1 4 pieces Screw M5 short Housing feet 8 pieces Screw M5 long 12 pieces Washer 3 pieces Display glass 3 pieces O-Ring for display glass Spare part set No.
- Page 17 Mounting instructions for accessories and spare parts: Before working on the bar-switchcontrol, Spare part set 3: isolate the unit from the voltage supply! Actuating shaft micro-switch • Disconnect bar-switchcontrol and remo- Spare part set 2: Display window ve from the actuator. The display window can be pressed out •...
- Page 18 Mounting instructions for accessories and spare parts: Before working on the bar-switchcontrol, • Mount the bar-switchcontrol, set the ac- isolate the unit from the voltage supply! tuating device, and remake the electrical connection. Spare part set 4: Actuating shaft round initiator Spare part set 6: Pressure compensating element •...
- Page 19 Montagehinweise für Zubehör und Ersatzteile: • Replace mounting plate into the housing, Spare part: remove cams from the actuating shaft. Round initiator / Slot initiator • Insert the actuating shaft into the • Disconnect the bar-switchcontrol and re- housing. move from the actuator. •...
- Page 20 Warranty: All purchases and sales contracts expressly require the Purchaser to accept the General Terms and Conditions of Sale and Delivery which can be found on www.wattswater.com/agb. Watts hereby objects to any deviating or additional condition to the General Terms and Conditions of Sale and Delivery which has been com- municated to the Purchaser in any form without the written consent of a Watts representative.
Need help?
Do you have a question about the bar switchcontrol SC-M2 and is the answer not in the manual?
Questions and answers