Advertisement
Quick Links
Advertisement

Related Manuals for Envoy EN2 DX2


Summary of Contents for Envoy EN2 DX2
- Page 1 User Guide for DX2 Twin Channel True Diversity receiver v1.02...
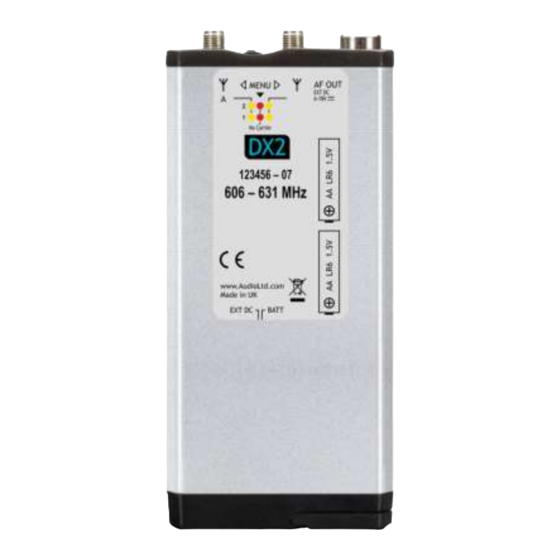
- Page 2 Installing and removing batteries To open the battery compartment, slide the catch away from the edge. Slide catch on battery Switch. cover to the right to open the compartment. The receiver can be powered externally via 6- 18 Volts DC using an appropriate Audio Limited cable or it can be powered internally using 2xAA type 1.5V batteries.
- Page 3 Receiver number. Menus Locked icon. Current attenuator setting. Current RF level. RF/Squelched icon (flashes when squelched). Diversity switch indicator. Current RF level. Current AF level bar indicator (0 – 10 segments). Current Frequency. Frequency selection mode (P = PRESET, U = USER, TUNE = TUNE mode). Selected channel number (PRESET or USER modes only).
- Page 4 In the preset frequency mode scroll with the nav-switch till the desired frequency is reached. Press the nav-switch to confirm the chosen frequency. In Frequency Tune mode the frequency any frequency within the switching bandwidth can be selected in 25kHz steps. The selected frequency can then be stored in the User memory.
- Page 5 Options On the main menu, the nav-switch can be used to highlight the ‘options’ icon. Once highlighted, press and hold the middle of the nav- switch to view the seven sub- options under the ‘options’ menu. The options menu will display seven icons, representing: Exit - Freq Mode - HP Output - RX Power –...
- Page 6 Use the nav-switch to highlight the desired mode and press the nav-switch to confirm the choice. The choice will be displayed on the default display by ‘P’, ‘U’, ‘T’. The display will then automatically return to the ‘options’ menu. c) HP Output On the ‘Options’...
- Page 7 Use the nav-switch to highlight the desired power option. Press and hold the nav- switch to confirm the choice. The display will then automatically return to the ‘Options’ menu. e) Display On the ‘options’ menu, the nav-switch can be used to highlight the ‘Display’ icon. Once highlighted, press and hold the middle of the nav- switch to view the two display sub-menus, ‘Brightness’...
- Page 8 The display will then automatically return to the ‘Options’ menu. f) Lock To prevent accidental changes to the settings the menus can be locked. On the ‘Options’ menu, scroll to the ‘Lock’ icon. Once highlighted, press and hold the nav-switch to confirm the locking of the receiver. By selecting ‘Yes’, the receiver will be locked and the ‘Options’...
- Page 9 g) Restore In order to restore the factory settings use the ‘Restore’ setting. On the ‘Options’ menu, the nav-switch can be used to highlight the ‘Restore’ icon. Once highlighted, press and hold the nav-switch to view ‘Yes; or ‘No’. To restore the receiver’s original factory settings, use the nav-switch to highlight the ‘Yes’...
- Page 10 ii)Free or TX scan Once the scan icon is highlighted, press and hold the middle of the nav-switch to view the two scan options. The user can scan for a free channel or for a transmitter. When the receiver detects no activity on any channel in ‘Free’ mode or detects a valid transmission in ‘TX’...
- Page 11 On the main menu, the ‘Info’ icon can be highlighted using the nav- switch. Once the info button is highlighted, press and hold the middle of the nav- switch to view the information for: S/N- Rev- Table Respectively. There is no need to press and hold the middle of the nav- switch for any of the options- the data for each of the options can be viewed by simply highlighting the option using the nav- switch.
- Page 12 This will cause the receiver to automatically display the main menu. Exit On the main menu, the ‘Exit’ icon can be highlighted using the nav- switch. Once the Exit is highlighted, press and hold the middle of the nav- switch. The screen will then display the original screen for the Parameter.
Need help?
Do you have a question about the EN2 DX2 and is the answer not in the manual?
Questions and answers