DwarfConnection DC-LINK-ULR1 Quick Start Manual
Hide thumbs
Also See for DC-LINK-ULR1:
- Quick start manual (2 pages) ,
- Manual (20 pages) ,
- User manual (22 pages)
Advertisement
Quick Links
Quick sTarT guide
dC-liNk-ulr1 / lr2 X.LINK.L1
Operating
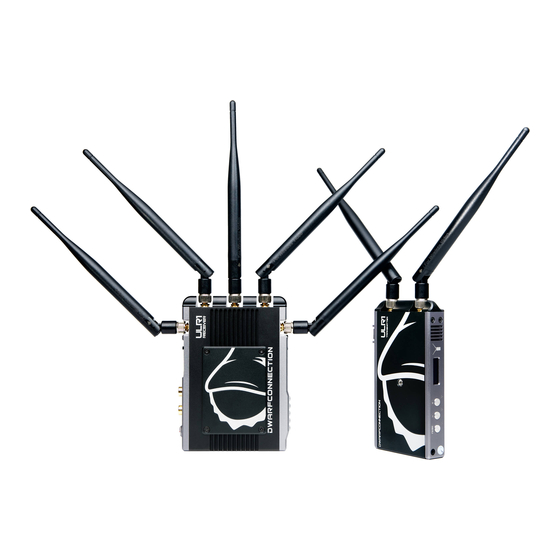
1. Connect the two omni-directional
antennas to the SMA connectors on the
Transmitter.
2. Connect the five omni directional antennas
to the SMA connectors on the Receiver.
3. Use the enclosed 4-pin male-to-D-TAP
cable to connect to a power supply with a
suitable voltage.
4. Connect an SDI or HDMI signal to the
transmitter's SDI or HDMI input. If there is
a signal on both inputs, the transmitter will
prioritise the SDI signal.
5.
Ensure you have selected the frequency
that corresponds to that of the transmitter.
Establishing a Connection
Once all previous steps have been performed,
turn on the transmitter and the receiver using
the power switch.
Once the transmitter recognizes a video input,
the video format will be displayed on the LCD
screen.
It takes between 10-30 seconds for the
transmitter to connect to the receiver. During
this brief period, the receiver's video output
displays "Waiting for connection".
Country-specific Regulations
Channel
Frequency
Europe
USA
0
5550 MHz
x
1
5590 MHz
x
2
5630 MHz
x
3
5670 MHz
x
4
5150 MHz
x
5
5190 MHz
Indoor
Indoor
6
5230 MHz
Indoor
Indoor
7
5270 MHz
x
8
5310 MHz
x
9
5510 MHz
x
Canada
Russia
Japan
China
x
x
✓
x
x
x
x
✓
x
x
x
x
x
x
✓
x
x
✓
x
x
x
x
✓
x
x
Indoor
Indoor
✓
✓
Indoor
✓
Indoor
✓
x
x
✓
x
x
x
x
x
x
✓
x
x
✓
x
x
Antenna Positioning
Position the antennas on transmitter and
receiver as shown in the illustration. This
ensures the best possible RF performance.
Install the transmitter and the receiver as
high as possible (at least 2 metres above
ground level) to maintain a good line-of-sight.
During operation, try to keep the transmitter
and the receiver at similar heights.
Avoid obstacles such as walls, trees, water
and steel structures between transmitter and
receiver.
The connection is at its strongest when the
flat surfaces of the transmitter and receiver
face each other.
The RSSI (Wireless Received Signal Strength
Indicator) display shows the strength of the
signal, allowing the operator to ensure the
system is working reliably.
Turkey
x
x
Status
x
x
0-1 LEDs
x
Indoor
2-3 LEDs
Indoor
Indoor
Indoor
4-5 LEDs
x
RSSI Display
Description
Radio signal strength is weak and
artefacts are visible in the video signal
Radio signal strength is normal and
video quality is good
Radio signal strength is very strong and
video quality is very good
Advertisement

Related Manuals for DwarfConnection DC-LINK-ULR1


Summary of Contents for DwarfConnection DC-LINK-ULR1
- Page 1 Quick sTarT guide dC-liNk-ulr1 / lr2 X.LINK.L1 Operating Antenna Positioning 1. Connect the two omni-directional antennas to the SMA connectors on the Transmitter. 2. Connect the five omni directional antennas to the SMA connectors on the Receiver. 3. Use the enclosed 4-pin male-to-D-TAP cable to connect to a power supply with a suitable voltage.
- Page 2 FuNcTioNs Choosing a Channel Fan Control To choose a channel on the transmitter/ To switch the fan on the transmitter / receiver press the “MENU” button and select receiver off or on, press the “MENU” button the channel with the “+” or “-” button, then to navigate to the fan menu and select the press the “MENU”...
Need help?
Do you have a question about the DC-LINK-ULR1 and is the answer not in the manual?
Questions and answers