Table of Contents
Advertisement
Quick Links
Advertisement
Table of Contents

Summary of Contents for OPTIMUM Maschinen OPTIturn TX 4414
- Page 1 Operating Manual Version 1.0.5 Lathe Part no. 3432420...
-
Page 2: Table Of Contents
Table of contents Safety Rating plate..............................7 Safety instructions (warning notes)....................... 8 1.2.1 Classification of hazards ........................8 1.2.2 Other pictograms..........................8 Intended use ..............................9 Reasonably foreseeable misuses....................... 10 1.4.1 Avoiding misuse ..........................10 Potential dangers that can be caused by the lathe..................10 Qualification of personnel ........................... - Page 3 Delivery, interdepartmental transport, assembly and commissioning Notes on transport, installation, commissioning ..................23 3.1.1 General risks during internal transport .....................23 Delivery ...............................24 Unpacking ..............................24 Lifting the machine ............................24 3.4.1 Forklift ..............................24 3.4.2 Crane ...............................25 Installation conditions ..........................26 3.5.1 Foundation and floor ........................26 3.5.2 Local requirements for delivery ......................26 3.5.3 Installation plan ..........................27 Assembly and installation, initial operation....................27...
- Page 4 4.15.4 Tailstock ............................45 4.16 Manual movements ............................ 45 4.17 Automatic feed............................46 4.17.1 Straight turning ..........................46 4.17.2 Face turning ............................ 47 4.18 Turning tapers............................. 47 4.18.1 Cross-adjustment of the tailstock ....................47 4.18.2 Turning short tapers with the top slide .................... 48 4.18.3 Turning of cones with high precision ....................
- Page 5 7.3.1 Avoiding misuse ..........................85 Basic safety instructions ..........................86 7.4.1 Optional soft lathe chuck jaws......................86 Calculating the required clamping force for a given speed .................87 Clamping force-speed diagram - Lathe chuck K11-200 ................88 Clamping jaw centrifugal force ........................88 Notes on instruction of operating personnel ....................90 Scope of delivery............................90 7.10 Assembly ..............................91...
- Page 6 If you have any further questions after reading these operating instructions and you are not able to solve your problem with a help of these operating instructions, please contact your specialised dealer or directly the company OPTIMUM. Optimum Maschinen Germany GmbH Dr.- Robert - Pfleger - Str. 26 D-96103 Hallstadt Fax (+49)0951 / 96555 - 888 email: info@optimum-maschinen.de...
-
Page 7: Safety
The serial number is located on the type plate. INFORMATION If you are unable to rectify an issue using these operating instructions, please contact us for advice: Optimum Maschinen Germany GmbH Dr.-Robert-Pfleger-Str. 26 D-96103 Hallstadt Email: info@optimum-maschinen.de... -
Page 8: Safety Instructions (Warning Notes)
Safety instructions (warning notes) 1.2.1 Classification of hazards We classify the safety warnings into different categories. The table below gives an overview of the classification of symbols (ideogram) and the warning signs for each specific danger and its (possible) consequences. Symbol Alarm expression Definition / consequence... -
Page 9: Intended Use
We expressly point out that the guarantee will expire, if any constructive, technical or proce- dural changes are not performed by the company Optimum Maschinen Germany GmbH. It is also part of the intended use that you observe the limits of the lathe, ... -
Page 10: Reasonably Foreseeable Misuses
It is forbidden to make any modifications or alternations to the operation values of the lathe. They could endanger the personnel and cause damage to the lathe. Reasonably foreseeable misuses Any other use other than that specified under "Intended use" or any use beyond the described use shall be deemed as non-intended use and is not permissible. -
Page 11: Qualification Of Personnel
INFORMATION Everyone involved in the assembly, commissioning, operation and maintenance must be duly qualified, and strictly follow these operating instructions. In the event of improper use there may be a risk to personnel, there is a risk of damage to the lathe and other property, ... -
Page 12: Authorized Persons
Qualified personnel Due to their professional training, knowledge and experience as well as knowledge of relevant regulations, qualified personnel are able to perform the assigned tasks and to independently recognise and avoid any possible dangers. Instructed person Instructed persons were instructed by the operating company regarding the assigned tasks and any possible risks of improper behaviour. -
Page 13: Operator Positions
Operator positions The operator position is in front of the lathe. Safety measures during operation CAUTION! Danger due to inhaling dust and mist that are hazardous to health. Dependent on the material which need to be processed and the used auxiliaries dusts and mist may be caused which might impair you health. -
Page 14: Lockable Master Switch
WARNING! Although the isolating safety devices provided and delivered with the machine are designed to reduce the risks of workpieces being ejected or parts of tools or workpieces breaking off, they cannot eliminate these risks completely. 1.9.1 Lockable master switch WARNING! Dangerous voltage even if the main switch is switched off. -
Page 15: Chip Guard Shield
1.9.6 Chip guard shield Polycarbonate inspection windows, which have a safety-critical protective function in respect of flying parts, must be visually inspected at regular intervals by responsible personnel provided by the customer in order to guarantee the operational safety of the milling machine. Polycarbonate viewing panes are subject to an ageing process and are classified as wear parts. - Page 16 Functional check Equipment Check Emergency-stop After activating the emergency-stop button, the drive on the lathe will shut off. The switch spindle continues to rotate for a while, depending on the mass moment of inertia of the spindle and workpiece. Positions switch ...
-
Page 17: Personal Protective Equipment
1.11 Personal protective equipment For certain work personal protective equipment is required. Protect your face and your eyes: Wear a safety helmet with facial protection when performing work where your face and eyes are exposed to hazards. Wear protective gloves when handling pieces with sharp edges. ... -
Page 18: Safety During Maintenance
Check that they are working properly! 1.14 Accident report Inform your supervisors and Optimum Maschinen Germany GmbH immediately in the event of accidents, possible sources of danger and any actions which almost led to an accident (near misses). There are many possible causes for "near misses". -
Page 19: Electronics
INFORMATION We provide information about the dangers of working with and on the lathe in these work descriptions. 1.15 Electronics Have the machine and/or the electric equipment checked regularly. Immediately eliminate all defects such as loose connections, defective wires, etc. A second person must be present during work on live components to disconnect the power in the event of an emergency. -
Page 20: Technical Specification
Technical specification The following information represents the dimensions and indications of weight and the manu- facturer‘s approved machine data. Electrical connection 3 x 400V ~ 50 Hz (~60Hz) 6.1 KW Power Spindle drive 5.5 kW Coolant pump 100W Work areas Center height [mm] 1280 Distance between centres [mm]... -
Page 21: Emissions
π Module threads [mm 44 pcs. 0.25 - 3.75 D.P. threads 44 pcs. 120 - 8 Lead screw pitch Tailstock MT4 Quill diameter [mm] Quill travel [mm] Taper in the quill 2.10 Tailstock MT5 version Quill diameter [mm] Quill travel [mm] Taper in the quill 2.11 Steady rest, follow rest (option) - Page 22 INFORMATION The specified numerical value represents the emission level and does not necessarily a safe working level. Though there is a dependency between the degree of the noise emission and the degree of the noise disturbance it is not possible to use it reliably to determine if further pre- caution measures are required or not.
-
Page 23: Delivery, Interdepartmental Transport, Assembly And Commissioning
Delivery, interdepartmental transport, assembly and commissioning Notes on transport, installation, commissioning Improper transport, installation and commissioning is liable to accidents and can cause damage or malfunctions to the machine for which we do not assume any liability or guarantee. Transport the scope of delivery secured against shifting or tilting with a sufficiently dimen- sioned industrial truck or a crane to the installation site. -
Page 24: Delivery
Delivery INFORMATION The machine is pre assembled. It is delivered in a transport box. After the unpacking and the transportation to the installation site it is necessary to mount and assemble the individual com- ponents of the machine. Check the status of the machine immediately upon receipt and claim possible damages at the last carrier also if the packing is not being damaged. -
Page 25: Crane
Img. 3-1: Forklift transportation method Center of Gravity 2.5 t 3.4.2 Crane The machine is lifted with slings. The bedslide and the tailstock must be driven to the end of the machine bed in order to achieve a balanced load. ... -
Page 26: Installation Conditions
Installation conditions In order to achieve sufficient safety against falls by slipping, the accessible area in the mechani- cal machining zone of the machine must be equipped with a slip resistance. The slip-resistant mat and/or slip-resistant flooring must be at least R11 in accordance with BGR 181. The used shoes must be suitable for being used in those machining areas. -
Page 27: Installation Plan
3.5.3 Installation plan 1566 Main switch Coolant tank moved out 1500 2409 Electrical connection Datum Name Assembly and installation, initial operation WARNING! The machine may only be commissioned after proper installation. There is a danger to persons and equipment, if the first commissioning carried out by inexperienced personnel. -
Page 28: Anchor-Free Assembly
3.6.1 Anchor-free assembly This must be done by laying down a strong base on each support of the levelling points, between the foundation and the machine foot. 3.6.2 Installation with levelling- damping elements Optional levelling- damping elements Attaching of 6 pieces SE2 levelling- damping elements on levelling points between the founda- tion and machine foot. - Page 29 SE85 maximum load per element 1500 kg Levelling screw (threaded rod) M16x2 x 150mm Vibration damper Ø 83 mm Note: The machine stands on the levelling nut (2) and not on the vibration damper (3). SE85 TX4414 Version 1.0.5 - 2020-12-09 Translation of original instructions...
-
Page 30: Anchored Assembly
3.6.4 Anchored assembly INFORMATION The components required for the anchored assembly are not included in the scope of delivery. These are set screws with lock nuts, adjusting washers and anchor rods. On a light foundation, square holes with side length of approximately 200mm and 250mm depth are made . -
Page 31: Aligning The Machine
3.6.5 Aligning the machine Once the bases are in place proceed to level according to the following description: Fit precision spirit levels on the cross slide. Position the carriage on the centre of the bed and, using the four end adjusting screws ( 1 ), adjust until the machine spirit level displays an approximate value. -
Page 32: Cleaning The Machine
This process is not reversible, i.e. the binder cannot be etched again and again. The company Optimum Maschinen Germany GmbH does not assume any guarantee for sub- sequent damages due to unsuitable cooling lubricants. -
Page 33: Electrical Connection
Electrical connection WARNING! The three-phase electrical connection may only be performed by an electrician or under the guidance and supervision of an electrician. CAUTION! Arrange the machine's connection cable in such a way that it will not cause a tripping hazard. -
Page 34: Operation
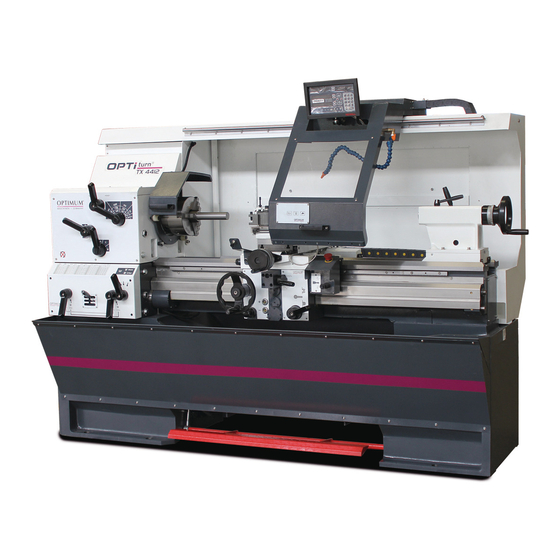
Operation Control and indicating elements Img. 4-1: TX4414 - Article no. 3432420 Pos. Designation Pos. Designation Speed selector switch Change wheel and feed table Lathe chuck protection Selector switch feed gear mechanism Machine lamp Chip guard shield Digital Position Indicator DP 700 or Digital Position Indicator NMS 300 Tailstock ... -
Page 35: Safety
Safety Commission the lathe only under the following conditions: The lathe is in proper working order. The lathe is used as prescribed. Follow the operating instructions. All safety devices are installed and activated. Eliminate or have all malfunctions rectified promptly. Stop the lathe immediately in the event of any abnormality in operation and make sure it cannot be started-up accidentally or without authorisation.Notify the person responsible immediately of any modification. -
Page 36: Rotational Direction
4.8.1 Rotational direction The rotational direction lever (1) activates the lathe. The lathe can only be switched on, when the lathe chuck protection is closed. Img. 4-3: TX4414 without rapid traverse Img. 4-4: TX4414 with rapid traverse Move the shift lever down if you want the turning direction to be anti-clockwise. The middle position is the neutral position "0". -
Page 37: Feed
Feed CAUTION! The faster the rotation of the lathe chuck, the higher the speed of the bed slide. ATTENTION! Only adjust gear settings when the lathe is being completely stopped. The selector levers are used to set the feed or the pitch required for the thread-cutting. Select the required feed direction (3). -
Page 38: Bed Slide And Cross Slide Rapid Traverse
INFORMATION The bed slide is moved towards the lathe chuck or tailstock using the selection lever for the feed on the headstock. Adjust as required. 4.9.1 Bed slide and cross slide rapid traverse INFORMATION The rapid traverse function of the bed slide and the cross slide is not part of the stand- ard equipment. -
Page 39: Adjusting The Camlock Bolts To The Workpiece Holder
4.10.2 Adjusting the Camlock bolts to the workpiece holder Insert all of the bolts in the screwed flange of the chuck, until the reference mark, the circular reference line (F) is in line with the wall of the chuck flange surface and the semicircular grooves are in line with the holes of the safety screw (E). -
Page 40: Influencing Factors That Significantly Impact The Tensioning Force
4.11.1 Speed information, maintenance recommendations, reference speed in accordance with DIN 6386 The reference speed is the number of rotations, at which the mathematical centrifugal force with the corresponding jaw design correlates with the greatest tensioning force when the machine is at a standstill. The reference speed applies for jaws mounted inside in tiers, whereby they must not protrude past the outer diameter of the chuck. -
Page 41: Maintenance Of Chucks
4.11.3 Maintenance of chucks A crucial prerequisite for fault-free functionality of a lathe chuck is regular and thorough lubrica- tion of the sliding surfaces. This prevents the reduction of tensioning force and premature wear and tear. Always observe the manufacturer's maintenance instructions when using replacement lathe chucks. - Page 42 Clamping diameter too Clamping on the largest small. possible diameter. Operation TX4414 Translation of original instruction Version 1.0.5 - 2020-12-09...
-
Page 43: Clamping Long Workpieces
4.12.1 Clamping long workpieces through the hollow shaft of the spindle CAUTION! Long rotating parts that have to protrude from the hollow shaft of the spindle must be secured by the operator using suitable covers. A cover can be a sleeve that is mounted on the headstock that, as a permanent safety device, completely covers the protruding workpiece. -
Page 44: Mounting Workpiece Holder
4.13 Mounting workpiece holder DANGER! Please observe the maximum permissible rotational speed of chucks and face plates with individually tensionable jaws. 4.13.1 Centering point in lathe spindle Clean the taper bore of the lathe spindle holding fixture. Clean the morse taper and the taper of the centring point. ... -
Page 45: Face Turning And Recessing
4.15.2 Face turning and recessing In the facing operation, the tool feeds per- pendicular to the axis of rotation of the workpiece. Feed is done manually, using the cross-slide hand wheel. The infeed for cut depth is made with the top slide or lathe saddle. -
Page 46: Automatic Feed
4.17 Automatic feed The drive of the feed rod is switched off as soon as the stop is contacted. PREVENTIVE MEASURES! Switch off the automatic feed of the lathe saddle about 4 or 5 mm before the stop. Img. 4-10: 4.17.1 Straight turning ... -
Page 47: Face Turning
Set the cross-feed / longitudinal feed (feed rod) (10) movement control handle on the apron to the up position. The engaging lever for thread-cutting (lead screw, apron nut open) must be set to the neutral position. Img. 4-12: If the described positions have been set, the lathe saddle moves towards the lathe chuck. In order for the lathe saddle to move toward the tailstock, the feed direction control handle (3) on headstock has to be in the right-side feed position. -
Page 48: Turning Short Tapers With The Top Slide
Cross-adjustment of the tailstock = 300mm x Tan 1°. The tailstock must be cross-adjusted by approximately 5.236mm. Img. 4-13: Tailstock ATTENTION! Check clamping of the tailstock and the sleeve, respectively for the turning jobs between the centres! Tighten the securing screw at the end of the lathe bed in order to prevent the tailstock from unintentional drawing-out of the lathe bed. - Page 49 2. By a simple calculation, a stop measure of 100mm length (of your own production) and a gauge with stand. Calculation of the offset of the top slide relating to the stop measure with a length of 100 mm. Step by step 100mm Kv = Vd =...
- Page 50 The stand is put on the top slide. The gauge is aligned horizontally and 90° to the top slide. The top slide is approximately adjusted to the cone angle and the test prod brought in contact with the cone surface (fix the bedslide). Now the top slide is twisted in a way that the gauge does not indicate any travel of the pointer over the whole length of the cone (offset over the handwheel of the top slide).
-
Page 51: Displacing The Top Slide On The Cross Slide
Example: Kv = 1 : 40 ; Lw = 150 mm ; L = 100 mm Vr = 1,875mm 2 x 40 Img. 4-17: Workpiece between centres: Tailstock offset Vr 4.19 Displacing the top slide on the cross slide Loosen the four clamping screw at the top slide. -
Page 52: Thread Cutting
Speed: n (rpm) Workpiece diameter: d (mm) Cutting depth: In order to achieve a good chipping, the results of the depth of cut divided by the feed shall re- sult in a figure between 4 and 10. Example: ap = 1.0 mm; f = 0.14 mm/rev ; and this equals to in a value of 7.1 ! Feed: The feed for rough turning is to be selected in a way that it does not exceed half the value of the corner radius. - Page 53 The threading engaging lever must be engaged during the whole thread cutting process. This does not apply to thread pitches that can be carried out with the thread gauge. The thread is produced in various cutting steps in a way that the cutting tool has to be ...
-
Page 54: Multiple-Layered Threads
4.21.3 Multiple-layered threads A multi-layered thread is generated by shifting the hand wheel scale to the front. Use a digital position display or a gauge to achieve the thread distance. 4.21.4 Thread types Designation Profile Code Short term (e. g.) Application letter ISO-threads... - Page 55 Round thread RD DIN 405 Bolt 1“ – 11 ½“ NPT Cone Bolt Operation TX4414 Version 1.0.5 - 2020-12-09 Translation of original instruction...
-
Page 56: Metric Threads (60° Flank Angle)
4.21.5 Metric threads (60° flank angle) pitch P depth of thread of the bolt h2=0.6134 x P depth of thread of the nut H1 = 0.5413 x P rounding r = 0.1443 x P flank diameter d2 = D2 =d - 0.6493 core removing hole drill = d - P Bolt flank angle = 60°... -
Page 57: British Thread (55° Flank Angle)
M 30 27.727 25.706 26.211 2.147 1.894 0.505 26.5 M 36 33.402 31.093 31.670 2.454 2.165 0.577 M 42 39.077 36.479 37.129 2.760 2.436 0.650 37.5 M 48 44.752 41.866 41.866 3.067 2.706 0.722 M 56 52.428 49.252 49.252 3.374 2.977 0.794 50.5... - Page 58 BA: BA: British Association Standard Thread (47 1/2° flank angle). Common with instruments and watches, is being replaced by the metric ISO thread and by the ISO miniature thread. It consists of numeric designations from 25 to 0=6.0 mm max diameter. Table of the British threads Nominal diameter of Threads in 1"...
-
Page 59: Indexable Inserts
4.21.7 Indexable inserts For indexable inserts there are partial profile and full profile indexable inserts. The partial pro- file indexable inserts are designed for a certain pitch range (e.g. 0.5 - 3 mm). The partial profile indexable insert is optimally appropriate for the single-piece production. ... -
Page 60: Cooling Lubricant
Consider this fact when selecting your cool- ing lubricant. The company Optimum Maschinen Germany GmbH does not assume any guarantee for sub- sequent damages due to unsuitable cooling lubricants. The flashpoint of the emulsion must be higher than 140°C. - Page 61 CAUTION! The cooling lubricant needs to be checked at least weekly, including during downtimes, with regard to its concentration, ph-value, bacteria and fungal decay. Cooling lubricants and tanks on page 82 We would like to ask you to have the following machine-related properties of the cooling lubri- cant confirmed in writing by the manufacturer of the cooling lubricant.
-
Page 62: Dp700 Quick Start Guide
4.23 DP700 Quick start guide For the complete manual please download from: http://newall.com , Click technical Support to access the download page. Warnings The mains supply is connected into a switch mode power supply (separate from your DP700) via a detachable supply cord supplied. - Page 63 Understanding the Keypad Message Axis 1 Display Axis 2 Axis 3 Power Digifind / Reference Axis Selection Key Switches between Zero and Axis Preset modes Switches between Absolute and Incremental modes Numeric Keys Switches between Inch and mm display Enter Key Information selection (scrolls through options on Message display)
- Page 64 Setting up the Unit How to enter setup F U N C S s e t u p display shows Until display shows S E T U P C O d E ? ( 1 9 3 7 ) Default Settings Optional Settings s e t u p f r a n c a i s...
-
Page 65: Nms300 Quick Start Guide
4.24 NMS 300 Quick start guide NMS300 Quick Start Guide For the complete manual please download from: http://newall.com/nms300 Warnings The mains supply is connected into a switch mode power supply (separate from your NMS300) via a detach- You can only use the NMS300 with Newall Spherosyn300 and Microsyn300 encoders. If a Spherosyn300 encoder travels over 3.2m an error message will be displayed, see full manual for details. - Page 66 Understanding the keypad 950. 3 55 100. 2 50 -156. 7 55 Message display Zero and axis pre-set modes Switches between absolute and incremental modes Switches between inch Numeric keys and mm display Undo key Menu key Navigation keys Function keys Zero Zero an axis in set mode hold...
- Page 67 Setting up the unit setup- Language EnG Gb setup- DRO-TYPE Generic mmill lathe setup- 0. 0 05 0. 0 1 0. 0 2 0. 0 5 setup- ----3 E---- setup- measure setup- err comp nonE See full manual for more details E------3 E------3 setup-...
-
Page 68: Cutting Speeds
Cutting speeds Selecting the cutting speed The variety of factors makes it impossible to present universal indications about the "correct“ cutting speed. Tables with reference values about cutting speeds to be set must be evaluated with utmost caution since they only apply for very particular cases. The refe- rence values without cooling (no best values) which are indicated in AWF documents are highly recommended. - Page 69 VC_GB.fm Table cutting speeds Reference values for cutting speeds in m/min when turning high speed steel and hard metal. (Excerpt from VDF 8799, Gebr. Boehringer GmbH, Göppingen) Tensile Infeed f in mm/rev. and setting angle k strength 0.063 0.16 0.25 0.63 Material Cutting material...
-
Page 70: Maintenance
Maintenance In this chapter you will find important information about Inspection Maintenance Repair of the lathe. ATTENTION! Properly performed regular maintenance is an essential prerequisite for operational safety, failure-free operation, long durability of the lathe and ... -
Page 71: Restarting
6.1.2 Restarting Before restarting, run a safety check. "Safety check“ on page 15 WARNING! Before starting the lathe, you must check that there is no danger for persons and that the lathe is not damaged. Inspection and maintenance The type and level of wear depends to a large extent on the individual usage and operating conditions. - Page 72 Check Interval Where? What? How? Clean the interior of the lathe and the chip sump. Use a tenterhook to pull out long cips. Cleaning Check the oil level in the apron. Check the oil level using the inspection window. Level max. until the middle of the above inspection window.
- Page 73 Check Interval Where? What? How? The machine was delivered with preloaded drive belt. After a few hours operation, the drive belt must be tightened again as the belt stretch due to being new. "Tensioning of drive belt“ on page 76 Check Readjusting The machine was delivered with preloaded synchro-...
- Page 74 Check Interval Where? What? How? For oil change use an appropriate collecting con- tainer with sufficient capacity. Unscrew the screw from the drain hole. Unscrew the screw from the filler hole. Close the drain hole if no more oil drains. ...
-
Page 75: Recommended Wearing Parts
Check Interval Where? What? How? "Inspection plan for water-mixed cooling lubricants“ on page 83 Replacing Cleaning Disinfect If the tailstock clamping wears off. Shorten the clamping distance by adjusting the nut below the tailstock. tighten Adjusting nut ... -
Page 76: Maintenance
This process is not reversible, i.e. the binder cannot be etched again and again. The company Optimum Maschinen Germany GmbH does not assume any guarantee for sub- sequent damages due to unsuitable cooling lubricants. -
Page 77: Adjusting The Spindle Nut On The Top Slide
Drive out the shear pin using a pin punch. Insert a new shear pin. Shear pin electric magnetic clutch Img. 6-4: Feed rod shear pin 6.4.4 Adjusting the spindle nut on the top slide The spindle nut consists of two parts. ... -
Page 78: Adjusting The Spindle Nut On The Cross Slide
6.4.5 Adjusting the spindle nut on the cross slide The cross spindle nut consists of two parts. Slightly loosen both hexagon sockets in the centre of the cross slide. Tighten the intermediary threaded pin, so the cross spindle nut is spread. This reduces the play in the thread. -
Page 79: Feed Rod, Lead Screw
6.4.9 Feed rod, Lead screw The feed rod and lead screw is guided on the tailstock side by plane bearings in the radial direction. The plain bearings require regular lubrication. With needle bearings before and after the plane bearing, the axial direction is guided. Oiler cup Img. -
Page 80: Aligning The Headstock
We recommend that the electrical cabinet is cleaned every 1000 operating hours . 6.4.12 Aligning the headstock ATTENTION! First check that the machine is level before you align the headstock. It is possible to readjust the headstock if the workpiece tapers while turning the shaft. Img. -
Page 81: Repair
If the repairs are carried out by qualified technical personnel, they must follow the indications given in these operating instructions. Optimum Maschinen Germany GmbH accepts no liability nor does it guarantee against damage and operating malfunctions resulting from failure to observe these operating instructions. -
Page 82: Cooling Lubricants And Tanks
Cooling lubricants and tanks CAUTION! The cooling lubricant can cause diseases. Avoid direct contact with cooling lubricant or parts covered in cooling lubricant. Cooling lubricant circuits and tanks for water-cooling lubricant mixtures must be completely emptied, cleaned and disinfected as needed, but at least once per year or every time the coo- ling lubricant is replaced. -
Page 83: Inspection Plan For Water-Mixed Cooling Lubricants
6.6.1 Inspection plan for water-mixed cooling lubricants Company: No.: Date: used cooling lubricant size to be checked Inspection methods Inspection Procedure and comment intervals noticeable Appearance, odour daily Find and rectify causes, changes e.g. skim off oil, check filter, ventilate cooling lubricant system pH value Laboratory techniques... -
Page 84: Rotary Chuck - K11-200 Iso
Rotary chuck - K11-200 ISO 702-2 Type K11-200/D4 K11-200/D5 K11-200/D6 ( 3442762 ) ( 3442764 ) ( 3442763 ) Material of the chuck body Cast steel Cast steel Cast steel Camlock direct fixing (without flange) DIN ISO 702-2 DIN ISO 702-2 DIN ISO 702-2 Size no. -
Page 85: Safety Instructions
Safety instructions Intended use This standard product is suitable for clamping workpieces on lathe machines and other rotating tooling machines. Unintended and improper use of the manual chuck may cause danger to life and limb of the operator. The specified maximum technical data must not be exceeded while the manual chuck is in operation! The manual chuck should only be used on the basis of its technical data. -
Page 86: Basic Safety Instructions
CAUTION! Risk of damages due to incorrect choice of clamping position for chuck jaws on workpiece. If an incorrect clamping position is chosen for the chuck jaws on workpiece, the lathe chuck jaws may be damaged. The external diameter of jaws must not exceed the external diameter of the chuck by more than max. -
Page 87: Calculating The Required Clamping Force For A Given Speed
Calculating the required clamping force for a given speed The initial clamping force F is the total force impacting radially on the workpiece via the jaws due to actuation of the lathe chuck during shutdown. Under the influence of rpm, the jaw mass generates an additional centrifugal force. -
Page 88: Clamping Force-Speed Diagram - Lathe Chuck K11-200
Clamping force-speed diagram - Lathe chuck K11-200 Speed n [rpm] Required minimum clamping force 33 % Tightening torque with key 177 Nm Tightening torque with key max. 250 Nm The clamping force to speed diagram shows the calculated centrifugal force with the matching jaw design as a function for the speed if the chuck jaws do not protrude beyond the outer diam- eter of the chuck. - Page 89 Base tensioning force Required minimum tensioning force Workpiece is released uncontrollably Speed The required effective clamping force for machining F is calculated from the product of the machining force F with the safety factor S . This factor takes into account uncertainties in the calculation of the clamping force.
-
Page 90: Notes On Instruction Of Operating Personnel
The centrifugal torque of the base jaws M can be found in the data of the lathe chuck. The centrifugal torque of the top jaws M is calculated. · r [ kgm ] The lathe chuck K11-200 has no base jaws and no top jaws. Example: The centre of gravity radius r of the jaw = 0.0632 m (jaw flush with the outer diameter of... -
Page 91: Assembly
1 set of external clamping jaws, centric clamping 1 clamping key without ejector 1 Operating manual 7.10 Assembly 7.11 Assembly of the manual chuck 7.11.1 Handling before mounting Actuate the chuck before assembly on the lathe. Turn the spindle to the left by means of the clamping key until it stops. -
Page 92: Ersatzteile - Spare Parts
Ersatzteile - Spare parts Ersatzteilbestellung - Ordering spare parts Bitte geben Sie folgendes an - Please indicate the following : Seriennummer - Serial No. Maschinenbezeichnung - Machines name Herstellungsdatum - Date of manufacture Artikelnummer - Article no. ... -
Page 93: Ersatzteilzeichnungen - Spare Part Drawings
Ersatzteilzeichnungen - Spare part drawings Spindelgetriebe - Spindle gear 153 154 TX4414 DE | EN Version 1.0.5 - 2020-12-09 Originalbetriebsanleitung... -
Page 94: B Spindelgetriebe - Spindle Gear
Spindelgetriebe - Spindle gear DE | EN TX4414 Originalbetriebsanleitung Version 1.0.5 - 2020-12-09... -
Page 95: C Spindelgetriebe - Spindle Gear
Spindelgetriebe - Spindle gear TX4414 DE | EN Version 1.0.5 - 2020-12-09 Originalbetriebsanleitung... -
Page 96: D Spindelgetriebe - Spindle Gear
Spindelgetriebe - Spindle gear DE | EN TX4414 Originalbetriebsanleitung Version 1.0.5 - 2020-12-09... - Page 97 Ersatzteilliste Getriebe Spindelstock - Spare parts list headstock gear Menge Grösse Artikelnummer Bezeichnung Designation Qty. Size Article no. Gehäuse Housing 03432420101 Spindel Spindle 03432420102 Flansch Flange 03432420103 Zahnrad Gear 03432420104 Ring Ring 03432420105 Hülse Sleeve 03432420106 Flansch Flange 03432420107 Ring Ring 03432420108 Zahnrad...
- Page 98 Scheibe Washer 03432420165 Zahnrad Gear 03432420166 Zahnrad Gear 03432420167 Zahnrad Gear 03432420168 Zahnrad Gear 03432420169 Zahnrad Gear 03432420170 Scheibe Washer 03432420171 Hülse Sleeve 03432420172 Scheibe Washer 03432420173 Passfeder Fitting key DIN 6885-A 6x6x20 Sicherungsring Retaining ring DIN 471 - 25x1,2 Dichtung Seal 25x35x7...
- Page 99 Sicherungsring Retaining ring DIN 472 -35 x 1,5 Innensechskantschraube Socket head screw ISO 4762 -M10x50 Zahnriemen Gear belt HTD400-5M25 034324201136 Innensechskantschraube Socket head screw ISO 4762-M12 x 30 Scheibe Washer DIN 125 - A 13 Scheibe Washer DIN 125 - A 15 Welle Shaft 034324201140...
-
Page 100: E Vorschubgetriebe - Feed Gear
Vorschubgetriebe - Feed gear DE | EN TX4414 Originalbetriebsanleitung Version 1.0.5 - 2020-12-09... -
Page 101: F Vorschubgetriebe - Feed Gear
Vorschubgetriebe - Feed gear TX4414 DE | EN Version 1.0.5 - 2020-12-09 Originalbetriebsanleitung... -
Page 102: G Vorschubgetriebe - Feed Gear
Vorschubgetriebe - Feed gear DE | EN TX4414 Originalbetriebsanleitung Version 1.0.5 - 2020-12-09... - Page 103 Ersatzteilliste Vorschubgetriebe - Spare part list feed gear Menge Grösse Artikelnummer Bezeichnung Designation Qty. Size Article no. Welle Shaft 0343242001 Zahnrad Gear 0343242002 Buchse Bush 0343242003 Zahnrad Gear 0343242004 Zahnrad Gear 0343242005 Zahnrad Gear 0343242006 Sicherungsring Retaining ring DIN 471-25x1,2 Nadellager Needle bearing HK1212...
- Page 104 Zahnrad Gear 0343242043 Zahnrad Gear 0343242044 Zahnrad Gear 0343242045 Zahnrad Gear 0343242046 Zahnrad Gear 0343242047 Buchse Bushing 0343242048 Zahnrad Gear 0343242049 Zahnrad Gear 0343242050 Buchse Bushing 0343242051 Nadellager Needle bearing HK3018 0343242052 Nadellager Needle bearing HK3016 0343242053 Welle Shaft 0343242054 Zahnrad Gear 0343242055...
- Page 105 Verschlussschraube Plug screw M20x1,5 Gehäuse Housing 0343242092 Flansch Flange 0343242093 Flansch Flange 0343242094 Innensechskantschraube Socket head screw ISO 4762 -M6 x 12 Ölschauglas Oil sight glas 0343242096 Senkschraube Screw DIN 7991 - M4x10 Innensechskantschraube Socket head screw ISO 4762 -M10 x 16 TX4414 DE | EN Version 1.0.5 - 2020-12-09...
-
Page 106: H Schlosskasten Handrad Links - Apron Hand Wheel Left Side
Schlosskasten Handrad links - Apron hand wheel left side DE | EN TX4414 Originalbetriebsanleitung Version 1.0.5 - 2020-12-09... - Page 107 Ersatzteilliste Schlosskasten - Spare part list apron Menge Grösse Artikelnummer Bezeichnung Designation Qty. Size Article no. Schlosskasten Apron 03432420401 Schlossmutter Claps nut 03432420402 Keilleiste 03432420404 Buchse Bushing 03432420405 Welle Shaft 03432420406 Platte Olate 03432420407 Welle Shaft 03432420408 Hülse Sleeve 03432420409 Welle Shaft 03432420410...
- Page 108 Innensechskantschraube Socket head screw ISO 4762 - M5 x 10 Innensechskantschraube Socket head screw ISO 4762 - M6 x 25 Innensechskantschraube Socket head screw ISO 4762 - M6 x 12 Innensechskantschraube Socket head screw ISO 4762 - M8 x 12 Innensechskantschraube Socket head screw ISO 4762 - M10 x 16...
-
Page 109: I Planschlitten, Bettschlitten - Cross Slide, Bed Slide
Planschlitten, Bettschlitten - Cross slide, bed slide TX4414 DE | EN Version 1.0.5 - 2020-12-09 Originalbetriebsanleitung... - Page 110 Ersatzteilliste Planschlitten/Bettschlitten - Spare part list cross slide/lathe sadle Menge Grösse Artikelnummer Bezeichnung Designation Qty. Size Article no. Planschlitten Cross slide 03432420601 Stahlkugel Steel ball 03432420602 Schmiernippel Lubrication cup 03432420603 Einstellschraube Ajust screw 03432420604 Keilleiste 03432420605 Handhebel Handle lever 03432420606 Handrad Handle 03432420607...
-
Page 111: J Oberschlitten - Top Slide
Oberschlitten - Top slide TX4414 DE | EN Version 1.0.5 - 2020-12-09 Originalbetriebsanleitung... - Page 112 Ersatzteilliste Oberschlitten - Spare part list top slide Menge Grösse Artikelnummer Bezeichnung Designation Qty. Size Article no. Führung Guide 03432420701 Grundplatte Base plate 03432420702 T-Nut T-Slot 03432420703 Oberschlitten Top slide 03432420704 Axiallager Thrust bearing 03432420705 Skalening Scale ring 03432420706 Handrad Handle 03432420707 Lagerbock...
-
Page 113: K Maschinenbett Kurz Mit Bettbrücke - Short Machine Bed With Bed Bridge
Maschinenbett kurz mit Bettbrücke - Short machine bed with bed bridge TX4414 DE | EN Version 1.0.5 - 2020-12-09 Originalbetriebsanleitung... -
Page 114: U Maschinenbett Lang Ohne Bettbrücke - Long Machine Bed Without Bed Bridge
Maschinenbett lang ohne Bettbrücke - Long machine bed without bed bridge DE | EN TX4414 Originalbetriebsanleitung Version 1.0.5 - 2020-12-09... -
Page 115: L Maschinenbett - Machine Bed
Maschinenbett - Machine bed TX4414 DE | EN Version 1.0.5 - 2020-12-09 Originalbetriebsanleitung... -
Page 116: Maschinenbett - Machine Bed
Maschinenbett - Machine bed Ersatzteilliste Maschinenbett - Spare part list lathe bed Menge Grösse Artikelnummer Bezeichnung Designation Qty. Size Article no. Maschinenbett Maschine bed with bed bridge 1280 03432420801 without bed bridge Maschinenbett TX4414 Maschine bed TX4414 034324208011 1380 Bettbrücke Bed insert for 1280 bed only 03432420802... - Page 117 Scheibe Washer 03432420816 Abdeckung Cover 03432420817 Abdeckung Cover 03432420818 Riemenscheibe Pulley 03432420819 Platte Plate 03432420820 Motor Motor 03432420821 Abdeckung Cover 03432420822 Abdeckung Cover 03432420823 Abdeckung Cover 03432420824 Antriebsriemen Drive belt 03432420825 Abdeckung Cover 03432420826 Fusspedal Foot pedal 03432420827 Maschinenunterbau Machine substructure 03432420828 Abdeckung Cover...
-
Page 118: N Reitstock - Tailstock
Reitstock - Tailstock DE | EN TX4414 Originalbetriebsanleitung Version 1.0.5 - 2020-12-09... - Page 119 Ersatzteilliste Reitstock - Spare part list tailstock Menge Grösse Artikelnummer Bezeichnung Designation Qty. Size Article no. Buchse Bushing 03432420901 Buchse Bushing 03432420902 Bolzen Bolt 03432420903 Welle Shaft 03432420904 Pinole Sleeve MK4 (MT4) 03432420905 Pinole Sleeve MK5 (MT5) 03432420905MT5 Spindel Spindle MK4 (MT4) 03432420906 Spindel...
-
Page 120: O Drehfutterschutz - Lathe Chuck Protection
Drehfutterschutz - Lathe chuck protection Ersatzteilliste Drehfutterschutz - Spare part list lathe chuck cover Menge Grösse Artikelnummer Bezeichnung Designation Qty. Size Article no. Handgriff Handle 034324201201 Bolzen Bolt 034324201202 Buchse Bushing 034324201203 Buchse Bushing 034324201204 Schraube Screw 034324201205 Endschalter Limit switch 034324201206 Platte Plate... -
Page 121: P Mitlaufende Lünette - Follow Rest
Mitlaufende Lünette - Follow rest Ersatzteilliste Mitlaufende Lünette - Spare part list follow rest Menge Grösse Artikelnummer Bezeichnung Designation Qty. Size Article no. Gehäuse Housing 034324201401 Bolzen Bolt 034324201402 Innensechskantschraube Socket head screw ISO 4762 - M12 x 55 Spitze Center 034324201404 Gewindebolzen... -
Page 122: Q Feststehende Lünette - Steady Rest
Feststehende Lünette - Steady rest Ersatzteilliste Mitlaufende Lünette - Spare part list follow rest Menge Grösse Artikelnummer Bezeichnung Designation Qty. Size Article no. Gehäuse Housing 034324201301 Gehäuse Housing 034324201302 Bolzen Bolt 034324201303 Spitze Center 034324201304 Gewndebolzen Threaded bolt 034324201305 Einstellmutter Ajust nut 034324201306 Bolzen... -
Page 123: R Schaltplan - Wiring Diagram
Schaltplan - Wiring diagram TX4414 DE | EN Version 1.0.5 - 2020-12-09 Originalbetriebsanleitung... -
Page 124: S Schaltplan - Wiring Diagram
Schaltplan - Wiring diagram DE | EN TX4414 Originalbetriebsanleitung Version 1.0.5 - 2020-12-09... -
Page 125: T Schaltplan - Wiring Diagram
Schaltplan - Wiring diagram TX4414 DE | EN Version 1.0.5 - 2020-12-09 Originalbetriebsanleitung... - Page 126 TX4414 - Bauteilliste Elektrik - Electric components Menge Grösse Artikelnummer Bezeichnung Designation Qty. Size Article no. Motorschutzschalter Motor protection switch Siemens 3RU6126-4ABO (11-16A) 0343242091F2 Antriebsmotor Drive motor IEC 132S-T4,400V/3PH/50HZ, 5.5KW 034324209821 Motor Kühlmittelpumpe Engine coolant pump AB-JM50-3?400V 3PH 50HZ 100W? 0343242091M5 Hauptschalter Main switch...
- Page 127 oil-compare-list.fm Viskosität Schmierstoffe Viskosity Kennzeich- Lubricant nung nach Viscosité ISO VG DIN 51502 Lubrifiant DIN 51519 mm²/s (cSt) Aral Degol BG BP Energol SPARTAN Klüberoil Mobilgear Shell Omala VG 680 CLP 680 Meropa 680 GR-XP 680 EP 680 GEM 1-680 Aral Degol BG BP Energol SPARTAN...
- Page 128 Spezialfette, ALTEMP wasserabweisend Mobilux EP Q NB 50 Special greases, water resi- Energrease Aral Aralub Klüberpaste stant PR 9143 Mobil Grea- ME 31-52 serex 47 Graisses spéciales, déperlant Wälzlagerfett Shell Alva- K 3 K-20 CENTO- Multifak Pre- Bearing grease Aralub HL 3 Energrease BEACON 3 Mobilux 3...
-
Page 129: Malfunctions
Malfunctions Cause/ Malfunction Solution possible effects Machine does not turn on • Position switch spindle brake machine • Check position switch spindle brake, switches off adjust • Position switch lathe chuck protection • Check position switch lathe chuck pro- switches the machine off. tection, adjust •... - Page 130 Cause/ Malfunction Solution possible effects Flank wear too high • Clearance angle too small (lathe tool • Increase clearance angle "pushes") • Lathe tool tip not adjusted to centre • Correct height adjustment of the lathe height tool Cutting edge breaks off •...
-
Page 131: Appendix
Appendix 10.1 Copyright This document is protected by copyright. All derived rights are reserved, especially those of translation, re-printing, use of figures, broadcast, reproduction by photo-mechanical or similar means and recording in data processing systems, either partial or total. Subject to technical changes without notice. 10.2 Terminology/Glossary Term... -
Page 132: Liability Claims/Warranty
Any defective products or components of such products will either be repaired or replaced by components which are free from defects. Ownership of replaced products or components is transferred to OPTIMUM Maschinen Germany GmbH. The automatically generated original proof of purchase which shows the date of purchase, ... -
Page 133: Storage
Example: not stackable - do not stack further packing case on top of the first one. Consult Optimum Maschinen Germany GmbH if the machine and accessories are stored for more than three months or are stored under different environmental conditions than those spec- ified here . -
Page 134: Decommissioning
Please make sure that the electrical components are disposed of professionally and according to the legal regulations. Please only throw depleted batteries in the collection boxes in shops or at municipal waste management companies. 10.6.1 Decommissioning CAUTION! Disused machines need to be decommissioned in a professional manner in order to avoid later misuse and endangerment of the environment or persons. -
Page 135: Disposal Via Municipal Collection Facilities
Modified settings Any experiences with the lathe which might be important for other users Recurring malfunctions Optimum Maschinen Germany GmbH Dr.-Robert-Pfleger-Str. 26 D-96103 Hallstadt Fax +49 (0) 951 - 96 555 - 888 email: info@optimum-maschinen.de Appendix TX4414 Version 1.0.5 - 2020-12-09... - Page 136 EC - Declaration of Conformity Machinery Directive 2006/42/EC Annex II 1.A Optimum Maschinen Germany GmbH The manufacturer / distributor Dr.-Robert-Pfleger-Str. 26 D - 96103 Hallstadt, Germany hereby declares that the following product Hand controlled lathe Product designation: TX4414 Type designation: fulfills all the relevant provisions of the directive specified above and the additionally applied directives (in the following) - including the changes which applied at the time of the declaration.
- Page 137 Index Prohibition, warning and mandatory signs .... 15 Protective Accident report ............18 equipment ............17 Protective cover Clamping force-speed diagram ......88 lathe chuck ............14 Cleaning lead screw ............13 machine ............32 of the headstock ..........14 Cooling lubricant ...........60 Copyright ............131 Qualification of personnel Customer service ..........81...
- Page 138 TX4414 Translation of original instructions Version 1.0.5 - 2020-12-09...
Need help?
Do you have a question about the OPTIturn TX 4414 and is the answer not in the manual?
Questions and answers
Warum sind die Schaltstellungen zur Gewindeeinstellung an der tx4414 schwerfällig?
The gear settings for thread adjustment on the OPTIMUM Maschinen OPTIturn TX 4414 can be difficult to operate because they must only be adjusted when the lathe is completely stopped. This requirement limits when adjustments can be made, making operation less convenient.
This answer is automatically generated