Table of Contents
Advertisement
Quick Links
®
Installation, Operation and Maintenance Manual
Installation, Operation and Maintenance Manual
Please read and save these instructions for future reference. Read carefully before attempting to assemble, install,
Please read and save these instructions for future reference. Read carefully before attempting to assemble, install,
operate or maintain the product described. Protect yourself and others by observing all safety information. Failure
operate or maintain the product described. Protect yourself and others by observing all safety information. Failure
to comply with these instructions will result in voiding of the product warranty and may result in personal injury
to comply with instructions could result in personal injury and/or property damage!
and/or property damage.
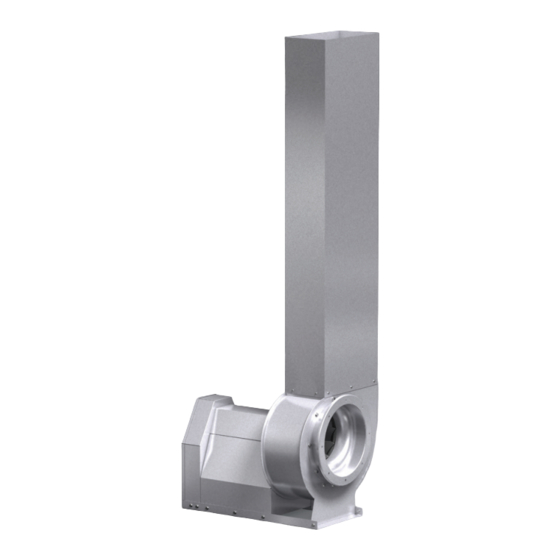
Model FJ-M Fume Jet Fan
Model FJ-M is a pre-engineered, factory supplied combination of a
centrifugal blower with a discharge stack. Designed to follow ANSI Z9.2
standard for local exhaust systems. Fan offers extended discharge to reduce
and prevent exposure to harmful fumes. Performance capabilities range up
to 17,000 cmh and up to 5.8 in. wg. of static pressure.
FJ-M fans are available in 8 sizes with wheel diameters ranging from 315 -
710 mm. Each fan shall bear a permanently affixed manufacturer's engraved
metal nameplate containing the model number and individual serial number.
General Safety Information
Only qualified personnel should install this fan.
Personnel should have a clear understanding of these
instructions and should be aware of general safety
precautions. Improper installation can result in electric
shock, possible injury due to coming in contact with
moving parts, as well as other potential hazards. Other
considerations may be required if seismic activity
is present. If more information is needed, contact a
licensed professional engineer before moving forward.
1. Follow all local electrical and safety codes, as well as
the National Electrical Code (NEC) and the National
Fire Protection Agency (NFPA), where applicable.
2. The rotation of the wheel is critical. It must be free
to rotate without striking or rubbing any stationary
objects.
3. Motor must be securely and adequately grounded.
4. Do not spin fan wheel faster than max cataloged fan
RPM. Adjustments to fan speed significantly effects
motor load. If the fan RPM is changed, the motor
current should be checked to make sure it is not
exceeding the motor nameplate amps.
5. Do not allow the power cable to kink or come in
contact with oil, grease, hot surfaces or chemicals.
Replace cord immediately if damaged.
6. Verify that the power source is compatible with the
equipment.
7. Never open access doors to a duct while the fan is
running.
®
FumeJet
DANGER
Always disconnect, lock and tag power source before
installing or servicing. Failure to disconnect power
source can result in fire, shock or serious injury.
CAUTION
When servicing the fan, motor may be hot enough
to cause pain or injury. Allow motor to cool before
servicing.
CAUTION
Precaution should be taken in explosive atmospheres.
FumeJet™ Fume Exhaust Fans
Document 484719
Model FJ-M
®
Fume Exhaust Fans
FJ-M
Belt Drive
1
Advertisement
Table of Contents

Related Manuals for Greenheck FumeJet FJ-M


Summary of Contents for Greenheck FumeJet FJ-M
-
Page 1: General Safety Information
Document 484719 Model FJ-M ® FumeJet Fume Exhaust Fans ® Installation, Operation and Maintenance Manual Installation, Operation and Maintenance Manual Please read and save these instructions for future reference. Read carefully before attempting to assemble, install, Please read and save these instructions for future reference. Read carefully before attempting to assemble, install, operate or maintain the product described. - Page 2 Receiving INDOOR - The ideal environment for the storage of fans and accessories is indoors, above grade, in a low Upon receiving the product, check to ensure all items humidity atmosphere which is sealed to prevent the entry are accounted for by referencing the delivery receipt or of blowing dust, rain or snow.
-
Page 3: Table Of Contents
Table of Contents Machined parts coated with rust preventive should be restored to good condition promptly if signs of rust General Safety Information ....1 occur. Immediately remove the original rust preventive General Information . -
Page 4: General Information
When contacting your Greenheck increased sound levels and representative with future needs or questions, please structural failure of the fan have the information on this label available. -
Page 5: Installation
POOR GOOD Installation Ducted Outlet Installations Discharge Duct Turns - Duct turns located near the Turning Move the fan to the desired location. Check and tighten Vanes fan discharge should always be in the direction of the fasteners throughout the unit and then fasten securely fan rotation. -
Page 6: System Assembly
System Assembly Equipment Supports Model GESS equipment supports are designed for use NOTE on flat roof decks, to be mounted directly to the roof When installing stack and fan body, be certain to rig deck structure, then roofed and flashed for weather each section separately using the lifting lugs provided. -
Page 7: Fan Drainage Piping And Trap Detail
RECOMMENDED DRAIN TRAP DESIGN (TRAP BY OTHERS) Fan Drainage Piping and Trap Detail V-Belt Drives NEGATIVE PRESSURE TRAP (by others) V-Belt Drive Installation Note: A conservation method of trap design is to set N = TSP and P = TSP (TSP = Total Static Pressure) MOTOR 1. -
Page 8: Radial Gap, Overlap And Wheel Alignment
Radial Gap, Overlap and Wheel Alignment " Wheels must rotate freely and not rub on the inlet cone. Radial Gap and Overlap Dimensions Model FJ-M wheels overlap the inlet cone. Refer to the Radial Size Overlap table for the proper dimension. Backward Inclined Radial Gap and Alignment These are the original drawings on the Illustrator file... -
Page 9: Unit Start-Up
Unit Start-Up Additional Steps for Initial Start-Up WARNING 1. Check for proper wheel rotation by momentarily Disconnect and secure to the OFF position all energizing the fan. Access to view the wheel can be electrical power to the fan prior to inspection or gained through the blower housing access panel. -
Page 10: Routine Maintenance And Operation
Routine Maintenance and Operation Belt Drive Maintenance WARNING V-belt drives must be checked on a regular basis Before taking any corrective action, make certain unit for wear, tension, alignment and dirt accumulation. is not capable of operation during repairs. Premature or frequent belt failures can be caused by Once the unit has been put into operation, a routine improper belt tension (either too loose or too tight) maintenance schedule should be set up to accomplish... - Page 11 Bearing Lubrication Schedule Wheel and Fastener Maintenance Shaft bearings are the most critical moving part of a Wheels require very little attention when exhausting fan. Therefore, special attention should be given to clean air, however, air heavily laden with grease or keeping the bearings clean and well lubricated.
-
Page 12: Bearing Replacement
Bearing Replacement The intent of this procedure is to allow a field service Bearing Installation technician to replace bearings with the fan remaining 1. Before installing, read bearing manufacturers’ in place in its intended application. All work can procedures. Before putting the new bearings on be conducted by accessing the bearings by either the shaft, you may need to break what is called removing a shaft guard, a weatherhood or working... -
Page 13: Troubleshooting
Troubleshooting WARNING Before taking any corrective action, make certain unit is not capable of operation during repairs. Problem Cause Corrective Action Adjust wheel and/or inlet cone. Wheel Rubbing Inlet Tighten wheel hub or bearing collars on shaft. Tighten sheaves on motor/fan shaft. Adjust belt tension. Align V-Belt Drive sheaves properly (see procedure). -
Page 14: Maintenance Log
Maintenance Log Date _______________ Time _______________ AM/PM Date _______________ Time _______________ AM/PM Notes: __________________________________________ Notes: __________________________________________ ________________________________________________ ________________________________________________ ________________________________________________ ________________________________________________ ________________________________________________ ________________________________________________ ________________________________________________ ________________________________________________ Date _______________ Time _______________ AM/PM Date _______________ Time _______________ AM/PM Notes: __________________________________________ Notes: __________________________________________ ________________________________________________ ________________________________________________ ________________________________________________ ________________________________________________ ________________________________________________... - Page 15 Maintenance Log Date _______________ Time _______________ AM/PM Date _______________ Time _______________ AM/PM Notes: __________________________________________ Notes: __________________________________________ ________________________________________________ ________________________________________________ ________________________________________________ ________________________________________________ ________________________________________________ ________________________________________________ ________________________________________________ ________________________________________________ Date _______________ Time _______________ AM/PM Date _______________ Time _______________ AM/PM Notes: __________________________________________ Notes: __________________________________________ ________________________________________________ ________________________________________________ ________________________________________________ ________________________________________________ ________________________________________________...
-
Page 16: Our Commitment
As a result of our commitment to continuous improvement, Greenheck reserves the right to change specifications without notice. Product warranties can be found online at Greenheck.com, either on the specific product page or in the literature section of the website at Greenheck.com/Resources/Library/Literature.
Need help?
Do you have a question about the FumeJet FJ-M and is the answer not in the manual?
Questions and answers