Advertisement
Quick Links
SS-956 SS-968 LCD REWORK SOLDERING
STATION
Thank you for purchasing Pro'sKit product. The SS-956 SS-968 LCD
Smart Hot Air Rework Station has been designed to meet high quality
standards .Please properly use and take care of your product for
prolonging service life. Please store the manual in a safe, easily accessible
place for future reference.
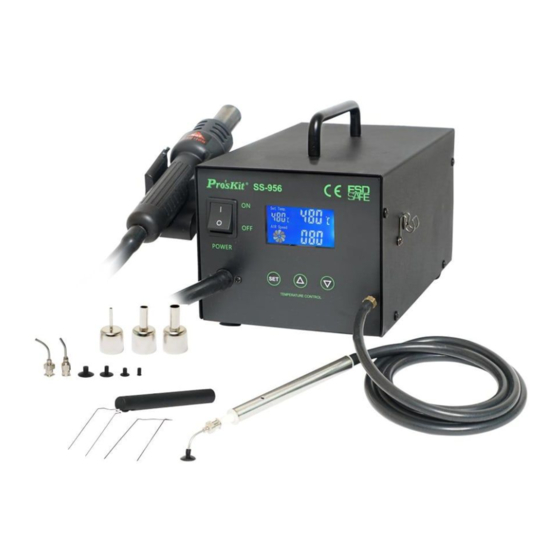
Packing List and Name of Parts
Name of Parts:
Hot air gun
Set button
UP button
(to increase temp.
or air speed.)
Packing List:
1. Smart Rework Station with
Holder
2. User's Manual
3. Hot Air Gun
4. Air Nozzle x 3
5. Power Cord
Features and Specifications
Features:
Microprocessor-controlled with closed circuit sensor design provides
better performance and accurate temperature control.
Temperature calibration function.
Handle with sensor design switches work & sleep mode for real-time
operation convenience.
Provide 600W high power and wide temperature range up to 480°C.
Auto cool-off process to prolong the lifetime of heating element
ESD safe design prevents static and electric leakage to damage the
PCB.
Complies with CE and ESD standard, conforms to RoHS.
High quality air pump supply and quiet operation.
Silicone handpiece cord wire heat-resistant up to 200℃.
Additional ground contact and power cord socket.
Interchangeable and applicable to most of branded hot air nozzles.
Specifications:
SS-956B
Specification
SS-968B
220V~240V~,
Power Input
Power Consumption
Temperature Range
Heating Element
Temperature Calibration
Pump/Motor Type
Air Capacity
Suction Capacity
Auto Sleep Function
Auto Cool-Off Function
Equipment Noise
Temperature Display
Fuse
Power Plug
B
Heating Element Model No.
5SS-989NB-H
Hot Air Gun Model No.
9SS-968B-HG
Nozzle
Suction Cup: Φ12.5mm/Φ10mm/Φ6.5mm/Φ3mm x 1pce
Opening Lever(Width) : 15mm/20mm x 1pce(SS-956)
Dimensions
Weight
Package
Down button
(to decrease temp. or air
speed.)
Suction pen
(SS-956)
6. Vacuum Suction Pen (SS-956)
7.
Suction Cup :
Φ12.5mm,Φ10mm ,Φ6.5mm,
Φ3mm (SS-956)
8. IC Popper : 15mm ,20mm
(SS-956)
SS-956C
SS-968C
110V~120V~,60Hz
240V~, 50Hz
50Hz
600W
Room Temperature~480°C(896°F)
Metal Heating Core
0~699℃(0~999℉) , Adjustable
Diaphragm Pump
24L/min(Max)
100g(SS-956)
YES
YES
<50dB
LCD (60mm X 35mm,Backlight)
5A/250V (φ5x20mm)
8A/250V (φ5x20mm)
C
5SS-989NC-H
5SS-989NE-H
9SS-968C-HG
9SS-968E-HG
9SS-900-A1 (ID:Ø 2.2mm) x 1pce
9SS-900-A2 (ID:Ø 6.6mm) x 1pce
9SS-900-A3 (ID:Ø 8.5mm) x 1pce
(SS-956)
250(L)*230(W)*170(H)mm
3.2kg
Color Box
Main Menu
How to Use
1.
Please remove the pump securing screw (M5x12 with red mark) from
the bottom of the rework station. Failure to do so may result in serious
problems (Fig.2)
Remove the
screw before use
2.
Insert the power plug into socket.
3.
Power on the rework station, and LCD screen will display standby
status after two seconds (Fig.3). When lift the hot air gun, LCD screen will
display the last setting temperature..
4.
Do not unplug the power plug instantly after turning off the power
switch, because the fan will keep operating to cool down the heating
element. The power plug only can be unplugged while the fan stops
operation completely.
Temperature and Air Speed Setting (Hot air gun can not
be placed on the holder while setting)
1.
Power on the rework station, lift the hot air gun, LCD screen will
display main menu (Fig. 4), last setting temperature will display.
Press the "SET" button for one second; then choose temperature
2.
setting mode or air speed setting mode.
In temperature setting mode, the "Set Temp" words will shinning,
3.
adjust the temperature by using the UP▲ and DOWN▼ buttons. In
another way, you can also press the UP▲ and DOWN▼ buttons directly
in the main menu to set the temperature.
In the air speed setting mode, the " Air Speed " words will
4.
shinning, adjust the air speed by using the UP ▲ and DOWN ▼
buttons(air speed range from 20~100). After stopping operation around
SS-956E
two seconds, it will go back to the main menu.
SS-968E
Temperature Calibration Setting
The hot air gun should be recalibrated after changing the gun, replacing
the heating element or nozzle.
E
( Fig.1)
Temperature setting
Real Temperature
Real Temperature
Air capacity
Air speed
Fig.2
Fig.3
Fig.4
Press "SET" button and Down button
1.
"▼" in the same time, and main menu will
display "CAL" and setting temperature. Press
UP ▲ or DOWN ▼ to input actual
temperature, press "SET" button to
confirm and back to the main menu.
2.
When the status display under
temperature is "---", it means temperature has
not been calibrated.
Fig.1
Advertisement

Related Manuals for Pro's Kit SS-956


Summary of Contents for Pro's Kit SS-956
- Page 1 STATION Temperature setting Real Temperature Thank you for purchasing Pro’sKit product. The SS-956 SS-968 LCD Smart Hot Air Rework Station has been designed to meet high quality standards .Please properly use and take care of your product for prolonging service life. Please store the manual in a safe, easily accessible place for future reference.
- Page 2 Do not touch the pin of plug to prevent electrical shock for human body. increased before. How to use suction pen(SS-956) Choose a proper suction cup according to the weight (less than 100g) and size of object. Install the cap with the suction pen. (Fig. 15) When the status display under temperature is "L”...
- Page 3 熱風嘴 9SS-900-A2 (Ø 6.6mm) x 1 個 當溫度數值下方顯示”- - -“(圖6),表示焊台溫度未被校準過, 出廠 熱風嘴 9SS-900-A3 (Ø 8.5mm) x 1 個 時通過物理方法(校溫電位器)調整至最佳狀態。 吸盤 Φ12.5mm/Φ10mm/Φ6.5mm/Φ3mmx 各 1 個(僅 SS-956 有) 撬棒(寬) :15mm/20mm x 各 1 個(僅 SS-956 有) 尺寸 (mm) 250*215*170mm(含提手/熱風手柄架/吸筆支架) 重量 約 3.2kg 包裝方式...
- Page 4 圖 13 圖6 6. 電源關機延時 當溫度數值下方顯示“H”或”HH” (圖7),表示焊台溫度已被校準調 當關閉電源後,拆焊台會用最大風量將發熱元件降溫至 100℃再關 高過。例:設定溫度350℃,實際溫度320℃,如圖3.1進行溫度校準 機(圖 14)以確保安全。 後,溫度將由320℃調升到350。 圖 14 圖7 當溫度數值下方顯示“L”或”LL”(圖8),表示焊台溫度已被校準調低 吸筆使用(SS-956) 過。 1.依據需要提取的物品重量(建議不大於100g)及表面大小,選擇使用的吸 盤規格安裝在吸筆的頭部(圖 15) 圖8 當溫度數值下方顯示“HHH” (圖9),表示焊台溫度已調整至最高溫 圖15 2.將吸盤平整放置在被吸物的表面, 用手指按住吸筆上的孔位 (圖 16) , 度或校溫幅度過大,為了機器安全考慮,此時無法再繼續調升溫度, 使吸筆吸住物品. 但可調降溫度。 圖16 3.將被吸物移動到放置的位置,鬆開堵住吸筆小孔上的手指,物品會脫離吸 圖9 當溫度數值下方顯示“LLL” (圖10),表示焊台溫度已調整至最低溫 盤.
- Page 5 热风嘴 9SS-900-A1 (Ø 2.2mm) x 1 个 当温度数值下方显示“L”或”LL”(图8),表示焊台温度已被校准调低过。 热风嘴 9SS-900-A2 (Ø 6.6mm) x 1 个 热风嘴 9SS-900-A3 (Ø 8.5mm) x 1 个 吸盘 Φ12.5mm/Φ10mm/Φ6.5mm/Φ3mmx 各 1 个(仅 SS-956 有) 图8 撬棒(宽) :15mm/20mm x 各 1 个(仅 SS-956 有) 当温度数值下方显示“HHH” (图9),表示焊台温度已调整至最高温度或校 尺寸 (mm) 250*215*170mm(含提手/热风手柄架/吸笔支架) 温幅度过大,为了机器安全考虑,此时无法再继续调升温度,但可调降温 重量...
- Page 6 图 13 三、超过保固期限仍需检修,虽未更换零件,将依本公司保固条款酌收工时服务费用 6. 电源关机延时 当关闭电源后,拆焊台会用最大风量将发热组件降温至 100℃再关机(图 制造商 :宝工实业股份有限公司 14)以确保安全。 地 址 :台湾新北市新店区民权路130巷7号5楼 电 话 :886-2-22183233 E-mail :pk@mail.prokits.com.tw 图 14 吸笔使用(SS-956) 销售/生产商 :上海宝工工具有限公司 1.依据需要提取的物品重量(建议不大于100g)及表面大小,选择使用的吸盘规格 地址 :上海市浦东新区康桥东路1365弄25号 安装在吸笔的头部(图 15) 原产地 :中国.上海 服务热线 :021-68183050 图15 2.将吸盘平整放置在被吸物的表面, 用手指按住吸笔上的孔位(图 16),使吸 笔吸住物品. 宝 工 实 业 股 份 有 限 公 司...