
Related Manuals for Sealer Sales W Series


Summary of Contents for Sealer Sales W Series
- Page 1 L-Bar Sealer Models: W-350L, W-500L, W-650L Distributed By: Version 1.0 Last Updated: 2/25/2020 Sealer Sales | www.sealersales.com | Tel: 818-718-8818 | E-mail: contact@sealersales.com...
- Page 2 For permission requests, write to the publisher, addressed “Attention: Permissions Coordinator,” at the address below. Sealer Sales, Inc. 8820 Baird Avenue Northridge, Ca 91324 www.sealersales.com...
-
Page 3: General Information
No part of this manual may be duplicated, reproduced, stored in a retrieval system, translated, transcribed, or transmitted in any form without the express prior written permission of Sealer Sales. E Q U I P M E N T I N F O R M A T I O N ... -
Page 4: Safety Instructions
W H L I N S T R U C T I O N M A N U A L Safety Instructions WARNING! Below are general safety precautions and warnings that should be understood prior to setting up or operating your equipment. Read and fully understand all instructions and warnings prior to using this unit. - Page 5 W H L I N S T R U C T I O N M A N U A L Never touch the heating elements with hand while the sealer is plugged into a power source, in operation or just finished operation. Touching heated areas may cause fire and/or severe burns. ...
-
Page 6: Specifications
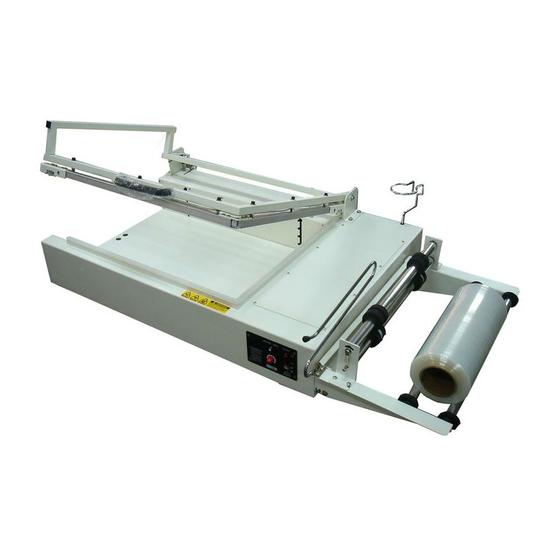
W H L I N S T R U C T I O N M A N U A L Introduction W-Series L-bar sealers are designed for quick and easy shrink film packaging. The L-bar sealers allow youto create sealed packages using centerfold shrink film in one step, producing products that have a factory fresh clean look and feel. - Page 7 W H L I N S T R U C T I O N M A N U A L Getting to Know your L-Bar Sealer W-Series L-Bar sealers are simple and efficient sealing machines. Sealing Arm Bring sealing arm to activate sealing process Heat Gun Holder Heat gun not included...
-
Page 8: Electrical Circuit Diagram
W H L I N S T R U C T I O N M A N U A L Electrical Circuit Diagram Figure 2. Electrical Circuit Diagram for W-Series L-Bar Sealers... -
Page 9: Installation
W H L I N S T R U C T I O N M A N U A L Operating your Sealer Important Read this manual carefully, and make it available to everyone involved with the supervision, maintenance, and/or operation of this machine. Additional copies are available at your request. (Contact your distributor for this information.) Be very careful when operating, adjusting, or servicing this equipment. -
Page 10: Operation
W H L I N S T R U C T I O N M A N U A L 3. Attach the film roller to the sealer using the four screws provided. 4. Adjust the bottom base of the L-bar sealer to the height of your product. Five options are available staring at 7 1/4"... -
Page 11: Maintenance
W H L I N S T R U C T I O N M A N U A L Maintenance The following maintenance procedures should be followed to ensure the longevity of your W-Series Long Hand sealer. Inspection and Cleaning 1. - Page 12 W H L I N S T R U C T I O N M A N U A L To install your replacement kit on your sealer, turn off power and unplug sealer. 1. Remove the PTFE adhesive to expose the heating element. Loosen the screw on the front spring hook and remove heating element.
-
Page 13: Parts Diagram
W H L I N S T R U C T I O N M A N U A L Parts Diagram Figure 6. Spare Parts Diagram... - Page 14 W H L I N S T R U C T I O N M A N U A L Item Part # Description Comments Upper Bracket specify model # when ordering Shaft specify model # when ordering WHL-3 Bearing-PHS12 Ring / E-Clip Bushing / Nut WHL-6...
- Page 15 W H L I N S T R U C T I O N M A N U A L Item Part # Description Comments WHL-31 Bracket WHL-32 Spring for #31 Bracket Bracket for Film Holder Transformer Holder Heat Gun Holder Heat Gun Fixed Bracket WHI-13 Power Socket for Heat Gun...
-
Page 16: Troubleshooting
W H L I N S T R U C T I O N M A N U A L Troubleshooting Problem Possible Causes Solution 1. Disconnected power cord 1. Check or change plug 2. Power cord is broken 2. Replace power cord No sealing 3.
Need help?
Do you have a question about the W Series and is the answer not in the manual?
Questions and answers