Additel ADT927 Maintenance Instructions Manual
Hide thumbs
Also See for ADT927:
- User manual (2 pages) ,
- User manual (2 pages) ,
- Maintenance and repair manual (15 pages)
Advertisement
Table of Contents
- 1 Preparation for Maintenance or Repair Service
- 2 Repairing Pre-Pressurization Piston Unit
- 3 Turn the Feed Screw Nut Counterclockwise and Completely Remove the Feed Screw Nut and Back Holder
- 4 Replace the O-Ring (9.12Mm X 3.53Mm) and Assemble All Parts Back in Revise Order
- 5 Repairing High-Pressure Pressurization Piston Unit
- 6 Turn the Hex Nut Counterclockwise until Completely out
- 7 Hold the High-Pressure Pressurization Wheel and Pull the Piston Unit out of Piston Chamber
- 8 Replace the O-Ring (6Mm X 3Mm) and Assemble All Parts Back in Reverse Order
- Download this manual
Preparation for maintenance or repair service.
1. Open vent valve and isolation valve,(Counterclockwise) push the
liquid out of piston cavity by turning the pre-pressurization wheel
clockwise until it is completely in.
2. Drain the liquid media out of the pump.
3. Close the isolation valve by turning clockwise until closed.
4. Close vent valve by turning clockwise until closed.
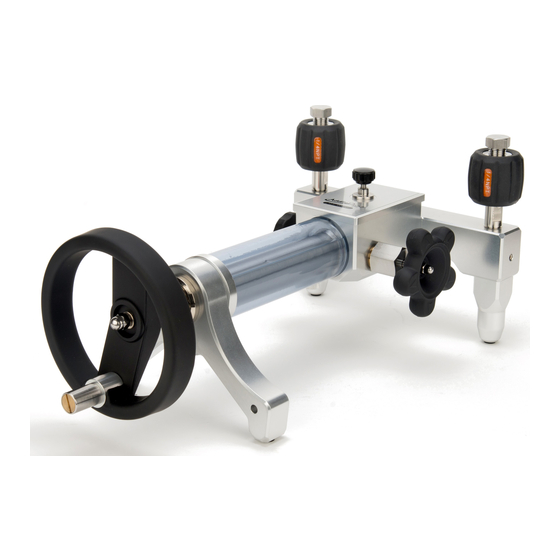
Vent Valve
Isolation Valve
Maintenance Instructions
(ADT927)
High-pressure
pressurization handle
Pre-pressurization
wheel
Advertisement
Table of Contents

Related Manuals for Additel ADT927


Summary of Contents for Additel ADT927
- Page 1 Maintenance Instructions (ADT927) Preparation for maintenance or repair service. 1. Open vent valve and isolation valve,(Counterclockwise) push the liquid out of piston cavity by turning the pre-pressurization wheel clockwise until it is completely in. 2. Drain the liquid media out of the pump.
- Page 2 Repairing pre-pressurization piston unit 1. Loosen the Allen screws by turning all three screws counterclockwise 5 to 8 turns. Allen Screw 2. Turn out the pre-pressurization wheel to about half way out. Pre-pressurization wheel...
- Page 3 3. Turn the feed screw nut counterclockwise and completely remove the feed screw nut and back holder Back Holder feed screw nut 4. Pull the pre-pressurization piston out of the chamber. (Warning: Be careful not to damage the liquid reservoir during procedure) Liquid Reservoir...
- Page 4 5. Replace the O-ring (9.12mm X 3.53mm). Pre-pressurization piston O-ring (9.12mm X 3.53mm) 6. Assemble all parts back in revise order. Repairing high-pressure pressurization piston unit 1. Turn the high-pressure pressurization wheel counterclockwise to about half way out.
- Page 5 high-pressure pressurization wheel 2. Turn the hex nut counterclockwise until completely out. Hex Nut...
- Page 6 3. Hold the high-pressure pressurization wheel and pull the piston unit out of piston chamber. High-pressure Pressurization Wheel 4. Turn the hex nut cover counterclockwise and completely remove it. Hex nut cover...
- Page 7 5. Replace the O-ring. (6mm X 3mm) O-ring (6mm X 3mm) 6. Assemble all parts back in reverse order.
Need help?
Do you have a question about the ADT927 and is the answer not in the manual?
Questions and answers