Table of Contents
Advertisement
Version 1.0
Contents
Introduction .......................................................................................................................................... 2
Features ............................................................................................................................................ 3
Applications for the Microbrick ........................................................................................................ 3
Supply Voltage .................................................................................................................................. 4
Speed Controller and Failsafe .......................................................................................................... 4
Basic Setups .......................................................................................................................................... 4
Connecting the Microbrick ................................................................................................................... 5
Setting Up the Microbrick .................................................................................................................... 5
Specific Issues ..................................................................................................................................... 10
Rudder Steering .............................................................................................................................. 10
Throttle Features ............................................................................................................................ 10
Indicator LEDs ................................................................................................................................. 11
Binding ............................................................................................................................................ 11
Programming ...................................................................................................................................... 11
Transmitter or Microbrick? ............................................................................................................ 11
Programming the Microbrick ......................................................................................................... 12
Swapping the Functions of the Onboard Servos ........................................................................ 12
Changing Stabilization Response Direction ................................................................................ 12
Selecting a Receiver Mix ............................................................................................................. 13
Enabling Dual Aileron Stabilization ............................................................................................ 14
Mixing Considerations .................................................................................................................... 14
Master Gain ........................................................................................................................................ 16
Troubleshooting ................................................................................................................................. 16
ANNEX A: Tips, Tricks and Modifications ........................................................................................... 18
The Variants of the Microbrick. ...................................................................................................... 18
Adding an External Bind Function. ................................................................................................. 18
Mounting the Microbrick with double sided tape. ........................................................................ 19
Power Supply Voltage and the Onboard Speed Controller............................................................ 19
Lemon Microbrick Reference Guide
2021-07-23
Advertisement
Table of Contents

Subscribe to Our Youtube Channel
Related Manuals for Lemon Rx Microbrick


Summary of Contents for Lemon Rx Microbrick
-
Page 1: Table Of Contents
ANNEX A: Tips, Tricks and Modifications ................... 18 The Variants of the Microbrick....................... 18 Adding an External Bind Function....................18 Mounting the Microbrick with double sided tape................. 19 Power Supply Voltage and the Onboard Speed Controller............19... -
Page 2: Introduction
250g range of outdoor foam models running on a 2s LiPo, as well as a wide range of indoor “UMX” type planes that use the 1s, 150-220mAh size cells. The Microbrick has five available flight channels in standard Spektrum order (1-4, 6), plus two internal control channels: Channel 1: Throttle: Onboard 5A brushed throttle and external signal for a brushless ESC Channel 2: Aileron (or Right Aileron in dual servo aileron setups;... -
Page 3: Features
Optional second stabilized aileron servo on channel 6 (Spektrum™ standard Dual Aileron setup). Applications for the Microbrick The Microbrick is ideal for small park flier models in the increasingly popular under-250g size. Often these lightweight models have a wingspan of 700mm or less and are either Throttle/Rudder/Elevator only or in addition have ailerons driven by two servos on a Y-lead or as two separate channels. -
Page 4: Supply Voltage
The HobbyKing servos are rated to 4.8v but people have found that they work up to 5v satisfactorily. They can be used in a 2s brushless setup where the speed controller has a 5v BEC supplying the Microbrick but must not be used on a direct 2s (8.4v) supply. -
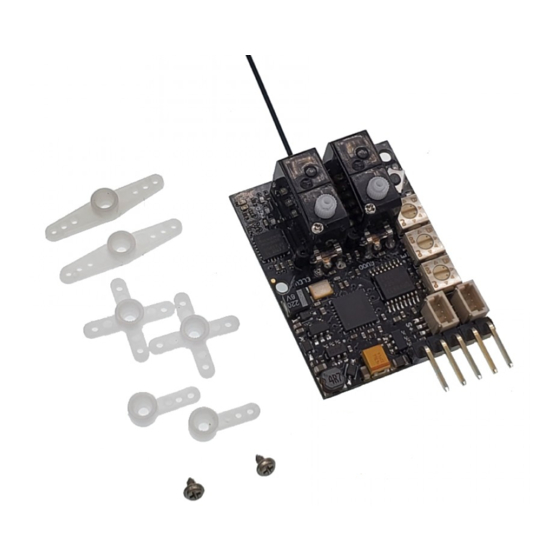
Page 5: Connecting The Microbrick
Motor/ESC/Battery connections can be soldered directly to the pads on the PC board to minimize weight. Lemon supply the Microbrick in a variety of configurations, either with battery leads already installed and a Nano 1.27mm connector for brushed motors or with a 5-pin, 0.1” 90° header which is convenient for brushless installations (the 5-pin 90°... - Page 6 Now put the transmitter into bind mode and go through the bind procedure. If you have difficulty binding, move the transmitter further away from the Microbrick. The sensitive receiver in the Microbrick can get overloaded at close range, which may inhibit the bind process. Normally, the receiver will bind at 1-2m, but sometimes it needs to be 3-4m from the transmitter.
- Page 7 5. Mount the receiver in the plane If you plan to use stabilization, install the Microbrick flat in the fuselage (right side up or inverted), aligned with the centerline and with the pins/connector pads at either back or front. If not using stabilization, orientation is not critical, as long as the onboard servos can drive the control surfaces.
- Page 8 ↻ and anticlockwise this ↺. The gain pots on the Microbrick can be adjusted from approximately 8 o’clock, which is fully anti-clockwise, to approximately 4 o’clock, fully clockwise. The 8 o’clock position results in virtually zero stabilization gain (effectively turning stabilization OFF) while the 4 o’clock position is maximum gain.
- Page 9 Lemon Microbrick Reference Guide Initially set the three gain pots at about the 10 o’clock position. This is a good conservative starting point that will produce noticeable stabilization but probably not oscillation. For most models, at least one or two gain settings will need to be increased or decreased during flight testing to achieve optimum stabilization.
-
Page 10: Specific Issues
Lemon Microbrick Reference Guide Notice how the model handles with the stabilizer turned on. It may be less responsive on one or more axes. Experiment with dual rate settings. Turn stabilization off and on to get familiar with its effects. -
Page 11: Indicator Leds
2. To serve as indicators when setting the various mixes. Lemon have packed a lot of functionality into the Microbrick and have achieved it by using only a single button to do all of the input – but it comes at the cost of some possible confusion. The LED display listed in the Lemon instructions is not always easy to follow or understand as lot of it is time dependent. -
Page 12: Programming The Microbrick
Mixing in the transmitter has the obvious advantage of being familiar and flexible. It avoids the need to master the “blue light dance” in the Microbrick. Mixing in the Microbrick, on the other hand, is very neat and self-contained. It only needs to be done once for a given model. -
Page 13: Selecting A Receiver Mix
5 seconds. During that time, the rudder response can be reversed by pressing the button. The direction will be indicated by the “R” LED. ON= reversed. When done, just release the button and wait for normal operation to restore – the Microbrick will permanently store the settings. -
Page 14: Enabling Dual Aileron Stabilization
These two will be flashing The display will change. If only the center LED “E” is flashing, then the Microbrick is in single aileron mode. If the center LED is flashing and the outer two “A and R” are solid, then the Microbrick is in dual aileron mode. - Page 15 Let’s take a look specifically at how these three types of control setup are dealt with in relation to the Lemon Microbrick. The actual setting of the mix and the indication of what has been set by the 3 blue LEDs has been described above.
-
Page 16: Master Gain
Troubleshooting Receiver Won’t Bind The Microbrick is a sensitive receiver; it can get overloaded during the bind process if it is too close to the transmitter or experiences multipath reception. Experience has shown that nearly all bind problems can be solved by ensuring that the transmitter and receiver far enough apart and are not close to large metallic surfaces. - Page 17 If the red/green LEDs do not change from Green only to Red-and-Green when the channel 5 switch is moved, then the Microbrick is not receiving the correct control signal on channel 5. Check that you have assigned a switch to channel 5.
-
Page 18: Annex A: Tips, Tricks And Modifications
UMX type models that have the Spektrum AR6400 brick receiver with onboard linear servos. The white JST-SH connectors on the Microbrick are the same as the AR6400 as well. Basically, this is a drop-in replacement for the extremely popular Spektrum linear servo bricks. The outer servo arms even move the same way as the linear bricks and a UMX brushed gearbox motor plugs straight into the two left sockets of the Nano connector. -
Page 19: Mounting The Microbrick With Double Sided Tape
Power Supply Voltage and the Onboard Speed Controller The Microbrick is 1-2s capable. That means you can power it from a 1s LiPo, a 5v or 6v BEC in an external brushless speed controller, or direct from a 2s LiPo. All onboard components including the two servos and the brushed speed controller are good up to 2s (8.5v) supply. - Page 20 You cannot use linear 1s servos on 5v, however. 3. Supply is direct from a 2s LiPo to the Microbrick. This might typically be used on a DLG or a plane with a 2s brushed motor. In this case any external servos, if used, must be 8.4V capable. The onboard Microbrick servos are fine on 2s.
Need help?
Do you have a question about the Microbrick and is the answer not in the manual?
Questions and answers