Advertisement
Quick Links
Lemon DSM2/DSMX protocol Telemetry Unit
NOTE: These instructions are based on version 1.5 of the Lemon Telemetry unit, sales of which began
in December 2014. See "Variants" on page 11 for an overview of version differences.
These instructions are written by two users on RCGroups: jj604 and Daedalus66. We have no connection with Lemon.
Lemon and Orange are brand names. Spektrum, DSM2, DSMX, X-BUS, Airware, STi, and the Telemetry logo are Trade Marks
of Horizon Hobby. Deans and PowerBox are Trade Marks. These names are used here simply as descriptions of those items.
NOTE: The DSM2 and DSMX logos have been obliterated in the photographs to avoid any Trademark issues.
Overview
The Lemon Telemetry unit will transmit telemetry data from the model when connected to the bind port of
most DSM2/DSMX-compatible receivers, whether Lemon, Spektrum or Orange. The unit has inbuilt
sensors for receiver voltage, temperature and altitude as well as external sensors for temperature, flight
battery current and voltage, and motor RPM.
Display of the data requires a suitable Spektrum or compatible transmitter that will show selected values
on the screen. At present the following Spektrum transmitters can receive and process the data from the
Lemon unit: DX6 (2014 version), DX7s, DX8, DX9, DX10 and DX18. In addition, the Lemon unit works
with the now-discontinued Spektrum STi Telemetry interface (SPMTR1000) for the iPhone/iPad. It may
become possible for other transmitters to display the telemetry data if equipped with a compatible
telemetry-capable module; such a unit is said to be under development by another manufacturer. The
focus here, however, is on using the Lemon unit with a Spektrum transmitter.
The first four pages of these instructions should give you what you need to get the telemetry unit up and
running. The rest of the document consists of various kinds of additional information likely to be of help
and interest to some users.
Getting Started – First Time Use
Before starting you need to prepare your model, bind the receiver and set it up to work with your
transmitter as usual. Do all the normal setup of servos and mixes so that the model is ready for flight
before moving on to the telemetry setup. It is strongly recommended that you review the Telemetry section
of your transmitter manual in order to understand how the telemetry function and displays work.
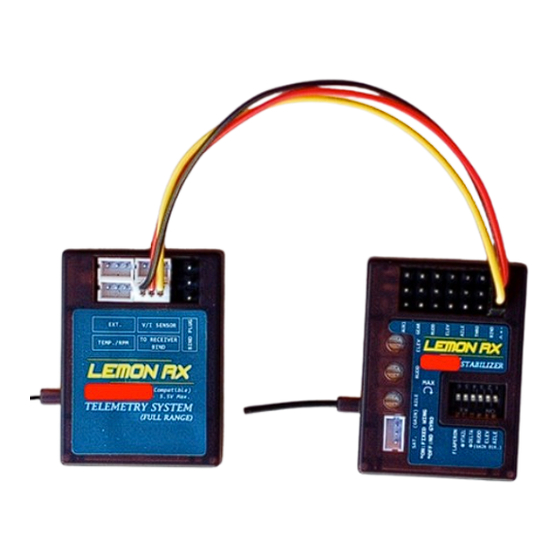
This is what the basic connection to a Lemon
10ch receiver looks like.
Lemon Telemetry Instructions
Instructions
And here is the same setup for a Lemon 7-
channel stabilized receiver.
10-Feb-16
1
Advertisement

Subscribe to Our Youtube Channel
Related Manuals for Lemon Rx DSM2


Summary of Contents for Lemon Rx DSM2
- Page 1 These instructions are written by two users on RCGroups: jj604 and Daedalus66. We have no connection with Lemon. Lemon and Orange are brand names. Spektrum, DSM2, DSMX, X-BUS, Airware, STi, and the Telemetry logo are Trade Marks of Horizon Hobby. Deans and PowerBox are Trade Marks. These names are used here simply as descriptions of those items.
- Page 2 Here is what it looks like with an Orange And finally, here is the Lemon unit connected RX3SM. Although the servo ports on this to a Spektrum AR8000 with satellite. receiver are Molex 1.25mm pitch Picoblade connectors, the bind connector is a standard 0.1”...
- Page 3 Configuring the Transmitter Screens – first steps The Telemetry screen on the Spektrum transmitter allows you to select which data items are recognized. You cannot, however, choose where on a telemetry screen they appear – only whether they are there or not. The placement is pre-programmed. Access to the transmitter’s Telemetry setup screen is from the System Setup screen.
- Page 4 WARNINGS: 1) Do not plug the Voltage/Current sensor into the Temp/RPM socket. If you then apply pack voltage you may destroy the telemetry unit. 2) The Voltage/Current sensor can be damaged if subjected to reverse voltage. Check the polarity of the connections before plugging in the flight battery.
- Page 5 (for example, the DX6 and DX7s do not display PowerBox). The telemetry unit works with any Lemon DSM2 or DSMX protocol receiver that has bind connector pins. This includes the 7-channel Stabilizer, as well as the 6-channel DSMX protocol compatible receiver, the 10-channel DSM2 protocol compatible receiver and most others.
- Page 6 The Lemon unit does not have an X-BUS port and is not Spektrum X-BUS compatible. Nor are the three- pin JST-ZH connectors (the four small white ones) wired like Spektrum. For this and other reasons, Spektrum sensors are NOT interchangeable with Lemon sensors. Do not interchange Lemon and Spektrum telemetry unit hardware and connectors, as the polarities are different.
- Page 7 unusual weather conditions with rapidly changing conditions. This is an inherent behavior of a pressure altimeter and not a fault of the unit. Display in meters or feet is chosen in the telemetry setup screen. Flight battery current is displayed on the same screen if you have the V/I sensor connected. Temperature The external temperature probe is accurate at room temperature to within 1˚F or better.
-
Page 8: Advanced Adjustments
Lemon claim better than 5% accuracy in mAh consumption reporting, and in normal use, you can expect 2-3% accuracy. This is quite good by hobby standards and is ample for tracking the state of discharge of the battery. The PowerBox display will show Voltage and Capacity for only a single flight pack. - Page 9 4) Plug the V/I sensor (and Temperature/RPM sensor if required) into the telemetry unit. 5) Power on the telemetry with a flight pack attached to the sensor. The green LED should become steady on within no more than 3 seconds. This indicates the current sensor's bias calibration is completed successfully.
- Page 10 3. Flight Battery Current: Again briefly touch the RPM wire to the middle pin of the bind connector. The green and red LEDs should start to flash. Turn on the motor with throttle stick while measuring the current with an external meter. BEWARE of the spinning propeller! For maximum accuracy, and because of fluctuations in the reading, it is advisable to calibrate the unit at as high a current as you can reliably measure, or at least in the general range of current you are interested in measuring.
- Page 11 IMPORTANT: The calibration system will loop through the three states in turn, so if you skip one by accident, just repeatedly touch the center bind pin with the wire until you reach the one you want. However any time you enter a calibration (flashing LED) mode the range is set to that pot position.
- Page 12 Appendix: Calibration choices The effect of the options described below is small. Users can ignore this section unless looking for maximum accuracy in setting alarms. For greatest accuracy in alarm behavior, it is necessary when adjusting the display readout to choose how you want the resolution limits to work.
Need help?
Do you have a question about the DSM2 and is the answer not in the manual?
Questions and answers