Advertisement
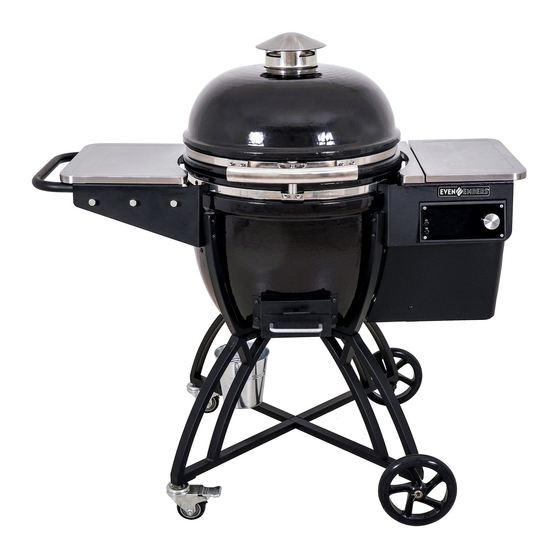
Pellet Fueled Ceramic Egg
OWNER'S MANUAL
OPERATING IN STRUC TIONS
SAVE THIS MANUAL FOR FUTURE REFERENCE
Model EGG1000AS
WARNING
NOTICE TO INSTALLER:
READ ALL INSTRUCTIONS BEFORE INSTALLING AND USING
LEAVE THESE INSTRUCTIONS
APPLIANCE. FAILURE TO FOLLOW THESE INSTRUCTIONS COULD
RESULT IN PROPERTY DAMAGE, BODILY INJURY OR EVEN
WITH THE GRILL OWNER
DEATH. CONTACT LOCAL BUILDING OR FIRE OFFICIALS ABOUT
FOR FUTURE REFERENCE .
RESTRICTIONS AND INSTALLATION INSPECTION REQUIREMENTS
IN YOUR AREA. SAVE THESE INSTRUCTIONS.
Advertisement

Related Manuals for Even Embers EGG1000AS


Summary of Contents for Even Embers EGG1000AS
- Page 1 Pellet Fueled Ceramic Egg OWNER’S MANUAL OPERATING IN STRUC TIONS SAVE THIS MANUAL FOR FUTURE REFERENCE Model EGG1000AS WARNING NOTICE TO INSTALLER: READ ALL INSTRUCTIONS BEFORE INSTALLING AND USING LEAVE THESE INSTRUCTIONS APPLIANCE. FAILURE TO FOLLOW THESE INSTRUCTIONS COULD RESULT IN PROPERTY DAMAGE, BODILY INJURY OR EVEN WITH THE GRILL OWNER DEATH.
- Page 2 IMPORTANT SAFETY WARNINGS WE WANT YOU TO ASSEMBLE AND USE YOUR GRILL AS SAFELY AS POSSIBLE. THE PURPOSE OF THIS SAFETY ALERT SYMBOL IS TO ATTRACT YOUR ATTENTION TO POSSIBLE HAZARDS AS YOU ASSEMBLE AND USE YOUR GRILL & SMOKER. WHEN YOU SEE THE SAFETY ALERT SYMBOL, PAY CLOSE ATTENTION TO THE INFORMATION WHICH FOLLOWS! READ ALL SAFETY WARNINGS AND INSTRUCTIONS CAREFULLY BEFORE ASSEMBLING AND OPERATING YOUR GRILL &...
-
Page 3: Table Of Contents
TABLE OF CONTENTS: General Warnings ..........3-4 Operating the Grill . -
Page 4: General Warnings
GENERAL WARNINGS: WARNING When using electric appliances, basic safety precautions should always be followed including the following: • Operate only per manufacturers instructions. • Keep all combustible materials at least 60 inches (152.4 cm) away from the grill at all times. Do not use this grill under any overhang or near any combustible structures. - Page 5 • This product is not designed for tabletop use. Do not set this product on a tabletop. • Do not cover cooking grate with aluminum foil. If you cover the grease tray with foil, do not block the openings between grease tray and grill body and cut a hole for grease drainage. •...
-
Page 6: Operating The Grill
USE CAUTION AND COMMON SENSE WHEN OPERATING YOUR PELLET GRILL & SMOKER. FAILURE TO ADHERE TO THE SAFETY WARNINGS AND GUIDELINES IN THIS MANUAL COULD RESULT IN SEVERE BODILY INJURY OR PROPERTY DAMAGE. SAVE THIS MANUAL FOR FUTURE REFERENCE. OPERATING THE GRILL: WARNING Read and follow all warnings and instructions contained in the preceding sections of this manual. - Page 7 Step 2 Plug power cord into a GFCI (grounded) outdoor electrical outlet. Control Panel Use only a GFCI (grounded) protected circuit, never remove the grounding plug or use with an adapter of 2 prongs; and use only extension cords with a 3 prong grounding plug, rated for the power of the equipment, and approved for outdoor use with a W-A marking.
- Page 8 Follow these steps If the grill does not ignite or if the fi re in the fi re pot goes out while cooking: Step 1 Turn the temperature control knob to “OFF” and unplug. Open cooking chamber lid and remove all food, cooking grate, grease tray and heat baffle plate. CAUTION: Some parts may contain sharp edges.
- Page 9 3. The Bluetooth range is around 120 ft. and can vary with Even Embers BBQ obstructions such as interior and exterior walls. 4. Download the app and turn your grill on. The Bluetooth icon on the grill control panel will fl ash until it connects with your phone.
- Page 10 COOK MODE: • The temperature dial can be changed at any time to increase or decrease the cooking temperature of the grill. • The 175°F to 300°F temperature settings are for slow cooking/smoking. • The 325°F to 500°F temperature settings are for grilling. •...
-
Page 11: Proper Care And Maintenance
PROPER CARE & MAINTENANCE: • Remove wood pellets from hopper if grill will not be used for a long period of time. Wood pellets can become soggy due to moisture/humidity and can cause the auger to bind up or not push pellets to burn chamber. -
Page 12: Transporting And Storage
TRANSPORTING AND STORAGE: WARNING • Never move a grill when it is hot or when objects are on the cooking surfaces. • Never store fl ammable liquids or spray canisters under or near the grill. • DO NOT extinguish grease fi res using water. BEFORE STORING YOUR GRILL: •... -
Page 13: Trouble Shooting
TROUBLE SHOOTING: PROBLEM CAUSE CORRECTION LCD screen will not 1. Make sure the grill is plugged into a working 1. Grill is not plugged in. power source. Check and make sure wire light up 2. The fuse is blown. connections are properly connected. 3. -
Page 14: Wiring Diagram
WIRING DIAGRAM:... - Page 15 IC: 25523-EGG1000AS FCC ID: 2AURUEGG1000AS The device complies with part 15 of the FCC Rules. Operation is subject to the following two conditions: (1) This device may not cause harmful interference, and (2) this device must accept any interference received, including interference that may cause any undesired operation.
-
Page 16: Assembly Instructions
READ ALL SAFETY WARNINGS & ASSEMBLY INSTRUCTIONS CAREFULLY BEFORE ASSEMBLING OR OPERATING YOUR GRILL. WE RECOMMEND TWO PEOPLE WORK TOGETHER WHEN AS SEM BLING THIS UNIT. The following tools are required to assemble this Even Embers Pellet Fueled Ceramic Egg: • Phillips Screwdriver • Pliers or Wrench... - Page 18 Part Bag Contents 26 Pcs M6x45 Bolts 16 Pcs M6x12 Bolts 1 Pcs M4x30 Bolt 2 Pcs M4x10 Bolts 2 Pcs M8 Nuts 22 Pcs M6 Nuts 4 Pcs M4 Nuts 1 Pcs M4 Spacer M6x45 Bolts - 26 Pcs M6x12 Bolts - 16 Pcs M4x30 Bolts - 1 Pc M4x10 Bolts - 2 Pcs...
- Page 19 Step 1 • Attach legs using sixteen M6x12 BOLTS Step 2 • Attach WHEELS using AXLE BOLTS and two M8 NUTS...
- Page 20 Step 3 • Attach four PLATES to LEFT SIDE LEGS using four M6x45 BOLTS and M6 NUTS Step 4 • Attach two PLATES to RIGHT SIDE LEGS using four M6x45 BOLTS and M6 NUTS...
- Page 21 Step 5 • Attach GREASE BUCKET BRACKET using two M6x45 BOLTS and M6 NUTS Step 6 • Lock casters and set CERAMIC EGG GRILL BODY on LEG ASSEMBLY...
- Page 22 Step 7 • Secure CERAMIC EGG GRILL BODY to LEG ASSEMBLY using two M6x45 BOLTS and M6 NUTS Step 8 • Repeat Step 7 procedure three times using six M6x45 BOLTS and M6 NUTS...
- Page 23 Step 9 • Attach three ACCESSORY HOOKS to LEFT FRONT SIDE TABLE BRACKET using three M4 NUTS • Attach LEFT FRONT SIDE TABLE BRACKET to CERAMIC EGG GRILL BODY using pre-attached nut and washer Step 10 • Secure LEFT FRONT SIDE TABLE BRACKET to CERAMIC EGG GRILL BODY...
- Page 24 Step 11 • Secure LEFT SIDE REAR TABLE BRACKET to CERAMIC EGG GRILL BODY using two M6x45 BOLTS and M6 NUTS Step 12 • Attach LEFT SIDE TABLE to LEFT SIDE TABLE FRAME using four M6x45 BOLTS...
- Page 25 Step 13 • Attach HOOD HANDLE to CERAMIC EGG GRILL BODY using pre-attached bolts, washers and lock washers Step 14 • Attach SMOKESTACK to CERAMIC EGG GRILL BODY using M4x30 BOLT, M4 NUT and M4 SPACER...
- Page 26 Step 15 • Attach GREASE TUBE to GREASE TRAY using two M4x10 BOLTS Step 16 • Store MEAT PROBE in tray above control panel...
- Page 27 Step 17 • Install GREASE TRAY ASSEMBLY, COOKING GRATE WARMING RACK into grill Step 18 • Hang GREASE BUCKET on grease bucket hook and install ASH TRAY into front of grill...
- Page 28 Model EGG1000AS...
- Page 29 WARRANTY The Boltz Group warrants to the original pur chas er that the Even Embers Pellet Fueled Ceramic Egg is free from defects due to workmanship or materials for: One-year: frame, housing, cart, cooking grate, electronic heating elements, temperature controller and other related parts.
Need help?
Do you have a question about the EGG1000AS and is the answer not in the manual?
Questions and answers