Table of Contents
Advertisement
Quick Links
Advertisement
Table of Contents

Related Manuals for Fisher-Price KIDZ BOP Star Station H6723


Summary of Contents for Fisher-Price KIDZ BOP Star Station H6723
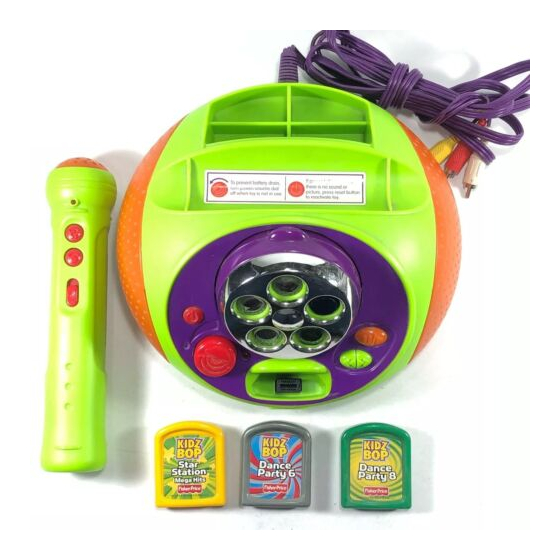
- Page 1 H6723...
- Page 2 e Consumer Information f Service à la clientèle S Información para el consumidor P Informação ao Consumidor e • Please keep this instruction sheet for future reference, as it contains important information. • Requires six “C” (LR14) and three “AAA” (LR03) alkaline batteries (not included). •...
-
Page 3: Unité De Base
e Battery Installation f Installation des piles S Colocación de las pilas P Instalação das Pilhas 1,5V x 6 “C” (LR14) e Shown Actual Size f Dimensions réelles S Se muestra a tamaño real P Apresentado em tamanho real e Base Unit •... - Page 4 S Unidad base • Localizar el compartimento de pilas en la parte de abajo de la unidad base. • Desajustar los tornillos de la tapa del compartimento de pilas con un destornillador de estrella y retirar la tapa. • Introducir seis pilas alcalinas tipo 6 x “C” (LR14) x 1,5V como se indica dentro del compartimento.
- Page 5 1,5V x 3 “AAA” (LR03) e Shown Actual Size f Dimensions réelles S Se muestra a tamaño real P Apresentado em tamanho real e Microphone • Locate the battery compartment on the microphone. • Loosen the screw in the battery compartment door with a Phillips screwdriver.
- Page 6 S Micrófono • Localizar el compartimento de pilas en el micrófono. • Desajustar el tornillo de la tapa del compartimento de pilas con un destornillador de estrella y retirar la tapa. • Introducir tres pilas alcalinas tipo 3 x “AAA” (LR03) x 1,5V como se indica dentro del compartimento.
-
Page 7: Battery Safety Information
e Battery Safety Information In exceptional circumstances, batteries may leak fluids that can cause a chemical burn injury or ruin your product. To avoid battery leakage: • Do not mix old and new batteries or batteries of different types: alkaline, standard (carbon-zinc) or rechargeable (nickel-cadmium). - Page 8 P Información de seguridad acerca de las pilas Em circunstâncias excepcionais, as pilhas podem derramar fluidos que podem provocar queimaduras ou danificar o brinquedo (produto). Para evitar o derrame de fluido: • Não misturar pilhas gastas e pilhas novas, nem pilhas de tipos diferentes: alcalinas, standard (carbono-zinco) ou recarregáveis (níquel-cádmio).
- Page 9 e Connecting Your Star Station™ to Your TV or VCR f Branchement du système Star Station sur un téléviseur ou un magnétoscope S Conectar el Super Karaoke a la televisión o video P Conectando sua Star Station ao seu televisor ou videocassete e Special Effect Lenses e Reset f Lentilles d’effets spéciaux...
- Page 10 e • Position Star Station™ near your TV (or VCR) or on the floor in front of your TV. Important! Do not place Star Station™ on top of your TV. Keep excess cable off the floor and out of the way. f •...
- Page 11 e • Locate the audio/video cable on the back of Star Station™. • Plug the audio/video pins into the matching coloured input jacks on your TV or VCR (Yellow for VIDEO IN, White for LEFT AUDIO IN and Red for RIGHT AUDIO IN).
- Page 12 e • Insert the ROM cartridge into the slot in Star Station™. Note: For proper function, turn the Star Station™ off before inserting ROM cartridges. f • Insérer la cartouche ROM dans la fente du système Star Station. Remarque : Pour assurer le bon fonctionnement de l’appareil, l’éteindre avant d’insérer une cartouche ROM.
- Page 13 e • To find the picture transmitted on your TV screen, set your TV's or VCR's mode selector to INPUT or VIDEO IN. • Have your child stand about 1,2 m or 1,5 m (4 or 5 feet) from Star Station™. e 1,2 m or 1,5 m •...
- Page 14 e No Image? If you do not see an image on your TV screen transmitted from Star Station™, try the following: 1. Verify that your audio and video cable is fully inserted into your TV or VCR. 2. Press the channel down button on the VCR or TV and check for an INPUT channel below channel 2.
- Page 15 e Hints About Lighting… Images on the TV screen look best when there is good lighting in the room where you use Star Station™. f Conseils d’éclairage... Les images à l’écran du téléviseur seront plus belles si la pièce où est utilisé le système Star Station est bien éclairée.
- Page 16 e • Slide the power/volume switch on the microphone to either low high volume. The power light turns on. Hints: The microphone power/volume switch controls the volume of your voice. The volume dial on Star Station™ controls the overall volume. Be sure to slide the power/volume switch to the off position O when you are finished.
- Page 17 e • Press the play/pause button to start the music. Press again to pause. e Play/Pause Button e Play/Pause Button • Use the track forward and back f Bouton de lecture/pause f Bouton de lecture/pause buttons to move ahead or back through S Botón Reproducir/Pausa S Botón Reproducir/Pausa the songs on the ROM Cartridge.
- Page 18 e • Star Station™ features five special effects lenses. • Press the lens button on the microphone to select from the e Lens Select e Lens Select five lenses. f Sélection de lentilles f Sélection de lentilles • Press the rotate effect button S Selección de lente S Selección de lente rotate the lens for different cool looks!
- Page 19 e Notes: • To prevent battery drain, turn power/volume dial off when toy is not in use • If power light is on and there is no sound or picture, press reset button to reactivate toy • When you are finished with Star Station™, turn off power on the main unit and microphone.
-
Page 20: Recording Your Performances
e Recording Your Performances If Star Station™ is connected to your VCR, you can record performances. Simply insert a blank tape and press record on your VCR. f Enregistrement des prestations Si le système Star Station est branché sur un magnétoscope, il est possible d’enregistrer les prestations. - Page 21 e Connection to an External Music Source Star Station™ can be connected to an external music source such as a portable CD player or stereo so you can sing along to other music! 1. Turn the power/volume dial on the Star Station™...
- Page 22 5. Appuyer sur le bouton de lecture de la source de musique externe. 6. Allumer le système Star Station. 7. Régler le volume de la source de musique externe. S Conexión a una fuente de música externa El Super Karaoke Star Station se puede conectar a una fuente de música externa, tal como a un reproductor de CDs portátil o a un estéreo, para cantar al compás de otras canciones.
-
Page 23: Entretien
e Care 1. Wipe this product with a clean cloth dampened with a mild soap and water solution. Do not immerse this product. 2. This product has no consumer serviceable parts. Do not take this product apart. f Entretien 1. Nettoyer le produit avec un chiffon propre et de l’eau savonneuse. Ne pas l’immerger dans l’eau. -
Page 24: Troubleshooting Guide
e Troubleshooting Guide PROBLEM CAUSE SOLUTION No image on the TV TV or VCR is not set to Press the channel down button on the VCR or TV proper input and check for an INPUT channel below channel 2. Use the menu system on your TV or VCR to find INPUT or SOURCE. -
Page 25: Guide De Dépannage
f Guide de dépannage PROBLÈME CAUSE SOLUTION Aucune image L’entrée du téléviseur ou du Appuyer sur le sélecteur de chaîne du n’apparaît à l’écran du magnétoscope n’est pas magnétoscope ou du téléviseur et chercher un canal téléviseur bien réglée d’entrée avant la chaîne 2. Utiliser le menu du téléviseur ou du magnétoscope pour trouver INPUT (entrée) ou SOURCE. -
Page 26: S Guía De Solución De Problemas
S Guía de solución de problemas PROBLEMA CAUSA SOLUCIÓN No se ve la imagen en La televisión o video no están Presionar el botón para bajar de canal de la video la televisión establecidos en la entrada o televisión y buscar un canal de ENTRADA (INPUT) correspondiente anterior al canal 2. - Page 27 P Guia para solucionar problemas PROBLEMA CAUSA SOLUÇÃO Sem imagem na TV TV ou videocassette não conectados Pressione o botão que diminui os canais no na entrada correta videocassete ou na TV para checar um canal de ENTRADA abaixo do canal 2. Utilize o menu do sistema na sua TV ou vídeo para encontrar ENTRADA ou FONTE.
- Page 28 e One (1) Year Limited Warranty Mattel Canada Inc., warrants to the original consumer purchaser that this product will be free of defects in material or workmanship for one year (unless otherwise specified in alternate warranties) from the date of purchase. If defective, return the product along with proof of the date of purchase, postage prepaid to Mattel Canada Inc., Consumer Service, 6155 Freemont Blvd., Mississauga, Ontario L5R 3W2 for replacement with an identical product or a similar product of equal or greater value according to availability.
- Page 29 S Garantía limitada de un (1) año Mattel de México, S.A. de C.V., garantiza sus productos por un periodo de 1 año en todas sus partes y mano de obra, a partir de la fecha de entrega. Condiciones: 1.- El consumidor presentará el producto en el lugar donde lo adquirió o lo presentará o enviará...
- Page 30 e Consumer Information f Renseignements pour les consommateurs S Información para el consumidor P Informações ao Consumidor CANADA Questions? 1-800-432-5437. Mattel Canada Inc., 6155 Freemont Blvd., Mississauga, Ontario L5R 3W2; www.service.mattel.com. MÉXICO Importado y distribuido por Mattel de México, S.A. de C.V., Insurgentes Sur #3579, Torre 3, Oficina 601, Col.
- Page 32 PRINTED IN CHINA/iMPRIMÉ EN CHINE H6723pr-0824...
Need help?
Do you have a question about the KIDZ BOP Star Station H6723 and is the answer not in the manual?
Questions and answers