Table of Contents
Advertisement
Quick Links
Advertisement
Table of Contents

Related Manuals for BlastPro BRB-1600


Summary of Contents for BlastPro BRB-1600
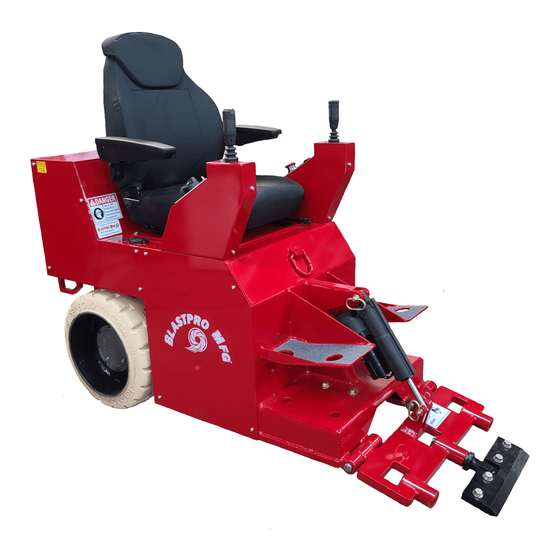
- Page 1 BRB-1600 MACHINE MANUAL KEEP WITH MACHINE...
-
Page 2: Table Of Contents
Table of Contents 1.1: Applications....................3 1.2: Specifications ....................3 1.3: Manufacturer ....................3 2.1: General ......................3 2.2: Maintenance and wear part replacement modes ........... 4 2.3: Work site assessment and inspection ............4 2.4: Personal protective equipment (ppe) ............. 5 2.5: Operational safety .................. -
Page 3: Applications
Coverings may include carpet, ceramic tile, and VCT. A wide variety of tools are available from Blastpro® for your specific application. In general, the BRB-1600 uses sharpened spring steel blades along with the weight of the machine itself to perform the scraping function. -
Page 4: Maintenance And Wear Part Replacement Modes
3. Floors have been thoroughly inspected. Some floor or deck surfaces may be coated with, or contaminated by, dangerous materials such as: • PCBS • Lead • Asbestos • Pesticides ® © 2011 Blastpro Manufacturing Inc. -
Page 5: Personal Protective Equipment (Ppe)
The work area must be checked for these materials before work can begin. Blastpro does not warrant its equipment to be suitable for, or approved for, removing dangerous materials. It is therefore the responsibility of the contractor to confirm the safety of the work area and the equipment with the proper authorities. -
Page 6: Operational Safety
3.1: Start-Up Only trained, authorized personnel should be allowed to run the machine. If training is needed, please consult with your Blastpro Manufacturing representative or authorized distributor. Prior to start-up, the work surface should be inspected for hidden studs, electrical boxes, or any other hidden obstructions. These items should be removed or clearly marked so they can be avoided. -
Page 7: Shut Down
9. Use the rocker switch in the right control lever to lower the cylinders until the front caster lifts off of the ground. 10. Rotate motor switch to “OFF” position. 11. Depress E-stop. 12. Cover the machine to protect it from dust and moisture. ® © 2011 Blastpro Manufacturing Inc. -
Page 8: Blade Selection
90° wings on each end of the blade will help keep the removed material manageable. See figure 3.3.2. Figure 3.3.2 Blastpro offers a carbide tipped tool for tile removal. This can be inserted into the 3-hole tool adapter on the blade holder. See figure 3.3.3. ®... -
Page 9: Transport
Verify that the blade holder is lowered and that the front swivel caster is off of the truck or trailer bed. Never allow personnel to stand under the machine when it is being lifted. ® © 2011 Blastpro Manufacturing Inc. -
Page 10: Maintenance Intervals
Perform these maintenance activities more frequently under extremely dusty, dirty conditions. Always wear leather gloves and use caution when handling blades. If additional assistance is required consult your Blastpro representative, authorized Blastpro distributor, or qualified systems professional. Daily or at the beginning of each shift: 1. -
Page 11: Motor Controller Fault Codes
Fault code example: 1 red flash, 2 yellow flashes, 2 red flashes & 3 yellow flashes indicates fault code 23. This is the number that should be communicated to your Blastpro representative to determine a resolution to the fault. 4.4: Battery Charging To charge the battery: 1. - Page 12 Since there are one sets of four batteries wired in series some cells become uneven during charge/discharge cycles. At least one a month, perform two charge cycles back- to-back. This will bring up cells that are lagging behind fully charged cells. This is important for overall battery performance. ® © 2011 Blastpro Manufacturing Inc.
-
Page 13: Recommended Spare Parts
• Sockets: 7/16”, 1/2”, 9/16” and 3/4” • Combination wrench: 7/16”, 1/2”, 9/16” and 3/4” • Utility knife • Rubber mallet or dead blow hammer • Leather gloves • Multi meter with DC and AC capabilities ® © 2011 Blastpro Manufacturing Inc. -
Page 14: Parts List
BRB-1600 Machine Manual 4.7: Parts List ® © 2011 Blastpro Manufacturing Inc. - Page 15 BRB-1600 Machine Manual ® © 2011 Blastpro Manufacturing Inc.
Need help?
Do you have a question about the BRB-1600 and is the answer not in the manual?
Questions and answers