
Related Manuals for GODIAG GT100+AUTO TOOLS OBD II


Summary of Contents for GODIAG GT100+AUTO TOOLS OBD II
- Page 1 GODIAG GT100+AUTO TOOLS OBD II Breakout Box ECU Connector Operation Manual 1.2021...
- Page 2 Box ECU Connector in a faster pace. Please observe your local national laws and regulations. In case of illegal use of GODIAG equipment, the user shall bear all risks and the company shall not assume any liability. GODIAG GT100+AUTO TOOLS OBD II Breakout Box ECU Connector Operation Manual is compiled by GODIAG.
- Page 3 Before starting to use the equipment, please refer to and observe the safety information provided by the vehicle or equipment manufacturer and applicable testing programs. Please use the equipment according to the Operation Manual, read, understand, and observe all safety information and instructions included in this manual.
- Page 4 11. Warranty ..............14 6. Feature Overview GODIAG GT100+ is a new ECU connector and protocol communication testing equipment. It’s convenient for users to individually connect the ECU module to diagnose, program and code. It may also be used for testing whether the diagnostic / programming /coding tool can send communication signals.
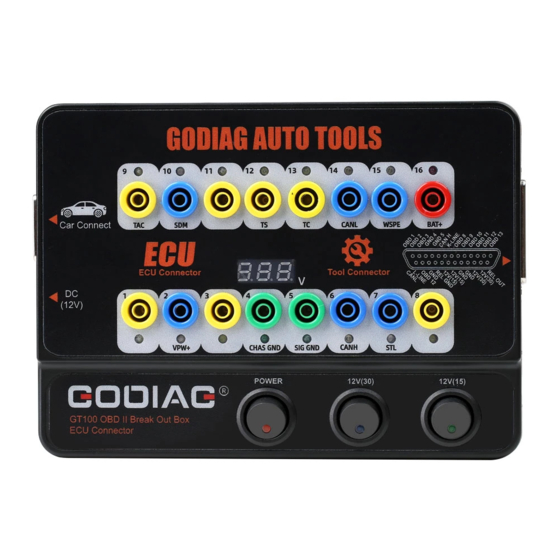
- Page 5 ① OBD2-DB15 diagnostic main cable ② DC12V interface ③ Indicators ④ Working voltage and current value display ⑤ Banana plug interface ⑥ DB25 color jumper ECU dedicated interface ⑦ Power switch ⑧ 12v (30) power switch. ⑨ 12v (15) power switch 8.
- Page 6 Indicator Light Meaning 1. Manufactory custom 9. Manufactory custom 2. SJE1850 wire <bus+> 10. SJE1850 wire<bus-> 3. Manufactory custom 11. Manufactory custom 4. Power grounding 12. Manufactory custom 5. Signal grounding 13. Manufactory custom 6. SAEJ2284 <CAN> high 14. SAEJ2284 <CAN> low 7.
- Page 7 4. CAN-H and CAN-L are correspondingly connected to the 6.CAN-H and 14.CAN-L port. ✓ By connecting the vehicle and the diagnostic tool via OBDII, Godiag GT100+ can check whether the communication of the vehicle OBDII diagnostic port is normal. ✓...
- Page 8 ① Connect the diagnostic / programming / coding tool to the OBD2 port of GT100+. (Do not connect it to the vehicle) ② Select the vehicle model and functions to operate. ③ If the device can send the communication signals, the corresponding protocol indicators on the GT100+ will be ON or blink.
- Page 9 ① GT100+ is connected to the vehicle OBD2 port. ② Start the Power switch, and GT100+ will display the current accumulator voltage. (If no voltage is displayed, please check the vehicle diagnostic interface and the cable. If the voltage is lower than 10V, please do not start the vehicle or go ahead for function operation, Please charge the car with a car charger.) ③...
- Page 10 B. To replace the engine ECU of Toyota or to use some key programmer to program Toyota when all keys lost, it needs to short-circuit PIN13-PIN4...
- Page 11 C. To program Mitsubishi key with all keys lost or to set OBDII when all remote key lost, please short-circuit PIN1-PIN4.
- Page 12 D. To program Porsche Cayenne transponder or remote all keys lost, please short circuit PIN3-PIN7.
- Page 13 On bench connect the ECU module by using the banana connector or db25 dedicated ECU interface, and Godiag GT100+ will display the voltage / current value. The user can intuitively see the current status of the ECU. There is no current display or The actual...
- Page 14 6). Quickly communicate with a single ECU on bench by connecting with the ECU diagnostic / programming tool. [Which allow the engineers or technicians to complete the job on bench, also keep away the risk of data loss in other modules when directly testing on the vehicle.] How to Operate: ①...
- Page 15 multiple ECU modules for key programming] Multiple ECU Module Connection Operation Steps: ① Connect GT100+ and Colorful Jumper Cable DB25. Insert the DB25 jumper into the banana plug, tighten the screw, and then insert it into the corresponding port of gt100+ . ②...
- Page 16 Uninterruptible Power Supply Connecting Mode Operation Steps ① Prepare a spare battery “A” and a new battery “B” to be installed. ② Connect to NO.16 /4 /5 holes of Godiag GT100+ and the OBD2 diagnostic port of the car, and connect to the spare battery “A”.
- Page 17 Operation Steps: ① Connect GT100+ OBD2 to the OBD2 port of the vehicle. ② Switch on GT100+ Power. (If no voltage is displayed, please check the vehicle diagnostic port and the cable. If the voltage is lower than 10V, please do not start the vehicle or operate. Please charge the accumulator with a car charger first) ③...
- Page 18 ① Insert the DB25 jumper into the banana plug, tighten the screw. ② Insert the banana plug into the corresponding port of GT100+ by following the OBD1 protocol. ③ Connect the OBD2 port of GT100+ to the diagnostic tool. ④ When there is a good communicating between the car and the diagnostic / programming / coding tool, GT100+ protocol indicator will turn on or blink to indicate which protocol of the car module and the communication status.
- Page 19 CAS4. ⑥ Put the programmed key into the key coil of Godiag CAS4 / CAS4+ programming test platform. ⑦ Press the start switch of Godiag CAS4 / CAS4+ programming test platform, if the dashboard indicator turn on, it means that the key and the CAS4 module are synchronized, otherwise, they are not synchronized.
- Page 20 Open the key programmer software, follow the instruction to obtain the data to complete key programming. ⑤ Put the programmed key into the key coil of Godiag FEM/BDC programming test platform. ⑥ Press the start switch of Godiag FEM/BDC programming test platform, if the dashboard indicator turn on, it means that the key and the FEM/BDC module are synchronized, otherwise, they are not synchronized.
- Page 21 9. GT100+ Package List GT100+ host DB15-OBDII male connector-OBDII female connector DB25-ECU cable Banana plug connector 12V 1a power adapter Jumper CAN 120 ohm resistor 10. Product Specifications...
- Page 22 Content Description Diagnostic interface OBDII 16 pin Working voltage DC 9V-24V Product power 0.8W Adapter power Input AC100v-240v output DC12V 1A Working temperature -20 to 70 ° C (-4 to 158 ° F) range Storage temperature -40 to 85 ° C (-40 to 185 ° F) range Product packaging Carton 24*18*8 CM...
- Page 23 Shenzhen Sinoy Technology Co.,Ltd All rights reserved www.godiag.com +86 18813687743 Sales@GoDiag.com Thank you for choosing GODIAG GT100+ AUTO TOOLS!
Need help?
Do you have a question about the GT100+AUTO TOOLS OBD II and is the answer not in the manual?
Questions and answers