Table of Contents
Advertisement
Quick Links
enconnex
35 Pond Park Road, Hingham, MA 02043
1-800-341-0792
Step 1
Dis-assembly
Before tarting: DRAIN OUT ALL GA OLINE FROM TANK AND FLOAT BOWL AND DI PO E OF AFELY
tep 1A - Remove skins
1a-1 Remove choke label
(Propane does not use choke).
1a-7/8 Remove two handle screws.
tep 1B - Remove gas tank & drain lines
1b-2 Remove fuel tank by separating
1b-1 Remove fuel line clamp at
plastic frame at very top and gently lifting
bottom of gasoline tank AFTER
up on tank. Discard empty tank and lid
FULLY DRAINING GA OLINE!
tep 1C - Remove air cleaner box
1c-1/2/3/4/5/6 Remove air cleaner unit by first removing outer cover then one inner 8mm hex bolt, vent tube, then two outer 8mm hex nuts then slide off air cleaner assembly. discard 2 8mm nuts
tep 1D - Remove choke
1d-1/2/3 Remove pressed-in choke plate by pulling outward with pliers (use force),
then turn handle full right then pulling up. Discard choke plate, handle and felt washer.
tep 1F - Remove gasoline pump & pump hoses
1f-1/2/3/4/5 Remove and discard gas pump & line to carburetor by moving away clamp first. Then pull off tube going to engine vent below carburetor remove gas lines from plastic
holders (leave bracket in place for new fuel line). Then remove clamp on pump hose & clamp going down to the on/off switch. Lastly remove two screws holding pump to frame
and discard screws and pump assembly.
tep 1G - Remove carburetor & bolts & ground screw
1g-1/2/3 Remove two 8mm long bolts holding carburetor to engine by removing two shorter
8mm flange bolts. Save short bolts, but discard 2 long bolts.
®
https://genconnexdirect.net/liturature.htm
1a-2 Remove access door.
1a-3 Remove gas cap by
removing cotter snap pin.
1a-9 Remove lower trim (this
side only) by prying off with finger
or flat blade screw driver.
1b-3/4 Remove fuel drain & vent tubes (3 tubes) and discard.
enconnex
®
Copyright 2021 New England Gen-Connect LLC. All rights reserved.
On-Line PDF
=
+
1a-4/5 Unscrew and tilt out front bezel (4 screws).
1a-10/11 Remove lower skins
1a-12 Remove screw near pull handle.
bolts (2 10mm bolts).
1g-4 Remove ground screw and save.
Engineered to the next level.
®
Genconnex
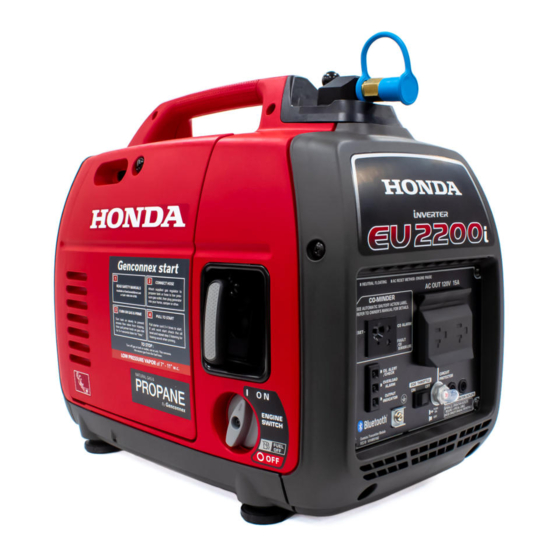
Honda EU2200i
Propane kit
Assembly Instructions
Version 2.05
#1 Phillips dead screw driver
#2 Phillips head screw driver
flat head screw driver
8mm socket
10mm socket
+
3/8" socket
pliers or channel locks
microwave oven or boiling water
5/32" Allen head socket or wrench
1a-6 Remove rear bezel (4 screws).
1a-13 Gently remove skins.
1b-5 Depending on which you have, remove
either 2 fuel tank bottom bumpers or entire
new rubber cover (not shown) and discard.
The 2 bumpers were replaced by Honda with
a single cover in their most recent re-call.
Advertisement
Table of Contents

Related Manuals for GenConnex Honda EU2200i


Summary of Contents for GenConnex Honda EU2200i
- Page 1 ® enconnex Genconnex Honda EU2200i ® Propane kit Assembly Instructions 35 Pond Park Road, Hingham, MA 02043 Version 2.05 1-800-341-0792 On-Line PDF https://genconnexdirect.net/liturature.htm #1 Phillips dead screw driver Step 1 #2 Phillips head screw driver flat head screw driver 8mm socket...
- Page 2 “Owner’s Manual Supplement” 2g-1/2/3 Attach “Genconnex start” label on door next to pull start and the small “Propane” label below it, the LARGE “Propane” Label on opposite side and a small “Propane” label on the back. Place Emissions label over existing EPA label on engine frame near oil dip stick.
Need help?
Do you have a question about the Honda EU2200i and is the answer not in the manual?
Questions and answers