Table of Contents
Advertisement
Quick Links
Advertisement
Table of Contents

Related Manuals for CIS CIS-NW-POE


Summary of Contents for CIS CIS-NW-POE
- Page 1 CIS-NW-POE User Manual...
-
Page 2: Table Of Contents
Table of Contents Welcome to Custom Integration Solutions ....................... 4 Overview ................................... 4 Package Contents ..............................4 Power ..................................4 PoE Output ................................4 Device Details ................................5 Ports..................................5 LED Indicators ................................5 Buttons ..................................5 Input Power Requirements ............................ 5 Quick Setup ................................... - Page 3 View and Set Interfaces ............................18 Power Cycling an Ethernet Port ..........................18 Managing Access Points with the Wireless Manager .....................19 Viewing the Connected Access Points .........................19 Viewing Connected Devices ..........................20 Changing the SSID of Managed Access Points ....................20 Changing the Wi-Fi Password of Managed Access Points ................21 PoE Information and Settings ..........................22 Enable/Disable PoE on a Specific Port ........................22 Tools ....................................23...
-
Page 4: Welcome To Custom Integration Solutions
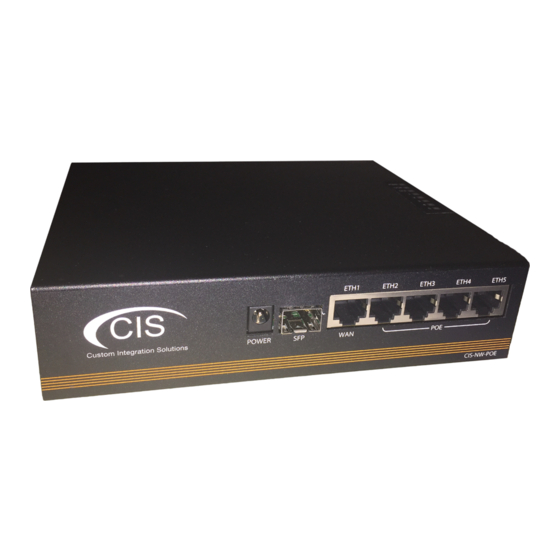
Overview The CIS-NW-POE router is equipped with five gigabit ethernet ports and one SFP port, compatible with 1 Gb modules. The device is pre-configured with all ports switched together (excluding the WAN port). The device is capable of powering other devices through PoE. -
Page 5: Device Details
Keeping holding until the USR LED light starts flashing, (5 seconds) then release the button to reset to the default CIS configuration. You can use this procedure if you have forgotten the password to access the device, or simply wish to return the unit to its default configuration state. -
Page 6: Quick Setup
Quick Setup... -
Page 7: Accessing The Web Interface
1. Connect the ISP’s modem to the port labelled “ETH1” or “WAN.” Connect your laptop to any remaining port on the front of the CIS router. Ensure your computer is set to DHCP mode. 2. In a web browser, navigate to 10.100.1.1 (the default IP address). If you have requested a different network address, enter it or open a command window and use the ipconfig command to get the default gateway. -
Page 8: The Status Page
The identity is used to identify your device on the network. It is essential to set the router to the name of the client using the format below, as CIS will use it to identify the router when connecting for updates and troubleshooting. -
Page 9: Undo / Redo
Undo / Redo Undo and Redo buttons are located in the left toolbar. You may use them to quickly undo/redo any changes made to configuration. Show / Hide Passwords Selecting the Hide Passwords button in the left toolbar will toggle the displaying of passwords related to Wi-Fi, Hotspot, and more. -
Page 10: Changing The Default Password
Changing the Default Password After you log in for the first time, please create a new a password to increase the security of the device. Enter the old password in the top field and a secure password in the new and confirm password fields. Setting the Time Zone You can find the Clock settings under the System tab in the left toolbar. -
Page 11: Ip Addressing
To view the IP addresses assigned to the router, choose the Addresses tab in the IP section in the left toolbar. You can see the WAN address on ether-01-gateway-WAN, the LAN address assigned to bridge- operations, and either a CIS support address or a PAR address. The DHCP Client Tab The DHCP Client tab will present you with the IP address assigned to your router from the ISP’s modem. -
Page 12: Renewing The Wan Ip Address
Renewing the WAN IP Address Once you’ve clicked the entry under the DHCP Client option, click the Renew button to obtain a new lease. The DHCP Server The main page displays the lease time for the DHCP server. - Page 13 The Leases tab displays the IP and MAC addresses of connected devices. The Networks tab displays the gateway and DNS server IP addresses that the connected devices will receive.
-
Page 14: Setting A Dhcp Reservation
Setting a DHCP Reservation It is highly recommended that static DHCP reservations are created for important networking devices such as switches, access points, automation controllers, NVRs, printers, etc. 1. Before assigning a static IP address, select IP > Pool from the toolbar. Do not assign any addresses inside of the DHCP pool range. -
Page 15: Changing The Dns Servers
Changing the DNS Servers In the IP section in the left toolbar, select the DNS tab. CIS Routers now use Google DNS by default (8.8.8.8 and 8.8.4.4). To add another server, click the down arrows, and a box will appear below the arrow... -
Page 16: Port Forwarding
Port forwarding allows inbound traffic to a specific port on a desired host. Be careful when using port forwarding, as each port you open may leave the host vulnerable to attack! CIS recommends using a VPN connection instead whenever possible. - Page 17 Enabled Check this box to activate the rule. Chain Set to dstnat Dst. Address The Dst. Address is your public IP address. It will be automatically updated. Protocol Select TCP or UDP based on which port you need to open. Dst.
-
Page 18: View And Set Interfaces
View and Set Interfaces The Interfaces tab provides an overview of the activity on all ports. You can view the traffic sent and received, the status of PoE, PoE settings, PoE priority and current being drawn by PoE devices. Power Cycling an Ethernet Port Select an Ethernet port in the table below to view the information for it. -
Page 19: Managing Access Points With The Wireless Manager
CIS-ACWAP. Viewing the Connected Access Points On your CIS router, select the Wi-Fi Manager section in the left toolbar. The active Wi-Fi radios will be displayed. If you select the WiFi Access points tab, you’ll be able to view the identity, MAC address and other... -
Page 20: Viewing Connected Devices
Select the Registration Table tab to view the connected devices. Changing the SSID of Managed Access Points Select the SSID-Channel tab in the Wi-Fi Manager section. Click on the 2.4GHz network. Copy and paste the SSID so that the 5GHz network has the same SSID. CIS Guest... -
Page 21: Changing The Wi-Fi Password Of Managed Access Points
Changing the Wi-Fi Password of Managed Access Points Select the Wi-Fi Password tab. Click on the network that you’d like to change the password for. If you’ve purchased a guest network, it will appear here. Click on the network you’d like to set the password for, then enter the passphrase in the box below. It is highly recommended you use only WPA2 PSK for security purposes. -
Page 22: Poe Information And Settings
When selected, the router will not supply power to connected devices. PoE-Out limitations The CIS-NW-POE provides up to 450mA for each port, with a maximum total output of 2A. Enable/Disable PoE on a Specific Port Select the port from the Interfaces tab. Change the PoE Out option accordingly. -
Page 23: Tools
Tools UPnP Universal Plug and Play enables your router to easily discover other devices located on the network and vice-versa. If you require UPnP, select it under the IP tab in the toolbar, then enable it. UPnP has implications on the security of the device, and it is recommended you leave it disabled unless required. Ping Ping uses Internet Control Message Protocol (ICMP) echo messages to determine if a remote host is active. -
Page 24: Ip Scan
IP Scan The IP scan tool locates devices on the network. It can also locate devices that have a static IP set internally if they are on the same network as the router. To use the IP scan tool, select the network you wish to scan on (bridge-operations is default), then enter the network address and subnet mask using CIDR notation. -
Page 25: Platinum Monitoring
Platinum Monitoring If the client has a Platinum or PlatinumDN service, they will receive the Platinum Monitoring service, which will send email alerts when key networking equipment at a specified IP address goes offline. You can enable and disable notifications by clicking the D or E buttons on the left. Torch Torch allows you to view packets flowing through an interface. -
Page 26: Troubleshooting
• Ensure the wired devices you are using support Gigabit ethernet and not 10/100 mbps. • The CIS-NW-POE has a tested maximum speed of 850 Mbps in our environment. I cannot access the router’s web interface. -
Page 27: Warranty Information
Solutions™ or a designated service center with prior notification and an assigned return authorization (RA) number. Contact Information Web: www.custom-integration-solutions.com Phone: Technical Support - (888) 976-3651 Email: activations@custom-integration-solutions.com The CIS-NW-POE is in compliance with the essential requirements and other relevant provisions of Directive 2014/53/EC.
Need help?
Do you have a question about the CIS-NW-POE and is the answer not in the manual?
Questions and answers