Table of Contents
Advertisement
Available languages
Available languages
WOOD PELLET GRILL & SMOKER
IMPORTANT, READ CAREFULLY, RETAIN FOR FUTURE
REFERENCE. MANUAL MUST BE READ BEFORE OPERATING!
GRIL & FUMOIR À GRANULES DE BOIS
IMPORTANT, PRENEZ CONNAISSANCE DE CE DOCUMENT ET
CONSERVEZ-LE POUR RÉFÉRENCE ULTÉRIEURE. VOUS DEVEZ
LIRE CE GUIDE AVANT D'UTILISER LE BARBECUE!
For outdoor and household use only. Not for commercial use.
Réservé à l'usage extérieur et résidentiel uniquement. Non destiné à un usage commercial.
WARNING: Please read the entire manual
before installation and use of this electric,
pellet fuel-burning appliance. Failure to
follow these instructions could result
in property damage, bodily injury or
even death. Contact local building or fire
officials about restrictions and installation
inspection requirements in your area.
AVERTISSEMENT : Veuillez lire l'intégralité
du
manuel
avant
l'installation
l'utilisation de cet appareil électronique à
granules. Le non-respect de ces instructions
peut entraîner des dommages aux
biens, des blessures ou même la mort.
Communiquez avec les autorités locales
en matière d'incendie et de bâtiment
concernant les restrictions et les exigences
d'installation dans votre région.
et
MODEL / MODÈLE : PB0500SP
PART / PIÈCE : 10564, 10532
5005166
ASSEMBLY GUIDE
GUIDE DE MONTAGE
Advertisement
Chapters
Table of Contents

Related Manuals for Pit Boss Sportsman PB0500SP


Summary of Contents for Pit Boss Sportsman PB0500SP
- Page 1 MODEL / MODÈLE : PB0500SP PART / PIÈCE : 10564, 10532 5005166 ASSEMBLY GUIDE GUIDE DE MONTAGE WOOD PELLET GRILL & SMOKER IMPORTANT, READ CAREFULLY, RETAIN FOR FUTURE REFERENCE. MANUAL MUST BE READ BEFORE OPERATING! GRIL & FUMOIR À GRANULES DE BOIS IMPORTANT, PRENEZ CONNAISSANCE DE CE DOCUMENT ET CONSERVEZ-LE POUR RÉFÉRENCE ULTÉRIEURE.
-
Page 2: Table Of Contents
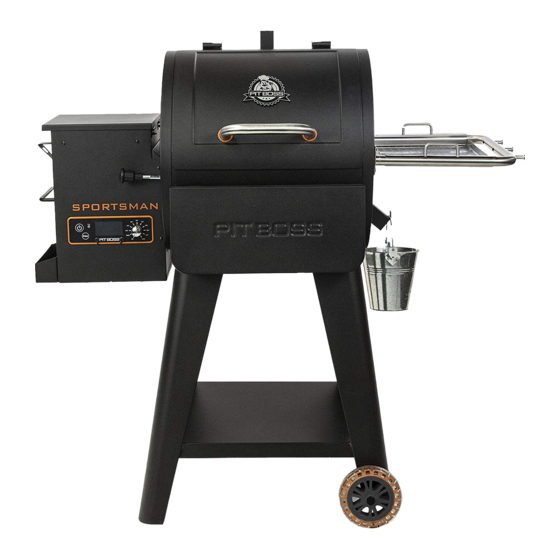
TABLE OF CONTENTS Parts & Specs ..............4 Assembly Preparation ............6 Assembly Instructions Connecting The Wheels To The Legs ........6 Mounting The Legs To Main Barrel .......... 7 Installing The Bottom Shelf ............7 Securing The Lid Stopper ............8 Installing The Lid Handle ............8 Installing The Spice Box, Bottle Opener ........8 Installing The Front Shelf Brackets ..........9... -
Page 3: Parts & Specs
PARTS & SPECS Part# Description Part# Description Flame Broiler Slider (x1) Screw (x26) Flame Broiler Main Plate (x1) Washer (x26) Porcelain-Coated Steel Upper Cooking Rack (x1) Locking Washer (x26) Porcelain-Coated Cast-Iron Cooking Grid (x2) Screw (x2) Lid Stopper (x1) Nut (x2) Bottle Opener (x1) Wheel Axle Pin (x2) Spice Box (x1) - Page 4 PARTS & SPECS...
-
Page 5: Assembly Preparation
If any part is missing or damaged, do not attempt to assemble. Shipping damage is not covered under warranty. Contact your dealer or Pit Boss Customer Service for parts: Monday ®... -
Page 6: Mounting The Legs To Main Barrel
2. MOUNTING THE LEGS TO THE MAIN BARREL Parts Required: Main Barrel /Hopper Assembly (#8) Support Leg for Wheel / Front (#19) Support Leg for Wheel / Back (#20) Screw (#A) Washer (#B) Locking Washer (#C) Installation: • Place a piece of cardboard on the floor to prevent scratching the unit and parts during assembly. -
Page 7: Securing The Lid Stopper
4. SECURING THE LID STOPPER Parts Required: Lid Stopper (#5) Installation: • Secure the Lid Stopper onto the top of the Main Barrel using the pre-installed screw on top of the Main Barrel. 5. INSTALLING THE LID HANDLE Parts Required: Lid Handle Bezel (#14) Lid Handle (#15) Installation:... -
Page 8: Installing The Front Shelf Brackets
7. INSTALLING THE FRONT SHELF BRACKETS Parts Required: Front Shelf Bracket / Left (#22) Front Shelf Bracket / Right (#23) Screw (#A) Washer (#B) Locking Washer (#C) Installation: • Attach one Front Shelf Bracket to the front of the Grill Barrel by using three screws. -
Page 9: Installing The Cooking Components
10. INSTALLING THE COOKING COMPONENTS Parts Required: Flame Broiler Slider (#1) Flame Broiler Main Plate (#2) Flame Broiler Adjusting Bar Handle (#12) Flame Broiler Adjusting Bar (#13) Upper Cooking Rack (#3) Cooking Grids (#4) Installation: NOTE: Both flame broiler parts are lightly coated with oil to avoid rusting when shipped. -
Page 10: Placing The Grease Bucket
Place the grease bucket on the spout hook on the end of the main barrel. Ensure it is level to avoid grease spills. • The unit is now completely assembled. 12. CONNECTING TO A POWER SOURCE NOTE: Before plugging your Pit Boss into any electrical outlet, ensure ® FAST-BLOW FUSE, 5 AMP the temperature dial is in the OFF position. - Page 11 TABLE DES MATIÈRES Pièces et spécifications ..........13 Préparation de l'assemblage .........15 Instructions d’assemblage Montage des roues aux pieds de supports ......15 Montage des pieds de supports au baril principal .... 16 Installation de l'étagère inférieure ........16 Fixation du bouchon du couvercle .........17 Montage de la poignée du couvercle ........17 Installation de la boîte à...
-
Page 12: Pièces Et Spécifications
PIÈCES ET SPÉCIFICATIONS Description des pièces Description des pièces Glissière de la chaudière (x1) Vis (x26) Plateau principal de la chaudière (x1) Rondelle (x26) Grille de cuisson supérieure en acier recouvert de Rondelle de verrouillage (x26) porcelaine (x1) Vis (x2) Grille de cuisson en fonte recouverte de porcelaine (x2) Écrou (x2) Bouchon de couvercle (x1) - Page 13 PIÈCES ET SPÉCIFICATIONS...
-
Page 14: Préparation De L'assemblage
à la liste des pièces. En cas de pièce manquante ou endommagée, ne tentez pas d’assembler. Les dommages lors de l'expédition ne sont pas couverts par la garantie. Contactez votre revendeur ou le service à la clientèle de Pit Boss pour les pièces : du lundi au samedi, de 4h à... -
Page 15: Montage Des Pieds De Supports Au Baril Principal
2. MONTAGE DES PIEDS DE SUPPORTS AU BARIL PRINCIPAL Pièces nécessaires : baril principal / assemblage de la trémie (# 8) pied de support pour roue / avant (# 19) pied de support pour roue / dos (# 20) vis (# A) rondelle de blocage (# C) rondelle (# B) Installation :... -
Page 16: Fixation Du Bouchon Du Couvercle
4. FIXATION DU BOUCHON DU COUVERCLE Pièces nécessaires : bouchon de couvercle (# 5) Installation : • Fixez le bouchon du couvercle sur le dessus du barillet principal en utilisant la vis préinstallée sur le dessus. 5. MONTAGE DE LA POIGNÉE DU COUVERCLE Pièces nécessaires : cadran de la poignée du couvercle (# 14) poignée de couvercle (# 15) -
Page 17: Installer La Tablette Avant
8. INSTALLER LA TABLETTE AVANT Pièces nécessaires : tablette avant (# 24) vis (# I) écrou (# E) Installation : • À partir du dessous, insérez la vis (de l'intérieur) dans la tablette avant et ensuite le support pour tablette avant, puis verrouillez-le avec From underneath, insert the screw (from the inside) into the front l'écrou. -
Page 18: Installer Les Composants De Cuisson
10. INSTALLER LES COMPOSANTS DE CUISSON Pièces nécessaires : glissière de la chaudière (# 1) plateau principal de la chaudière (# 2) poignée de la barre de réglage pour chaudière (# 12) barre de réglage pour chaudière (# 13) grille de cuisson supérieure (# 3) grilles de cuisson (# 4) Installation : REMARQUE : Les deux pièces de flamme sont légèrement recouvertes... -
Page 19: Placer Le Seau À Graisse
Assurez-vous qu'il soit à niveau pour éviter les déversements de graisse. • L'appareil est maintenant complètement assemblé. 12. CONNEXION À UNE SOURCE D'ALIMENTATION REMARQUE : Avant de brancher votre Pit Boss dans une prise FUSIBLE À ACTION RAPIDE, électrique, assurez-vous que le cadrant de réglage des températures 5 AMPÈRES... - Page 20 IMPORTANT DO NOT RETURN PRODUCT TO STORE For all questions, comments, or inquiries, please contact Dansons directly. Our Customer Service department is available Monday through Sunday, 4am - 8pm PST (EN/FR/ES). TOLL FREE: 1-877-303-3134 | TOLL FREE FAX: 1-877-303-3135 service@pitboss-grills.com IMPORTANT NE RETOURNEZ PAS LE PRODUIT AU MAGASIN Pour toute questions, commentaires ou demandes de renseignements, veuillez communiquer...
Need help?
Do you have a question about the Sportsman PB0500SP and is the answer not in the manual?
Questions and answers