Advertisement
Quick Links
Advertisement

Related Manuals for Gold Note B-7 Ceramic


Summary of Contents for Gold Note B-7 Ceramic
- Page 1 B-7 Ceramic HIGH-PRECISION TONEARM USER MANUAL...
-
Page 3: Table Of Contents
INDEX DESCRIPTION AND SPECIFICATIONS........................ P. 3 INSTALLATION............................... P. 5 OVERVIEW AND ANTI-SKATING ........................P. 6 VTA AND AZIMUTH ............................P. 7 WARRANTY AND SERVICE..........................P. 8 TROUBLESHOOTING........................... P. 9 IMPORTANT SAFETY INFORMATION......................... P. 10... -
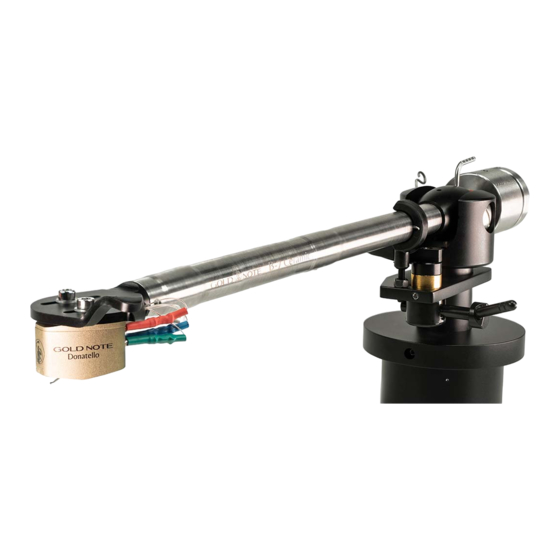
Page 4: Description And Specifications
A well designed tonearm should perform at its best with every cartridge while keeping things simple and effective, being easy to install and use: add quality materials and elegant looks to the equation and you'll get an idea of the B-7 Ceramic. - Page 5 DESCRIPTION AND SPECIFICATION SPECIFICATIONS Typology: 9” Ball Bearing Tonearm Overhang: 19mm Offset: 24° Arm wand: Straight Titanium with 6 different sections Inserting Plinth Shaft: 23mm Dynamic effective mass: 10g VTF: 0.176N (18g) VTA: adjustable on collar Lift: hydraulic Anti-skating: wire 5 positions Anti-skating force: from the center to the outside the effect is 0.5g each step = 0.5 - 1.0 - 1.5 - 2.0 - 2.5 Azimuth: adjustable on the headshell CABLES...
-
Page 6: Installation
INSTALLATION STEP 1 Insert the tonearm into the arm collar on the turntable and block it with the hex-bolts on the collar while adjusting the VTA (requires the cartridge to be already installed). Insert the Phono Cable into the arm collar of the turntable as suggested in the picture. Insert the arm into the base and then proceed to screw the 3 grains arranged on the external circumference at intervals of 120 °. -
Page 7: Overview And Anti-Skating
OVERVIEW AND ANTI-SKATING - ANTI-SKATING nylon wire with bullet counterweight - ANTI-SKATING adjustment bar - TONEARM COUNTERWEIGHT: to set up the correct tracking force depending on the phono cartridge in use - SHELL AZIMUTH ADJUSTMENT: to adjust the alignment of the tonearm head-shell (0,9mm Allen Wrench) INSTALLING THE ANTI-SKATING SYSTEM 1 - Slip the loop of the ANTI-SKATING nylon wire over the groove of the ADJUSTMENT BAR 2 - Feed the wire through the loop of the SUPPORT HOOP... -
Page 8: Vta And Azimuth
VTA SETUP To up or down the arm by correctly adjusting the VTA, use the 1.5 mm Allen key supplied by Gold Note and insert it in the three holes on the arm board indicated by the arrows. Allen-key 1,5 mm... -
Page 9: Warranty And Service
WARRANTY AND SERVICE WARRANTY To validate the warranty is necessary to register the unit on the Gold Note internet web site within 15 days from the purchase on the appropriate area of the web site: www.goldnote.it/warranty If the unit is not registered correctly or has been purchased from a different country of the purchaser home address the unit will not be covered by any warranty and the registration will be refused. -
Page 10: Troubleshooting
• Adjust the VTA moving the arm shaft by loosing the three hex-bolts placed on the Angle of the arm is edge on the arm board collar with the Wrong. help of the 1,5mm Allen Wrench supplied. For spare parts visit the official Gold Note store at: http://www.akamaiaudio.it/... -
Page 11: Important Safety Information
Protect the product from rain, humidity and keep away from heat sources, electric and electronic motors etc. The power Chord supplied must be used only on this unit. Gold Note does not have responsibility for any improper use of this unit. This appliance has a serial number located on the rear panel. - Page 12 IMPORTANT SAFETY INFORMATION 1 Read these instructions and store them. 9 Protect the power cord from being walked on or pinched particularly at plugs, convenience receptacles, and the point 2 Heed all warnings. where they exit from the apparatus. 3 Follow the instructions. 10 Only use attachments/accessories specified by the manufacturer.
- Page 13 NOTES...
- Page 14 NOTES...
- Page 16 Gold Note Audio Gold Note Akamai S.r.l. service@goldnote.it www.goldnote.it...
Need help?
Do you have a question about the B-7 Ceramic and is the answer not in the manual?
Questions and answers