Advertisement
Instruction Manual
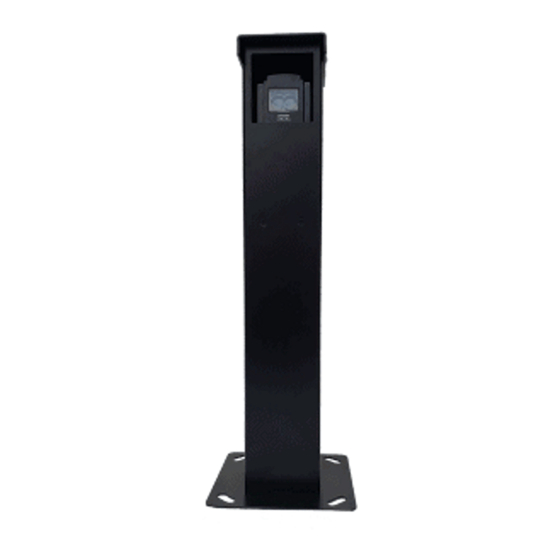
The
PhotoeyeVault
a stylish alternative to visible hardware. Keep photoeyes safe from vandalism, inclement weather,
and accidental contact damage with this solid steel fixture. The PhotoeyeVault hides electronics
while blending in with the surroundings. It is compatible with EMX IRB-RET, EMX IRB-MON, and
EMX IRB-4X photoeyes.
Contents
A. PhotoeyeVault Kit Parts
B. Tools and Materials for Field Installation
C. Prerequisites to Installing the PhotoeyeVault
D. Installation Steps
.............................................................................
...................................................................................................
.......................
*EMX photoeye sold separately
Cautions and Warnings
This product is an accessory or part of a system. Install the EMX PHOTOEYE (IRB-RET,
IRB-MON, or IRB-4X) according to instructions from the gate or door operator manufacturer.
Comply with all applicable codes and safety regulations.
Specifications
EMX Industries, Inc.
PhotoeyeVault_Rev1.0_112520
PhotoeyeVault
Protection Bollard
is
a
security-style
Step 1: Unbox PhotoeyeVault Kit
Step 2: Mount Photoeye* and PhotoeyeVault
Step 3: Connect Wiring
Step 4: Aim PhotoeyeVault
Step 5: Conclude the Installation
Housing Material
Dimensions
Finish
Weight
Tech support: 216-518-9889
technical@emxinc.com
™
bollard
that
protects
.120" 11-gauge steel post
1/8" steel base plate
4.25" x 4.25" x 24.25" post
8 x 8" base plate
Black powder coat
ononly)
Up to 115 ft (35 m)
16 lbs
photoeyes
and
provides
Page 2
Page 3
Page 3
Page 5
Page 5
Page 5
Page 7
Page 8
Page 8
TM
1/8
Advertisement
Table of Contents

Subscribe to Our Youtube Channel
Related Manuals for EMX PhotoeyeVault


Summary of Contents for EMX PhotoeyeVault
- Page 1 Keep photoeyes safe from vandalism, inclement weather, and accidental contact damage with this solid steel fixture. The PhotoeyeVault hides electronics while blending in with the surroundings. It is compatible with EMX IRB-RET, EMX IRB-MON, and EMX IRB-4X photoeyes.
- Page 2 Front Cover Knock-out Hole PhotoeyeVault Backplate Attachment Screws for IRB-MON / IRB-4X IRB-MON / IRB-4X Thru Beam Photoeye* IRB-RET Retroreflective Photoeye* *EMX photoeye sold separately (NOT INCLUDED IN KIT) Fig A: PhotoeyeVault Kit EMX Industries, Inc. Tech support: 216-518-9889 PhotoeyeVault_Rev1.0_112520...
- Page 3 All wires to be routed through the conduit described in item C.1.2 Fig C.1: Installation Schematics Torxun recommends the use of cylindrical concrete footing for ease and symmetry of aiming the PhotoeyeVault and the photoeye across the drive path (see inset). EMX Industries, Inc. Tech support: 216-518-9889 PhotoeyeVault_Rev1.0_112520...
- Page 4 C.2 The PhotoeyeVault, with the photoeye in it, is installed and typically positioned a few inches before the vehicle gate line such that the photoeye transmitter projects a beam across the opening of the vehicle gate to the receiver or reflector.
- Page 5 D. Installation Steps Step 1 – Unbox the PhotoeyeVault Kit Note: The EMX photoeyes are sold separately; they are not part of the kit Remove the PhotoeyeVault from the product box • Check each item referring to section A – the kit parts list •...
- Page 6 • Follow the instructions in the EMX manual to install the IRB-RET unit to the bracket • Follow the instructions in the EMX manual to install the reflector at the opposite side of • the sensing zone Proceed to Step 3.2 •...
- Page 7 PhotoeyeVault. (See Fig A – Part #4) Refer to the wiring guide in the EMX manual for wiring the IRB-MON / IRB-4X photoeye •...
- Page 8 • base plate of the PhotoeyeVault Step 5 – Conclude the Installation To each PhotoeyeVault baseplate, drill the first mounting hole using the baseplate as a jig, • referencing the position markers established earlier in the process Conduct a round of final tests on the photoeyes to ensure correct aim •...
Need help?
Do you have a question about the PhotoeyeVault and is the answer not in the manual?
Questions and answers