Table of Contents
Advertisement
Advertisement
Table of Contents

Related Manuals for Status Pro Level Precision


Summary of Contents for Status Pro Level Precision
- Page 1 Precision Level System User Guide BA 1044 E 07/15 Another fine solution by...
-
Page 2: Table Of Contents
English Level System (BG 840100) We would like to congratulate you on the purchase of your Status Pro µLevel Precision Level System. Before initial usage you should carefully read the safety instructions as well as the user guidelines contained in this manual. We wish you every success when using this Measurement Instrument. - Page 3 CONTENT 2.5 Liability Exclusion ............6 3.
-
Page 4: Introduction
INTRODUCTION 1. Introduction µLevel is produced in Far East with the quality standard ISO 9001 since 1993. It is a high accuracy measuring product adopting sensitive capacitance sensor, as well as using SCM as controller. It is widely used for the inspection of the flatness, straightness of products, installation and adjustment of precision machine tools, Machining Centers, Three Coordinates Measuring Machines. -
Page 5: Advice On Batteries / Rechargeable Cells
NOTES ON SAFETY 2.2 Advice on batteries / rechargeable cells If the equipment is being stored for a longer period of time or being powered using Mains, then the batteries / rechargeable cells should be removed to prevent damage of the instrument through leakage. -
Page 6: Calibration
Within the scope of the service checks, the complete system will also be examined for possible wear or damage, as well as receiving any software updates. The date of the next service check for your equipment is stamped on the Status Pro cali- bration sticker. -
Page 7: Getting Started
GETTING STARTED 3. Getting started 3.1 Batteries / rechargeable cells 1. Open the cover of the battery storehouse under the handle. 2. Put in 4 pieces of “AA”5# battery as per the positive and negative poles marked on the cover of the battery storehouse. 3. -
Page 8: Display
GETTING STARTED 3.3 Display Measurement with 1µm/m resolution Serial number for current data Measurement with 10µm/m resolution The last data stored Zero Setting Display of measurement readings Voltage Power low Temperature Tilt direction display: right side high Read stored data Tilt direction display: left side high Delete stored data Minus display... - Page 9 GETTING STARTED Touch gently the Mode key and adjust it to volt- , the LED displayer will show current voltage. If the voltage is lower than 4 V, Low Voltage warning will flash. Reminding If no shows or show abnormally after the power being switched on, please switch off the power at once.
- Page 10 GETTING STARTED Function Choice After the apparatus is switched on, touch gently Mode key could choose different functions. Measuring Phase This is a high precision measuring phase. The resolution of measur- ing phase II of WL11 Digital Level Meter is 0.001mm/m, suit to inspect the flatness, straightness of products with precision grade “00”.
- Page 11 GETTING STARTED Temperature Function of measuring the temperature automatically. LED displayer shows the current environment temperature (°C). Reading At this function, press “gentle adjust zero setting”, the data stored in the E-level meter and sequence number could be shown in turn. This E-level meter could store maximum 999 data.
-
Page 12: Operation Guide
OPERATION GUIDE 4.Operation guide Temperature Constant before Using 1. Before to be used, the E-level meter must be placed in its working environment more than 4 hours (not necessary to electrify). 2. After electrify 20 to 30 minutes, it could be used to inspect. 3. -
Page 13: Level Inspection And Adjustment For Working Surface
OPERATION GUIDE 1. One digit shown at the display screen of the measuring mode, is equal to the resolution value of the corresponding measuring range phase of the E-level meter. For example: 0000 means the digital E-level meter has been zero set (relative zero) 0012 means the digital E-level meter display 12 numbers -1288 means the digital E-level meter display -1288 numbers 2. -
Page 14: Straightness And Flatness Measurement
OPERATION GUIDE precision. Normally phase I is firstly chose for glancing adjustment, then choose phase II for fine adjustment. Level adjustment should be done at “X, Y” direction respectively on the inspected surface. Straightness and Flatness Measurement E-level meter inspect straightness and flatness, adopting section distance method, sepa- rate the inspected surface into skits of sections, use Digital E-level meter measure the angle change (the height difference) relative to the natural level, then converse it to lin- earity value as per the length of this section. -
Page 15: Use The Store Function Of The Level Meter
OPERATION GUIDE Use the Store Function of the Level Meter 1. When use the store function of the level meter, please insert the plug of the control box into the data transmission socket of the Digital E-level meter. 2. At the measuring phase , after the shown measuring data is steady, press the count button “Save”... -
Page 16: Adjustment Of The Apparatus
ADJUSTMENT OF THE APPARATUS 5. Adjustment of the Apparatus When zero setting is needed, the E-level meter should be at function mode. 5.1 Relative Zero Setting 1. Zero setting: Keep the position of the E-level meter unchanged, press key once each, the E-level meter display 0. 2. -
Page 17: Scale Of The Apparatus Displayed Value
ADJUSTMENT OF THE APPARATUS The check of the zero value error of the digital level meter, should be done after the absolute zero setting. When adjust the level for the working surface, it is suggested to adjust the digital level meter to absolute zero position. It will make the level adjustment simple and easy. -
Page 18: Renew The Leave Factory Settings
ADJUSTMENT OF THE APPARATUS 5. Keep the position of digital level meter and wait the reading to be steady, and press separately, the displayer level meter show zero, then replace by a relevant gauge listed as below under the probe of the right side indication needle, adjust the small angle inspection instrument and make the displayed value of the indi cation needle to zero position, at such time press the key “Save”... -
Page 19: Technical Data
TECHNICAL DATA 6 Technical Data Display range: 0 ~ ±9999µm/m Measuring range: 0 ~ ±2000µm/m Resolution: Phase I = 0.01 mm/m – Phase II = 0.001 mm/m Measurement error in measurement range: ± (1 + A × 2%) A: measurement value in µm/m Stability: 6 µm / 4h Repeating accuracy:... -
Page 20: Level Android Software (Optional)
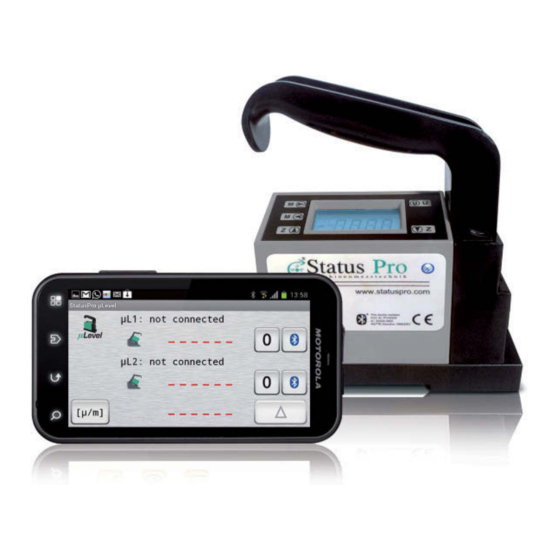
LEVEL ANDROID SOFTWARE 7 µLevel Android Software (optional) 7.1 Software Installation If you have ordered the µLevel Ext. Display (IT 200610 ) together with your µLevel Instrument then everything is ready for use and no installa- tion is required. If you receive the Software per Email on your own Android Mobile it may be necessary to change the security settings before installing the App. - Page 21 LEVEL ANDROID SOFTWARE The connection manager will open with a list of coupled Bluetooth Units: Choose your µLevel from the list . The µLevel will connect per Bluetooth. The Bluetooth Symbol changes colour from Black to Blue: The current measured value from your chosen µLevel will be continuously displayed on your Android.
-
Page 22: Differential (Delta)- And Rightangles- Resultant
LEVEL ANDROID SOFTWARE In this case (shown left) the 1st µLevel has been zeroed. The 2nd µlevel displays its original value (-1573). On the right we see that now both µLevel have been Zeroed. Units You can choose between µm/m and mm/m. Note: µm/m = µRad and mm/m = mRad. Just touch the symbol: Differential (Delta)- and Rightangles- resultant When using two µLevel you will have one of the following setups. -
Page 23: Disconnect And Exit The App
LEVEL ANDROID SOFTWARE (the display unit mm/m will show 3 decimal places). If the µLevel is doing something else like (ZERO, VBAT, °C, DATA oder DEL) the Android will display „MODE?“. Go back to measurement mode I or II and you will see the vales displayed again. -
Page 24: Smartlevel Pro Software (Optional)
SMARTLEVEL PRO SOFTWARE 8 SmartLevel Pro Software (optional) The applications are: • Straightness • Paralism (Machine guide etc.) • Flatness • Perpendicularity (Testing…) • Machine Tools, GuideWay etc. 8.1 Basic Setup System Requirements • Microsoft Windows XP/2000/2003/NT Operating System • CPU Pentium III above •... -
Page 25: Program Operating
SMARTLEVEL PRO SOFTWARE 2. Installation directly from the directory on the CD-ROM Use your file manager (Explorer) to search the directory SOFTWARE . In this directory to find the file Setup.exe. Double the setup.exe to start installation. Follow the directives on the monitor. Removal of the Software The software SmartLevel Pro can be removed as follows: 1. -
Page 26: Measuring Icon
SMARTLEVEL PRO SOFTWARE 8.3 Measuring icon The Least Square Evaluate Open File Method of Straightness The Minimum Zone Evaluate Save File Method of Straightness The EndPoint Evaluate Method Export Excel of Paralism The Least Square Evaluate Export Text Method of Paralism The Minimum Zone Evaluate Exit the System Method of Paralism... -
Page 27: Measuring Object
SMARTLEVEL PRO SOFTWARE Measuring Flatness (Grid) Length Measuring Flatness (Diagonal) Width Step Number Step Number Step Length Resolve Step length Diagonal Dicay Step Number Step Length Calculate 8.4 Measuring object The Basic 1. Instrument Connected to Computer 2. Change the Instrument On Measuring Process 3. - Page 28 SMARTLEVEL PRO SOFTWARE Measuring Straightness Step 1. The Parameter Setup => Length The Measuring length, click the mouse right key to standard length StepN => Step Number StepL => Step Length StepL = L/StepN 2. The Measuring Process KeyBoard Read one Data Status –...
- Page 29 SMARTLEVEL PRO SOFTWARE Import Data Methods of aligning Measuring Paralism Step 1. Setup Parameter => Length The Measuring length, click the mouse right key to standard length StepN => Step Number StepL => Step Length StepL = L/StepN Status – µLevel User Guide...
- Page 30 SMARTLEVEL PRO SOFTWARE 2. The Measuring Process Keyboard, Online, Import Data Methods of aligning Paralism Measuring Flatness Step With Grid 1. Setup Parameter => Length The Measuring length, click the mouse right key to standard length StepN => Step Number StepL =>...
- Page 31 SMARTLEVEL PRO SOFTWARE 2. The Measuring Process 5. Calculated Data 3. Methods of aligning Flatness 6. Measuring Data 4. Color Graph Status – µLevel User Guide...
- Page 32 SMARTLEVEL PRO SOFTWARE Measuring Flatness Step With Diagonal 1. Setup Parameter => Length The Measuring length, click the mouse right key to standard length StepN => Step Number StepL => Step Length StepL L/StepN 2. The Measuring Process 3. Color Graph Status –...
-
Page 33: Products Und Services
Status Pro develops and manufac- tures laser alignment equipment and we are committed to this process. Most of our customers are machine builders, assembly and quality control people. - Page 34 PRODUCTS & SERVICES Status – µLevel User Guide...
- Page 35 MEMO Status – µLevel User Guide...
- Page 36 Copyright 2015 Status Pro Maschinenmesstechnik GmbH. This document or parts thereof may not be copied or other- wise reproduced without the permission of Status Pro GmbH. The technical details are subject to change without notifi- cation. We would appreciate being informed of any errors in this document.
Need help?
Do you have a question about the Level Precision and is the answer not in the manual?
Questions and answers