Advertisement
Orion Illuminated Reticle Eyepieces
An Orion Illuminated Reticle Eyepiece is useful for a variety
of different applications in amateur astronomy. By virtue of its
LED-lit crosshair reticle pattern, the illuminated reticle eye-
piece aids in polar alignment of a telescope on an equatorial
mount and in alignment of a telescope's finder scope. It also
allows precision guiding during long-exposure astrophotogra-
phy when used with an off-axis guider or as the eyepiece in a
guide scope.
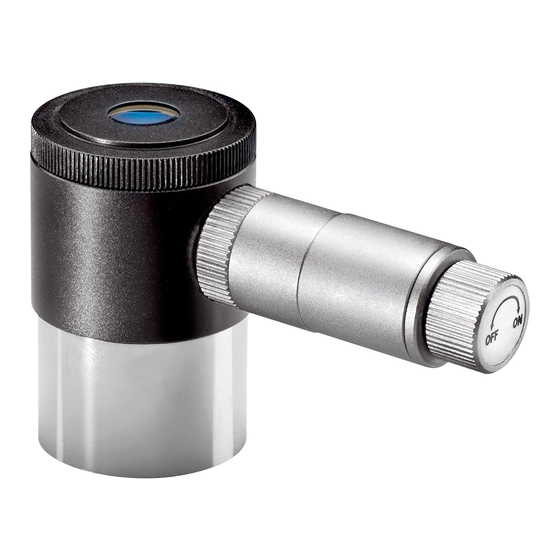
All Orion illuminated reticle eyepieces feature a double
crossline reticle etched in optical glass (Figure
1). The double line arrangement allows conve-
nient and precise positioning of a star image
either in the tiny central square formed by the
lines or on the intersection of any two of the
lines.
Attaching the Illuminator
All models come with a wireless illuminator. To attach the illu-
minator to the eyepiece, simply thread the LED end into the
threaded hole in the side of the eyepiece. Turn on the illumina-
tor by rotating the knurled knob on the exposed end of the illu-
minator. Brightness is also controlled by the knurled knob. Be
sure to turn the illuminator off when it is not in use, otherwise
the batteries will drain unnecessarily.
Yes, It's Dim!
Your first look through the eyepiece is likely to be in the day-
time, and you might not be able to see the illumination of the
double crosslines. When your eyes are dark-adapted, however,
the illumination will be obvious. You should be able to see the
LED itself light up even in the daytime when the illuminator is
not coupled to the eyepiece.
When using an illuminated reticle eyepiece in the field, the illu-
mination should be set as dim as possible so faint stars in the
field of view will not be "washed out" in the crosshairs' glare. In
INSTRUCTION MANUAL
#8450 12.5 Plössl
#8496 5mm Ultrascopic
Figure 1
some cases, you may find the illumination is too bright even at
the dimmest setting. To diminish the brightness even further,
try wadding up a tiny bit of paper and placing it between the
eyepiece and the illuminator. While this may sound odd, it is a
technique that has been employed by astrophotographers for
many decades!
Focusing the Eyepiece
The knurled top of the eyepiece allows focusing of the double-
crossline reticle to your eyesight. Proper focusing of the reticle
is important. If it is not in focus, you may experience "parallax"
errors in which the crosslines may appear to shift with respect
to the sky background.
It's a good idea to focus the reticle with the main telescope
capped or purposely set out of focus. Then, when the crosslines
appear sharp, remove the cap from the telescope and look into
the eyepiece. Aim at a star and focus the star image using the
telescope's focuser. Now, both the main telescope and the ret-
icle itself should be in sharp focus in eyepiece's field of view.
Replacing or Installing Batteries
The illuminator for the #8450 takes three SR54 batteries. These
are common watch-type batteries that are widely available. The
batteries are installed inside the illuminator arm. To replace the
batteries, refer to Figure 2. Note that the positive (+) side of the
batteries should face the LED end of the illuminator.
The illuminator for the #8496 takes two SR44 batteries. These
are common watch-type batteries that are widely available. The
batteries are installed inside the illuminator arm. To replace the
batteries, refer to Figure 3. Note that the negative (-) side of the
batteries should face the LED end of the illuminator.
Figure 2
Figure 3
IN 106 Rev. D 02/09
Advertisement
Table of Contents

Subscribe to Our Youtube Channel
Related Manuals for Orion 8450


Summary of Contents for Orion 8450
- Page 1 Replacing or Installing Batteries phy when used with an off-axis guider or as the eyepiece in a The illuminator for the #8450 takes three SR54 batteries. These guide scope. are common watch-type batteries that are widely available. The All Orion illuminated reticle eyepieces feature a double batteries are installed inside the illuminator arm.
- Page 2 A N E M P L O Y E E - O W N E D C O M P A N Y Copyright © 2021 Orion Telescopes & Binoculars. All Rights Reserved. No part of this product instruction or any of its contents...
Need help?
Do you have a question about the 8450 and is the answer not in the manual?
Questions and answers