Wigersma & Sikkema UNICOM 300 Installation And User Manual
Hide thumbs
Also See for UNICOM 300:
- Installation manual (4 pages) ,
- Installation and user manual (37 pages)
Table of Contents
Advertisement
Quick Links
Advertisement
Table of Contents

Subscribe to Our Youtube Channel
Related Manuals for Wigersma & Sikkema UNICOM 300

Summary of Contents for Wigersma & Sikkema UNICOM 300
- Page 1 Installation and user manual (type N531) Mains operated UNICOM 300...
- Page 2 Installation and user manual UNICOM 300 N531 All rights reserved. Copyright © 2021 Wigersma & Sikkema B.V. All the figures and descriptions in this installation, operating and maintenance manual have been compiled only after careful checking. Despite this, however, the possibility of errors cannot be completely eliminated.
-
Page 3: Table Of Contents
Appendix 1: Schematic display of the functionalities ..........32 Appendix 2: Schematic display of the data structure ..........33 Appendix 3: Wiring diagrams UNICOM 300 - UNIGAS 300 ........34 Serial connection between UNILOG 300 and UNIGAS 300 ............34 Pulse connection between UNILOG 300 and UNIGAS 300 ............ -
Page 4: Introduction
Mains operated UNICOM 300 is a (GSM-CSD/GPRS/LTE cat.1) 2G/4G modem and data logger. The inputs are equipped with Ex barriers so that mains operated UNICOM 300 may be used with equipment that is placed in a zone 0 with a potentially explosive atmosphere. -
Page 5: Explosion Safety Instructions (Ex)
Manual DDN5006GHEN (this manual) should be read and understand completely before installing and put into use UNICOM 300 N531. Does any question arise or clarification is needed with regard to explosion safety with respect to UNICOM 300 N531, please contact Wigersma & Sikkema. - Page 6 Installation and user manual UNICOM 300 N531 Additional instructions on explosion safety for use with external antenna: Replacing the antenna with a type other than the ones recommended is not recommended, see manual DDN5006GHEN (this manual) for additional information. Prevent damaging the cable of the external antenna during installation. If the cable is damaged, the antenna should be replaced as a whole with a non-damaged unit.
-
Page 7: Inputs And Data Structure
Mains operated UNICOM 300 has two pulse outputs that can transmit pulse or alarm. Mains operated UNICOM 300 is able to count two pulses in two counters, read an encoder counter in a third counter and log it in an interval logger. -
Page 8: Installation
See DDN5002MHML installation manual for installation/assembly options and installation instructions. This manual can be downloaded from www.wigersma-sikkema.com. It is not necessary to open the UNICOM 300 to mount the mounting brackets to a gas meter or to the wall. 4.2 Dealing with mains voltage First read the provisions for explosion protection, see chapter 2 Explosion protection instructions (Ex) or the DDN5802CVML EU Declaration of Conformity and Safety instructions UNICOM 300 N531. -
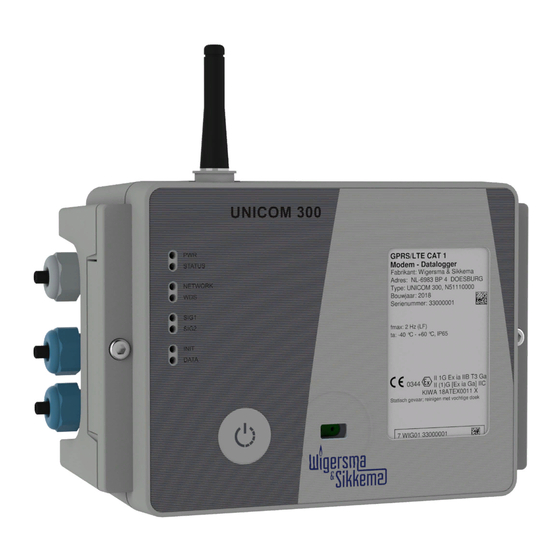
Page 9: Front Mains Operated Unicom 300
Make sure that when closing the lid it is not pushed up or down. Make sure that the sealing ring in the lid is clean. (3) Breather opening for pressure equalization between UNICOM 300 and ambient atmosphere. Behind the breather opening a membrane is placed that prevents ingress of moisture. -
Page 10: Components
Installation and user manual UNICOM 300 N531 4.6 Components Figure 4 Status LED logger Programming switch (SW5) LED power supply Backup battery (optional) UNICOM 300 power connector Status LED encoder Switch manual encoder initialization (SW4) DDN5006GHEN/04-2021/rev.B1... -
Page 11: Components Inside Cover
Installation and user manual UNICOM 300 N531 4.7 Components inside cover Figure 5 Mini-SIM card holder Label for terminal connections and/or SIM-card Connectors for battery packs SW3 (zie table 3) DDN5006GHEN/04-2021/rev.B1... -
Page 12: Power Supply Connections
Installation and user manual UNICOM 300 N531 4.8 Power supply connections Figure 6 Cable gland for mains voltage Sealing cap for cable gland Cable gland for back-up battery 24 VDC connection (15 VDC - 32 VDC) 230 VAC Mains connection... -
Page 13: Connecting To The Mains Voltage
Insert the power cable through the appropriate cable gland (Fig. 6, 1). Connect the power cable to the 230 VAC or 24 VDC terminal in the UNICOM 300 (fig. 6, 5). Screw the terminal and the cable gland tight and fit the Ex-protection cap (fig. 6, 7). -
Page 14: Function Switches Mains Operated Unicom 300
Connection for Encoder Table 2: connections inputs See Appendix 3 for connection diagrams for UNICOM 300 - UNIGAS 300. In order to make a good connection between the threaded ends and the connection terminals (see Figure 7, 1 and 7, 2), it is important to ensure that the connection terminals are first fully unscrewed. -
Page 15: Into Service
APN; such as APN name with the corresponding username and password. 5.2 SIM-card placement Open UNICOM 300 (see figure 3, note 2). The mini-SIM holder is located in the lid of the UNICOM 300 (see figure 5). -
Page 16: Activation And Registry
(see chapter 5.4). 5.6 Out of service If it is necessary to deactivate the UNICOM 300 (take it out of service), it must be ensured that the modem is not active! This can be checked by activating SW1 for 1 second (see table 3, from firmware version 11.0.21) or activating the communication port SW2 which causes the status LED to display. -
Page 17: Activation Of The Modem, Tcp And Ntp Services
NETWORK status LED (see Chapter 5) is off for a short time. 6.2 Activation of TCP services If the TCP server function is activated in UNICOM 300, the device will log on to GPRS/LTE cat. 1 when the modem is switched on. -
Page 18: Function Check
Blinking at transfer of data by modem Table 4: status LEDs UNICOM 300 Checking the system status data logger On the logger part of UNICOM 300 two status LEDs (see figure 4) are available which show different conditions. Status LED... -
Page 19: Configuration
If an encoder counter is connected without initializing it and the position of the encoder counter is lower or much higher than the value in counter 3 (Vm3) of UNICOM 300, UNICOM 300 will not take over the encoder counter mode. In the status register a message is made of an incorrect readout of the encoder counter. -
Page 20: Gas Meters With A Pulse
Check and / or program the correct pulse ratios (parameter 1:0.7.2 and 2:0.7.2) by means of the UNITOOL service software. For UNICOM 300 pulse outputs, a choice can then be made for Vm1-Vm2-Vm3 or Alarm1 via the parameters mentioned in chapter 11. -
Page 21: Counters And Registers
UNICOM 300 N531 11 Counters and registers Below are the counters and registers (parameters) that are present in UNICOM 300. The name is displayed per counter or register, supplemented by the OBIS code, the security level and a short description. - Page 22 • EXT – BAT • EXT – ACCU • Ah-used C.90.21 Consumed energy from the UNICOM 300 battery in Ah Networkh C.90.4 GSM/ GPR / LTE cat.1 connected to network time registration Commh C.90.5 GSM/ GPRS/ LTE cat.1 communication time registration...
- Page 23 Installation and user manual UNICOM 300 N531 GPRS / LTE cat.1 settings Name Unit OBIS Security level Description TCP APN Name C.92.40 Password 2a APN name on which UNICOM 300 must log in for TCP and TCP APN user C.92.41...
- Page 24 Installation and user manual UNICOM 300 N531 GPRS / LTE cat.1 settings (continued) Name Unit OBIS Security level Description Pin code for modem. If an Modem CHV1 ME C.92.61 Password 2a incorrect PIN is used for a SIM password card with PIN protection, an...
-
Page 25: Unicom 300 Datalogger
Installation and user manual UNICOM 300 N531 11.2 UNICOM 300 datalogger Device data Name Unit OBIS Security level Description Device type Device type C.1.1 version UNICOM 300 Serial number of the Serial number C.1.0 UNICOM 300 Firmware version Firmware version 7-0:0.2.0... - Page 26 Broadcast mode C.93.15 Password 2a Response to a 1107 request. In "Off" UNICOM 300 does not respond if there is no device address in the request (transparent modem) With "On", there will be a response if there is no device address in the...
- Page 27 Password 2a mask 2 status registers 7.1, 7.2 and 7.3 at alarm output 2 Consumption Data Name Unit OBIS Security level Description UBatt C.90.6 Voltage of the UNICOM 300 LOGGER Battery hour C.6.0 Number of hours in operation counter LOGGER DDN5006GHEN/04-2021/rev.B1...
- Page 28 C.91.8 Password 2a Text for display in the file name. If this object is set to 00000000, the serial number of UNICOM 300 is issued in the file name. This object is also displayed in data read out FTP interval C.92.49...
- Page 29 Event writing of OBIS parameter 9, B, D, F 8, 9, A, B, C, D, E, F UNICOM 300 had no power supply 4, 5, 6, 7, Event C, D, E, F 2, 3, 6, 7, Clock has been set with more than...
- Page 30 Installation and user manual UNICOM 300 N531 Status registry 1; operational status 1 St : 1 Status Weergave Omschrijving CRC-error 8, 9, A, B, E F CRC error occurred in program memory of the processor LOGGER of the top PCB. The memory is checked once per hour...
- Page 31 Installation and user manual UNICOM 300 N531 Status registry 3; other alarm and warnings St : 3 Weergave Weergave Omschrijving Encoder 4, 5, 6, 7, Set if encoder initialization could not be performed. This to enable indicate that encoder is functionally switched on, but not C, D, E, F read out.
-
Page 32: Appendix 1: Schematic Display Of The Functionalities
Alarm contact Ingang 2 Statusbit: Alarm contact alarm contact1 C.93.40 Enco der Encoder Decoder Value check INP3 3:23.0.0 Statusbit: Encoder alarm contact1 Gasmeter 7-1:0.2.14 Encoder init Stock lock C.91.10 deactivated C.91.11 Schematic display of the functionalities of UNICOM 300 datalogger DDN5006GHEN/04-2021/rev.B1... -
Page 33: Appendix 2: Schematic Display Of The Data Structure
Installation and user manual UNICOM 300 N531 Appendix 2: Schematic display of the data structure Schematic display of the data structure UNICOM 300 datalogger DDN5006GHEN/04-2021/rev.B1... -
Page 34: Appendix 3: Wiring Diagrams Unicom 300 - Unigas 300
Installation and user manual UNICOM 300 N531 Appendix 3: Wiring diagrams UNICOM 300 - UNIGAS 300 Serial connection between UNILOG 300 and UNIGAS 300 For the serial connection to UNIGAS 300 the optical connector cable is used. Available lengths: 0,3m NN2430S... -
Page 35: Pulse Connection Between Unilog 300 And Unigas 300
Installation and user manual UNICOM 300 N531 Pulse connection between UNILOG 300 and UNIGAS 300 Available lengths: 5m NN2647 10m NN2648 DDN5006GHEN/04-2021/rev.B1... -
Page 36: Pulse And External Power Supply Connection Between Unilog 300 And Unigas 300
Installation and user manual UNICOM 300 N531 Pulse and external power supply connection between UNILOG 300 and UNIGAS 300 Available lengths: When replacing a UNILOG with a UNICOM power supply, it is possible 0,65m NN2662 to use the cable used with the UNILOG. Strip for the correct cable... -
Page 37: Appendix 4: Technical Specification
Installation and user manual UNICOM 300 N531 Appendix 4: Technical specification Subject to changes UNICOM 300 General Explosion safety ATEX II (1) G [Ex ia Ga] IIC • ta: -40° C to +60° C Suitable for natural gas installations Mounting in the safe area. - Page 38 Installation and user manual UNICOM 300 N531 Status indicator Front Status indicator LED’s - PWR (power supply status (Good; Low; • Flat)) Activated at placing optical head - STATUS (stock-lock active, not active, critical or pushbutton front error) - NETWORK (IP service status: Non;...
- Page 39 Installation and user manual UNICOM 300 N531 Status indicator 2 Status indicator LED’s Diagnosis • NAMUR Encoder counter initialization Inputs Inputs LF 1 and 2 2 Hz max, reed and electronic switches with • pulse length min 50 ms Cable gland Ø...
- Page 40 180 x 50 mm • material Stainless steel • Weight 0,2 kg • Specification universal mounting bracket for mounting UNICOM 300 with UNIGAS 300 General dimensions approx. 40 x 240 mm • material Stainless steel • Weight 0,2 kg •...
-
Page 41: Appendix 5: Serial Connections Unigas Converters
Installation and user manual UNICOM 300 N531 Appendix 5: Serial connections UNIGAS converters Connector type Description Cable color black with M12 Cable color blue with M12 Cable color blue with Male connector Male connector optical connector UNIGAS EVC type UNIGAS 61D or UNIGAS... - Page 42 Wigersma & Sikkema B.V. Leigraafseweg 4 NL-6983 BP Doesburg The Netherlands TEL: +31 (0)313 – 47 19 98 info@wigersma-sikkema.com www.wigersma-sikkema.com...
Need help?
Do you have a question about the UNICOM 300 and is the answer not in the manual?
Questions and answers