Table of Contents
Advertisement
Quick Links
ARC ADJUSTMENTS
All I-40/41 group adjustable heads are preset to
approximately 180°. Sprinklers may be adjusted
with water on or off. It is recommended that initial
adjustment be made before installation.
1. Using the palm of your hand, rotate the
nozzle turret counterclockwise to left stop to
complete any interrupted rotation cycle.
(Fig. 1).
2. Rotate the nozzle turret clockwise to right
stop. This is the fixed side of the arc. The
nozzle turret must be held in this position for
all arc adjustments.
To Increase Arc
1. Insert the key end of the Hunter wrench into
the adjustment socket (Figs. 2 & 3).
2. While holding the nozzle turret at the right
stop, turn the wrench clockwise. Each 360°
turn of the wrench increases the arc 45°.
3. Adjust to any arc between 40° and 360°.
4. Wrench will stop turning, or there will be a
ratcheting noise, when the maximum arc
(360°) is reached.
To Decrease Arc
1. Insert the key end of the Hunter wrench into
the adjustment socket (Figs. 2 & 3).
2. While holding the nozzle turret at the right
stop, turn the wrench counterclockwise.
Each 360° turn of the wrench decreases
the arc 45°.
3. Adjust to any arc between 40° and 360°.
4. Wrench will stop turning, or there will be
a ratcheting noise, when the minimum arc
(40°) is reached.
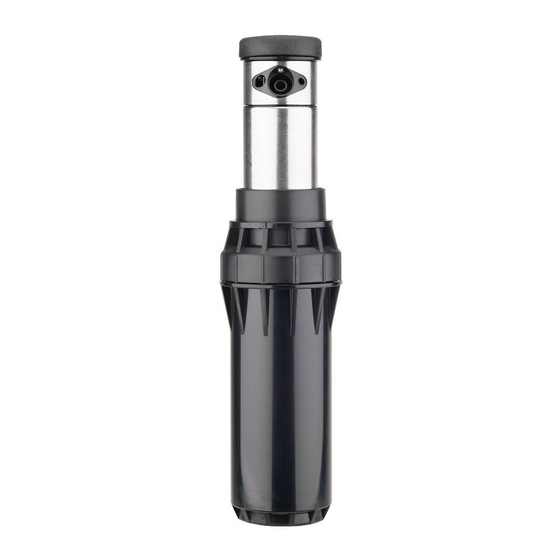
Fig. 1
Hunter Industries Incorporated • The Irrigation Innovators
1940 Diamond Street • San Marcos, California 92069
www.HunterIndustries.com
Institutional Series™
Radius Adjustment
Insert the hex end of the Hunter wrench into the
nozzle-retainer/range-adjustment screw (Figs.
2 & 3). Turn the screw clockwise into the stream
of water to decrease the radius, or counter-
clockwise to increase the radius.
Precipitation Rate Adjustment
Where excessively wet or dry areas are a
problem, the precipitation rate may be adjusted.
Simply replace the existing nozzle with a larger
one to increase, or a smaller one to decrease
the rate of precipitation.
Nozzle Installation
1. Insert the key end of the Hunter wrench
2. Using the Hunter wrench, loosen the nozzle-
3. Discard nozzle if removed with pliers.
Recess
for Nozzle
ID Button
Retainer/
Adjustment
Fig. 2
into the lifting socket of a pop-up sprinkler.
Pull the riser up to gain access to the
nozzle socket.
retainer/range-adjustment screw. If a nozzle
is already installed in the sprinkler, it may
now be removed by briefly turning on
the water.
Slip the desired nozzle into the nozzle
socket. Note that the socket is angled up
25° (see Fig. 4). Tighten the nozzle-retainer/
range-adjustment screw.
Arc Adjustment
Socket
I40
36S
Specific
Model
V
43
Indicates
Nozzle
VStat
®
Self-
Range
Adjusting
Stator
Screw
Lift Up
Socket
Fig. 3
I-40/41/42/43
Gear-Driven Sprinklers
Arc Adjustment
Direction
Water
flow
Fig. 4
© 2004 Hunter Industries Incorporated
P/N 700144
LIT-144
1/04
Advertisement
Table of Contents

Related Manuals for Hunter Institutional Series


Summary of Contents for Hunter Institutional Series
- Page 1 ARC ADJUSTMENTS Radius Adjustment All I-40/41 group adjustable heads are preset to Insert the hex end of the Hunter wrench into the approximately 180°. Sprinklers may be adjusted nozzle-retainer/range-adjustment screw (Figs. with water on or off. It is recommended that initial 2 &...
- Page 2 CORRECT INSTALLATION I-40 Nozzle Performance Data I-41 Nozzle Performance Data – Metric Pressure Radius Flow Precip in/hr Pressure Radius Flow Precip mm/hr Nozzle Nozzle Bars /hr l/min 0.67 0.77 13.7 1.59 26.5 0.73 0.84 14.0 1.82 30.3 0.77 0.89 14.0 1.93 32.2 10.2...
Need help?
Do you have a question about the Institutional Series and is the answer not in the manual?
Questions and answers