Advertisement
Quick Links
Advertisement

Related Manuals for Air’n Outdoor THEIA


Summary of Contents for Air’n Outdoor THEIA
- Page 1 THEIA Owner’s manual...
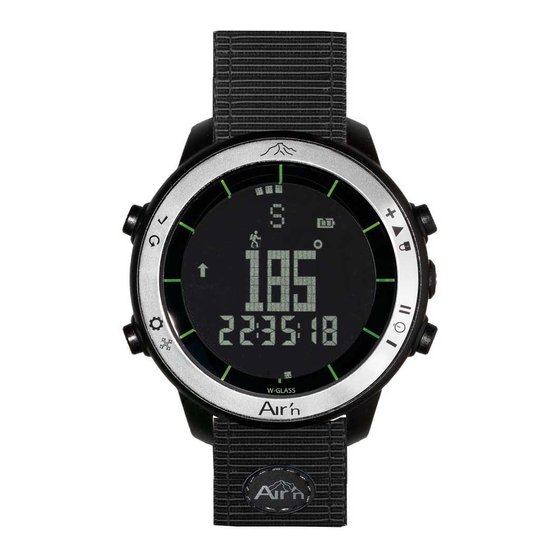
- Page 2 AVANT DE COMMENCER 1- Unscrew the battery cover. 2- Remove the battery insulation. 3- Screw the battery cover (4 turns). Adjust the arrow in between the safety area. S4- Escape 2 seconds= valid S1- Mode: hour, altimeter, sum, pedometer, compass, diary, LCD contrast 2 seconds = adjust S3- Chronometer, alarm, timer, decrement 2 seconds = change small digit information...
-
Page 3: Clock Setup
1- Clock setup 1- Press and hold (2sec.) S1, selection ashes, choose your time indication format (24 or 12 hours format). - Adjust by pressing S2 or S3. - Continue on S1. 2 sec. - Repeat the same operation for the year, months, days, hours, minutes, seconds. 2- DCLK, indicate if you need the Dual Clock mode. -
Page 4: Clock Mode
2- Clock mode 1- Press S1 to enter in the clock mode 2- Press S3 to select the dot matrix section information : Day, atmospheric pressure chart (24 hours) , moon phase if selected during the setup. You can modi y the small digits section 3- Press and hold S3 (SELECT) 4- Press S2 to select: clock, calendar, altimeter, barometer (relative pressure), chronometer , timer. - Page 5 3-Altimeter, barometer 1- From the clock mode base, press 2 times S1. 2- Press and hold S1 to adjust the altitude, (altitude ashes) adjust on S2 or S3. 3- Press and hold S4 to validate. 4- Press S3 to display the absolute (real) pressure. 5- Press S3 to display the relative (sea level) pressure.
- Page 6 4-Altitude change 1- From the clock mode base, press 3 times S1. 2- Press S2 to start the altitude change speed (icon is ON). 3- Press S3 to display the up sum. 4- Press S3 to display the down sum. 5- Press and hold S4 to reset the mode.
- Page 7 5-Pedometer 1- From the clock mode base, press 4 times S1to enter in pedometer mode. 2- Press and hold S1 to adjust from -3 to +3 the pedometer sensibility. 3- Press S2 or S3 to decrease or increase the sensibility. 4- Press S1 to adjust the feet distance (from 0,5 m to 1,2 m) 5- Press and hold S4 to validate.
- Page 8 6- Compass, temperature, inclinometer 1- From the clock mode base, press 5 times S1 to display the compass. The arrow indicates the magnetic North. 2- Press S3 to display the temperature. 3- Press S3 to display the inclinometer. Put your watch parallel at the slope, the display indicates the inclinaison.
-
Page 9: Lcd Contrast
7- History 1- From the clock mode base, press 6 times S1 to enter in history mode. The diary mode keeps in memory all the up sum collected from the altitude change mode. 2- Press S2 to display the peak record. 3- Press S2 to display the total chronometer use. - Page 10 8- Chronometer, dual time, alarm, timer 1- Chronometer From the clock mode base, press S3 to enter in chronometer mode. Press S2 start/ stop the chronometer. (iconON when the chronometer is ON) Press S3 to split the chronometer. Press and hold S4 to reset the chronometer. 2- Dual Time From the clock mode base, press 2 times S3 to enter in dual time mode.
- Page 11 8- Chronometer, dual time, alarm, timer 3- Alarm From the clock base mode, press 3X S3 to enter in the alarm mode. 1-Press and hold S1 to set up the alarm. 2-Press S2 / S3 to setup the hour, minute, second after validate on S1. 3-Pres and hold S4 to validate.
- Page 12 9- Battery The battery icon on your watch works as follows: Full battery : no icon 50% battery : icon appears low battery : icon is ashing, the battery has to be replaced. 1- Unscrew the battery cover 2- Replace the battery (CR2032) 3- Screw the battery cover .
- Page 13 11- W-GLASS secure «W-GLASS SECURE» aims to combine the advantages of both synthetic and mineral glass technologies in a sandwich structure. The concept consists in adding a removable mineral glass on a synthetic glass. This structure thus ensures the waterproofness and the well functioning of a device in all circumstances.
-
Page 14: Warranty
12- Cleaning Clean your watch with water and soap.Never use solvant. Never try to insert whatever into the holes situated on the side (pressure sensor), that may damage the water resistancy of the watch. Just use regurarly a soft brush to ensure the cleaness. Warranty Your Air'n Outdoor ®...
Need help?
Do you have a question about the THEIA and is the answer not in the manual?
Questions and answers