
Subscribe to Our Youtube Channel
Related Manuals for for Living H19-0281


Summary of Contents for for Living H19-0281
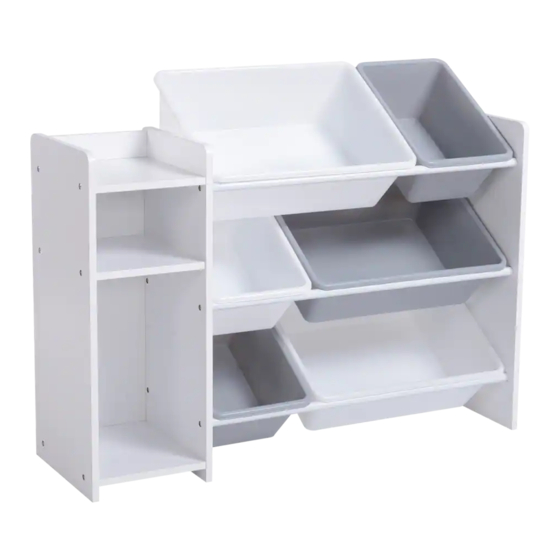
- Page 1 6-Bin Organizer Product No. 168-0082-6 Model No. H19-0281 Assembly Instructions Having trouble? Toll free: 1 877 483 6759...
- Page 2 • For Living is a great place to start. NEVER allow children to climb or play on any type of desk furniture. Placing TVs on furniture that are not designed to support a television is hazardous, which may result in injury or death.
- Page 3 Parts List Exploded View Item Description Quantity Middle Divide Panel Metal Tubes Right Side Panel Back Rail Top Shelf Fixed Shelf Bottom Panel Left Side Panel Back Panel Screws M1/4"×30 mm Screws Ø4×25 mm Wood Dowels Ø5.8×30 mm Large White Bins Small Grey Bins Small White Bin Large Grey Bin...
- Page 4 Warning Assembly Preparation CAUTION! • Proper placement of your Organizer is essential. • Keep children away during assembly. This product contains small parts which can be swallowed by children. • Keep fingers away from the places where they can be pinched or trapped. Serious or fatal crushing injuries can occur from •...
- Page 5 Step-by-Step Instructions Step 2 Requires D, E, 3 Insert three WOOD DOWELS Ø5.8×30 MM (3) to BACK RAIL (D). NOTE: Dip the ends of the wood dowels into a bit of glue (13) before inserting them into the holes of the panel. Attach the BACK RAIL (D) to TOP SHELF (E).
- Page 6 Step-by-Step Instructions Step 3 Step 4 Requires A, D, E, F, G, 2 and 3 Requires A, E, G and I Attach the BACK RAIL (D), TOP SHELF (E), FIXED SHELF (F) and BOTTOM PANEL (G) to the MIDDLE Insert BACK PANEL (I) into the groove in the MIDDLE DIVIDE PANEL (A), TOP SHELF (E) and BOTTOM DIVIDE PANEL (A) using six WOOD DOWELS Ø5.8×30 MM (3) and six SCREWS Ø4×25 MM (2).
- Page 7 Step-by-Step Instructions Step 5 Step 6 Requires D, E, F, G, H, 2 and 3 Requires D, 8, 9, 10, 11 and 12 Attach the LEFT SIDE PANEL (H) to the BACK RAIL (D), TOP SHELF (E), FIXED SHELF (F) and BOTTOM Fasten one FLAT WASHER (12) and one ANTI-TIP RESTRAINT (8) to the BACK RAIL (D), use one SCREW Ø4×12 MM (9).
- Page 8 Do not use bleach or other abrasive cleaners on the frame parts. WARRANTY This For Living ® product carries a one (1) year warranty against defects in workmanship and materials. Trileaf Distribution agrees to replace the defective product free of charge within the stated warranty period, when returned by the original purchaser with proof of purchase.
- Page 10 Range-tout à 6 bacs No d’article : 168-0082-6 No de modèle : H19-0281 Instructions d’assemblage Des difficultés? Numéro sans frais : 1 877 483-6759...
- Page 11 Attention! Surveillez toujours attentivement les enfants lorsqu’ils utilisent cet article ou jouent à proximité de celui-ci. Ne laissez jamais les enfants sans surveillance. For Living est un excellent point de Une utilisation incorrecte du meuble peut entraîner des blessures graves ou départ pour votre premier appartement...
- Page 12 Liste des pièces Vue éclatée Pièce Description Quantité Panneau de séparation central Tubes métalliques Panneau latéral droit Rail arrière Tablette supérieure Tablette fixe Tablette inférieure Panneau latéral gauche Panneau arrière Vis M1/4 po×30 mm Vis de Ø4×25 mm Goujon en bois de Ø5,8×30 mm Grands bacs blancs Petits bacs gris Petit bac blanc...
- Page 13 Avertissement Préparation en vue de l’assemblage ATTENTION! • Il est essentiel d’installer cet article à un endroit approprié. • Tenez les enfants à l’écart durant l’assemblage. Cet article contient de petites pièces que les enfants peuvent facilement avaler. • Évitez de mettre vos doigts là où ils pourraient se coincer ou être pincés. Le basculement d’un meuble peut entraîner des •...
- Page 14 Directives détaillées Étape 2 N.B. : Appliquez de la colle sur le bout de chaque goujon en bois (13) avant de les Nécessite les pièces D, E, 3 insérer dans les trous du panneau. Insérez trois GOUJONS EN BOIS DE Ø5,8×30 MM (3) dans le RAIL ARRIÈRE (D). Fixez le RAIL ARRIÈRE (D) à...
- Page 15 Directives détaillées Étape 3 Étape 4 Nécessite les pièces A, D, E, F, G, 2, 3 Nécessite les pièces A, E, G, I Fixez le RAIL ARRIÈRE (D), la TABLETTE SUPÉRIEURE (E), la TABLETTE FIXE (F) et la TABLETTE Insérez le PANNEAU ARRIÈRE (I) dans la rainure du PANNEAU DE SÉPARATION CENTRAL (A), de la INFÉRIEURE (G) au PANNEAU DE SÉPARATION CENTRAL (A) à...
- Page 16 Directives détaillées Étape 5 Étape 6 Nécessite les pièces D, E, F, G, H, 2, 3 Nécessite les pièces D, 8, 9, 10, 11, 12 Fixez le PANNEAU LATÉRAL GAUCHE (H) au RAIL ARRIÈRE (D), à la TABLETTE SUPÉRIEURE Fixez une RONDELLE PLATE (12) et la FIXATION ANTIBASCULEMENT (8) au RAIL ARRIÈRE (D) à l’aide d’une VIS DE Ø4×12 MM (9).
- Page 17 Ne pas utiliser de javellisant ou tout autre nettoyant abrasif sur les pièces du cadre. GARANTIE Cet article For Living est couvert par une garantie d’un (1) an contre tous les défauts de matériaux et de fabrication. Distribution Trifeuil consent à remplacer l’article défectueux sans frais lorsqu’il est retourné, accompagné...
Need help?
Do you have a question about the H19-0281 and is the answer not in the manual?
Questions and answers