Advertisement
Quick Links
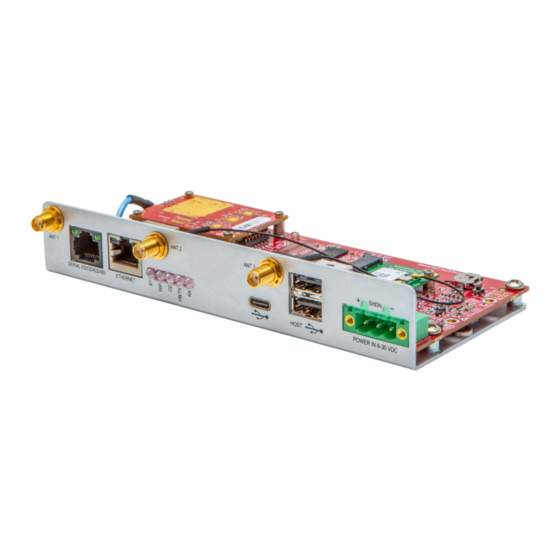
The FreeWave Fusion Wi-Fi Bridge is
designed to create a seamless Wi-Fi access
point (AP) anywhere on a ZumLink network.
This allows Wi-Fi devices and sensors to be
connected in remote and rugged locations, without
extra wiring or special networking.
This guide will walk you through the first-time setup and
configuration of the Fusion Wi-Fi Bridge, connecting the device to a ZumLink network
and introducing the device's Wi-Fi parameters and functionality.
This guide assumes a level of familiarity with ZumLink networks. If information about
setting up a ZumLink network is required, please visit
https://www.freewave.com/gettingstartedwithzum/
You Will Need
1. A computer running Windows with an available USB port
2. A FreeWave ZumLink 900MHz system or gateway to which the Fusion device can connect as an endpoint
Kit Contents
1. Fusion Wifi Bridge
a. 900MHz SMA antenna (long antenna)
b. 2xDual-band Wifi antenna (short antenna)
c. Fusion power supply, terminated
Purpose of this guide
This document will guide the setup and installation of a Fusion Wi-Fi Bridge endpoint on a ZumLink network.
By the end of this guide, we will have created a Wi-Fi AP that allows the user to connect Wi-Fi devices to a
ZumLink network, as pictured below.
5395 Pearl Parkway, Boulder, CO 80301 | info@freewave.com | 866.923.6168 | www.freewave.com
Quickstart
Guide
FreeWave Fusion
Advertisement

Subscribe to Our Youtube Channel
Related Manuals for FreeWave Fusion Wi-Fi Bridge


Summary of Contents for FreeWave Fusion Wi-Fi Bridge
- Page 1 Purpose of this guide This document will guide the setup and installation of a Fusion Wi-Fi Bridge endpoint on a ZumLink network. By the end of this guide, we will have created a Wi-Fi AP that allows the user to connect Wi-Fi devices to a ZumLink network, as pictured below.
- Page 2 The device is now ready to configure. 4. Make a note of the “Default Gateway” IP. In the case above, the Default Gateway is 192.168.1.1 We will use this later in Fusion configuration. 5395 Pearl Parkway, Boulder, CO 80301 | info@freewave.com | 866.923.6168 | www.freewave.com...
- Page 3 2. The browser should automatically begin downloading the certificate from the Fusion device 3. Once the certificate has downloaded, open the Downloads folder, right click on the freewave.crt file, and select “Install Certificate” 5395 Pearl Parkway, Boulder, CO 80301 | info@freewave.com | 866.923.6168 | www.freewave.com...
-
Page 4: Web Setup
2. You should now be at the Login screen. Login with the credentials now, navigate to the System tab and update credentials: your credentials there. username:admin and password:password 3. You should now have access to configure the device 5395 Pearl Parkway, Boulder, CO 80301 | info@freewave.com | 866.923.6168 | www.freewave.com... - Page 5 Fusion configuration tool. If you’re still on the Z9 configuration, use the “Wi-Fi Router” link at the top to get back to the main screen, then click “Networking” on the left of the configuration tool: 5395 Pearl Parkway, Boulder, CO 80301 | info@freewave.com | 866.923.6168 | www.freewave.com...
- Page 6 Wi-Fi device to any other Endpoint your Wi-Fi interfaces icon on connections, such as SCADA equipment and on-premises the Start bar, and “FusionWiFi” gateways! should be available. 5395 Pearl Parkway, Boulder, CO 80301 | info@freewave.com | 866.923.6168 | www.freewave.com...
- Page 7 Support/Further Reading This is just the beginning of what is capable with FreeWave Fusion and ZumLink devices. With the multi-radio configurability of Fusion, users will be able to create complex networks build with a mixed variety of radio and network types according to their need.
- Page 8 FCC NEMA Installation and Label Where applicable, the models described in this guide must be installed in a NEMA enclosure. When any FreeWave Technologies, Inc. module is placed inside an enclosure, a label must be placed on the outside of the enclosure. The label must include the text: “Contains FCC ID: KNYPMT0101AB”...
-
Page 9: Approved Antennas
Silex WiFi/Bluetooth module solder under IC: 4908A-SXPCEAC2. All devices have been tested and comply under the colocation ISED - SDoC. When any FreeWave Technologies, Inc. module is placed inside a Host, a label must be placed on the outside of the Host. The label must include the text “Contains IC: 2329B-PMT0101AB” and “Contains IC: 4908A-SXPCEAC2”. - Page 10 FUSION-BR-WZ is intended to be operated from a Limited Power Source (LPS) or Class 2 power source in accordance with IEC/EN/UL 60950-1 and CAN/CSA C22.2 No. 60950-1-07. The FUSION-BR-WZ is approved to operate with an input voltage range of +6 to +30 VDC, 14W, Tmra of 85°C. 5395 Pearl Parkway, Boulder, CO 80301 | info@freewave.com | 866.923.6168 | www.freewave.com...
- Page 11 Fusion device front faceplate, but rather mount the antennas to an external mount point and connect the antennas to the device using coax cable (certain lengths available from FreeWave upon purchase). 5395 Pearl Parkway, Boulder, CO 80301 | info@freewave.com | 866.923.6168 | www.freewave.com...
Need help?
Do you have a question about the Fusion Wi-Fi Bridge and is the answer not in the manual?
Questions and answers