Table of Contents
Advertisement
Quick Links
Advertisement
Table of Contents

Subscribe to Our Youtube Channel
Related Manuals for Parker SmogHog SHM-C

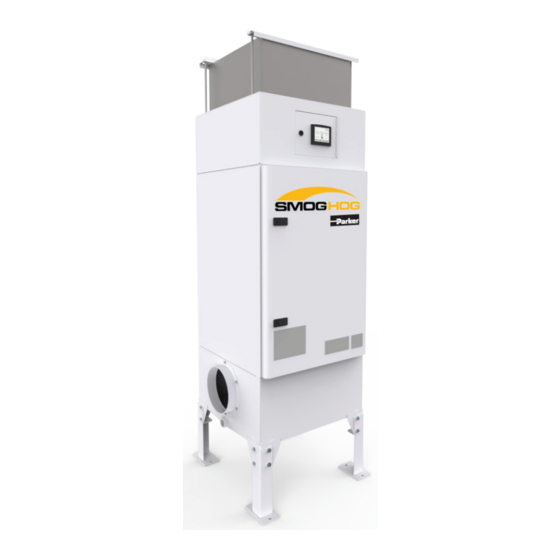
Summary of Contents for Parker SmogHog SHM-C
- Page 1 SMOG-HOG Media Mist Collector ® Owner’s Manual Models SHM-C & SHM-F...
- Page 2 For quick future reference, fill in the unit information in the spaces below. Should you need assistance, call the Parker customer service number shown below. To expedite your service, have the following information available when contacting Parker.
-
Page 3: Table Of Contents
TABLE OF CONTENTS Page Safety Precautions..................1. Important notice..................2. Introduction....................2.1 SMOG-HOG Nomenclature ............... 1 2.2 Equipment Description................1 2.3 Principal of Operation................1 3. Installation......................3 3.1 Inspection and Off Loading................ 3 3.2 Installation Preparation and Planning............3 3.3 Discharge Component Installation ............ -
Page 4: Safety Precautions
SAFETY PRECAUTIONS We have provided many important safety messages in this manual. Always read and obey all safety messages. This is the safety alert symbol. This symbol alerts you to potential hazards that can kill or hurt you and others. All safety messages will follow the safety alert symbol and the word “DANGER”, “WARNING”... - Page 5 Parker equipment should be by a licensed contractor that is also experienced in potential fire and explosion hazards and adheres to related local, state and federal codes, standards, laws and regulations. Parker is not an expert nor certified design consultant in relation to spark, fire or explosion mitigation including but not limited to detection, mitigation, suppression and isolation pf combustible dusts and materials.
- Page 6 Page intentionally left blank...
-
Page 7: Important Notice
If at any time you have a ques- Each unit has a filter access door that provides access to both tion about oil mist collection, please do not hesitate to call Parker the prefilter and primary filter for service and replacement. The customer service. - Page 8 FIGURE 1A SHM Equipment Description 61-10113 FIGURE 1B SHM Equipment Description...
-
Page 9: Installation
Ensure there is adequate access to the electrical components with 3. Installation ducting installed. 3.1 Inspection and Off Loading 3.3 Discharge Component Installation As soon as your equipment arrives, it should be carefully inspected Ensure to position the unit so that the clean air discharge is directed to make certain that it is in good condition and that all items listed into an open area free of obstructions and with consideration for on the packing list have been received. -
Page 10: Electrical Connection
Metal Truss Supported Ceilings. Figure 3 shows an SHM-11 unit suspended from a metal truss supported ceiling. Customer should take care to determine that the truss will be sufficient to support the weight. As shown, angle iron braces are secured between two steel trusses. -
Page 11: Electrical Supply Power
Descrip on of Wire Diagram Appendix The supply voltage and FLA will be noted on the nameplate. The blower and pulse cleaning system controls are factory pre-wired Basic Controls for operation. The touchscreen controls are also pre-wired for the Remote Panel Basic Controls integral option, but require field wiring and connections for the One Blower &... -
Page 12: Machine Interlock Dry Contact
Basic Controls – The remote controls panel/enclosure will The hold-down brackets are to be placed on top the filters as contain the blower speed adjusting potentiometer inside the shown in Figure 5A balloon #7 and secured down with all-thread enclosure, and an on/off switch on the cover. This enclosure rods, washers and nuts. - Page 13 61-10126 FIGURE 4 Remote Panel Touchscreen Connection...
-
Page 14: Unit Operation
4.2.1 Airflow Adjustment Using Manual Speed Control 4. Unit Operation The SHM features an Electronically Commutated (EC blower that is equipped with airflow adjustment using the blower RPM. 4.1 Start-up To adjust the airflow, the blower speed (RPM) percentage can Before system start-up, verify that the installation is complete be adjusted from 20 to 100%. - Page 15 FIGURE 5A SHM Filter Removal & Installation 61-10115 FIGURE 5B SHM Filter Removal & Installation...
-
Page 16: Standard Format
4.3.3 Basic Screens Filter Screen: Figure 6 4.3.2 Standard Format The icon key, Table 3, outlines the various icons that are used on the screen for various reasons and may indicate status or condi- Figure 7 tions. The Home, Settings, and Information icons are shown at the The Filter screen can be displayed by the operator by selecting bottom of most screens and will take you directly to their associated the filter status icon on the Home screen shown in Figure 7. -
Page 17: Auto-Flow Screen
Information Screen: 4.3.6 Customer Settings The standard customer settings screen shown in Figure 12 will allow the operator to make General Settings changes without a password. The Locked Settings will require a password to be entered. The default password is 4440. Figure 9 The information screen will provide a phone number for customer service. - Page 18 Figure 15 Figure 18 The operator can select the Service settings shown here. Each of the selection will allow the operator to see the health of the The Auto-Flow Settings screen can be selected in the Locked unit. You are also able to see any pending alarms and the alarm Settings group on the Customer settings screen.
-
Page 19: Service
To order filters, contact your Parker sales representative. Identify position (balloon #4 in Figure 5A) (both handles down) until the filter your filter part number from your sales order, your unit nameplate, bottoms out on a stop. -
Page 20: Installation Procedure For Pre-Filter & Bag Filter
5.2.2 Installation Procedure for 5.3 Contaminant Removal Pre-filter & Bag Filter Drain the sump regularly. The required frequency of this action will be dictated by the load rate and operation. The pre-filter and primary bag filter must be slid into and out of their respective tracks in a delicate and uniform fashion to avoid damage Be sure oil is not accumulating in any location that could cause to the filter or jamming inside the tracks. -
Page 21: Troubleshooting Guide
6. Troubleshooting Guide Use the troubleshooting guide to correct any problems that occur with your oil mist col- lection unit. If the problem or condition continues, contact the Parker customer service. W A R N I N G All electrical/mechanical troubleshooting should be performed by a quali- fied electrician/maintenance individual familiar with Parker equipment. -
Page 22: Replacement Parts
7. Replacement Parts To order replacement parts, refer to Figure 6. Order through your local Parker representative or contact Parker at 1-800-343-4048. Please have the unit model number, serial number (from component access door) and part numbers available when ordering. - Page 23 SHM-11C SHM-11F Figure 6 SHM Replacement Parts...
-
Page 24: Appendix - Wiring Diagrams
APPENDIX A1 WIRING DIAGRAMS BASIC CONTROLS 04-001682... - Page 25 APPENDIX A2 REMOTE PANEL BASIC CONTROLS 04-001799...
- Page 26 APPENDIX A3 ONE BLOWER AND CONTROLS 04-001695...
- Page 27 APPENDIX A4 TWO BLOWER AND CONTROLS 04-001696...
- Page 28 APPENDIX A5 THREE BLOWER AND CONTROLS 04-001697...
- Page 29 APPENDIX A6 REMOTE PANEL TOUCH CONTROLS 04-001802...
- Page 30 APPENDIX A7 ONE BLOWER AND REMOTE CONTROLS 04-001798...
- Page 31 APPENDIX A8 TWO BLOWER AND REMOTE CONTROLS 04-001797...
- Page 32 APPENDIX A9 THREE BLOWER AND REMOTE CONTROLS 04-001796...
- Page 33 APPENDIX A10 575:480 TRANSFORMER 04-001717...
-
Page 34: Product Warranty
MCB, PNP, SDC, SFC, and SHM series will be free from defects in materials and workmanship for ten (10) years from the date of shipment from Parker. Subject to the terms and conditions hereof, warrants to the original... - Page 35 On claims that require repaired parts return, the claim will be processed after the part has been evaluated by the Parker IGFG Quality Department for verification of failure mode. The claims will be paid in the form of a credit to the customer’s account.
- Page 38 310 637 3400 +44 (0) 191 410 5121 +27 11 9610700 www.parker.com/watermakers www.parker.com/processfiltration www.parker.com/africa © 2020 Parker Hannifin Corporation. Product names are trademarks or registered trademarks of their respective companies MAN-IOU-SHM-122020 P/N: 44-10624 Parker Hannifin Corporation Industrial Gas Filtration and Generation Division...
Need help?
Do you have a question about the SmogHog SHM-C and is the answer not in the manual?
Questions and answers