Table of Contents
Advertisement
Quick Links
8
D
C
B
A
Diamond Products GTXR+
8
No part of this manual may be reproduced or used in any form or by any means (i.e. graphic, electronic, photocopying or electronic
retrieval systems) without the express written permission of HydraMaster. Specifications and information in this document are
subject to change without prior notice. All rights reserved. © 2021 HydraMaster
7
6
7
6
Owner's Guide and
Maintenance Logs
HydraMaster
11015 47
Mukilteo, Washington 98275
MAN-47310 Rev. D, FEB 2021
5
5
Avenue West
th
(000-182-740D)
4
3
LTR
REVISION DESCRIPTION
UNLESS OTHERWISE NOTED
DIMENSIONS ARE IN INCHES
BREAK ALL SHARP EDGES 0.005-.015
TOLERANCES
ANGULAR = 2°
750-012-754-10
NEXT ASSY USED ON
4
3
2
CODE
D
MACHINE
FINISH
.X= .1
.XX= .03
125
.XXX= .010
ASSEMBL
- - -
- - -
- - -
- - -
- - -
- - -
S
- - -
DRAWN
L.O.L. 11/18/2020
- - -
CHECKED
M.B.B.
01/20/2021
GTXR PLUS
M.B.B.
APPVD
01/20/2021
APPLICATION
SCALE: 1:16
CODE:
2
Advertisement
Table of Contents

Subscribe to Our Youtube Channel
Related Manuals for HydraMaster Diamond Products GTXR+

Summary of Contents for HydraMaster Diamond Products GTXR+
- Page 1 No part of this manual may be reproduced or used in any form or by any means (i.e. graphic, electronic, photocopying or electronic retrieval systems) without the express written permission of HydraMaster. Specifications and information in this document are subject to change without prior notice. All rights reserved. © 2021 HydraMaster...
- Page 3 Owner’s Guide in a visible location near the truckmount so that the log stays up to date. Please note that records of maintenance must be kept and copies may be required to be furnished to HydraMaster before any warranty is honored. The digital Owner’s Manual contains information on everything from cleaning and chemicals to truckmount operation and maintenance.
-
Page 4: Contact Information
To find a local distributor, please visit our website at https://hydramaster.com/dealer-locator/ If your question cannot be resolved by your distributor or by the information within this manual, you may contact HydraMaster direct using the following phone numbers. HOURS TELEPHONE NUMBERS... -
Page 5: Warnings, Cautions And Notices
WARNINGS, CAUTIONS AND NOTICES HydraMaster uses this WARNING symbol throughout the guide to warn of possible injury or death. This CAUTION symbol is used to warn of possible equipment damage. This NOTICE symbol indicates that federal or state regulatory laws may apply, and also emphasizes supplemental information. - Page 6 Transporting a vented fuel container that presently contains, or has ever contained in the past, a flammable liquid is strictly forbidden by HydraMaster and by federal and state regulations. Doing so will increase the risk of fire and explosion. Serious injury or death may result.
- Page 7 Never smoke in or around the truckmount. Doing so will increase the risk of fire and explosion. Serious injury or death may result. During the operation of the truckmount the exhaust system will become extremely hot. Keep all flammable materials away from the truckmount exhaust system. Failure to do so will increase the risk of fire and explosion.
- Page 8 Never allow water to freeze inside the truckmount. Serious component damage will occur. Perform all freeze guarding procedures outlined in the digital Owner’s Manual. Many vehicles have critical components mounted directly below the floor that can easily be damaged. Before drilling holes in the floor of the vehicle, inspect the underside of the vehicle for critical components.
- Page 9 RESPONSIBILITIES The Purchaser’s Responsibilities Prior to purchasing a van, ensure that the payload is suitable for all of the equipment that will be installed and transported. This includes and is not limited to: the truckmount, recovery tanks, fresh water tanks and on-board water, hose reels, hoses, cleaning tools, chemicals, drying equipment, etc.
- Page 10 • Ensure proper connection of the fuel lines. • Ensure proper connection and installation of the battery. Verify that the battery is in accordance with HydraMaster’s recommendation. • Check the pump, vacuum blower and engine oil levels prior to starting the truckmount.
- Page 11 Training The distributor should provide a thorough review of the operation manual with the purchaser along with instruction and familiarization in: • How all the truckmount’s systems function. • All safety precautions and their importance. • How to correctly start and shut down the truckmount. •...
-
Page 12: System Concept
SYSTEM CONCEPT The system utilizes an internal combustion engine to provide the power necessary to turn both a vacuum pump and a high pressure water pump. The heat of the engine and blower exhausts is transferred to the high pressure water in the finned tube heat exchanger of the system. -
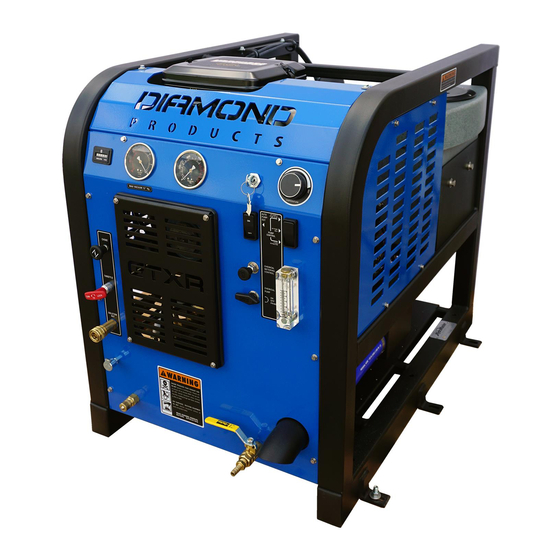
Page 13: Machine Specifications
MACHINE SPECIFICATIONS Frame Dimensions 24.0" W x 31” H x 36" D Weight 538 lbs. Engine- Briggs and Pressurized Oil System Air Cooled Stratton Vanguard 23 HP Engine Oil Synthetic 5W-30 Capacity Approx. 1 1/2 quarts , or 48 oz. (when changing oil and filter) Engine rpm 3,150 rpm... - Page 14 Standard Equipment Runtime Hour Meter Chemical Flow Meter (0-10 Gph) Chemical Flow Control Valve Vacuum Gauge (0-30" Hg) Solution Pressure Gauge (0 - 1,500 Psi) Solution Pressure Adjustment Pre-Wired Pump-In Switch Pre-Wired Pump Out Switch Fresh Water Inlet Water System Drain Valve Diagnostic/Status Lights Engine Choke Engine Throttle...
-
Page 15: High Altitude Operation
Hard Water Advisory HydraMaster recognizes that any hard water deposits which might occur within the water system of our truckmounts is a serious problem. The precision technology of truckmount heat exchanger systems is intolerant of any foreign material. Hard water deposits will ultimately decrease the performance of the system and are expected to seriously lower the reliability of the machine. - Page 16 Hard Water Area Map The hard water map, shown in Figure 1, defines hard water areas in the continental United States which compromise fluid related components such as hoses, fittings, heaters, pumps, valves and water-cooled engines. For other countries, hard water area maps can be obtained from geological societies.
- Page 17 Cleaning efficiency and equipment life is increased, chemical use decreased, and the appearance of cleaned carpets enhanced when water softeners are incorporated in hard water areas. HydraMaster strongly urges the use of water softener units with the GTXR+ in areas exceeding 3.0 grains per gallon.
- Page 18 HydraMaster makes an automatic pump out system called the Automatic Wastetank Disposal System, or AWDS, which can be ordered with new equipment or installed later.
-
Page 19: Start-Up Procedure
Operating Instructions START-UP PROCEDURE Perform all daily and periodic maintenance as specified in Section 4 of the Owner’s Manual. Connect a garden hose to supply water to the truckmount. If used, turn the “PUMP-IN” switch to the “ON” position (see Figure 2). The water box must be full prior to starting the truckmount. - Page 20 REVISION DESCRIPTION Pressure Gauge Optional Auto Vacuum Gauge Pump-Out Switch Temperature Knob UNLESS O DIMENSIO BREAK ALL S TOLERAN .XX= .XXX= ANGULAR - - - - - - Chemical Selection Valve - - - - - - 750-012-754 Blower Lube NEXT AS Port Chemical Metering Control Knob...
- Page 21 REVIS Press the “PUMP CONTROL” switch to engage the pump clutch for carpet cleaning or upholstery cleaning as follows: Switch to the “HP Only” if connected to a fresh water supply from a building. Switch to the “HP ON & Pump-In ON” if connected to a fresh water tank. Set the temperature to the desired level on the “TEMPERATURE”...
-
Page 22: Shutdown Procedure
Cap off the inlet(s) to the vacuum tank. Spray a HydraMaster-recommended spray lubricant into the “BLOWER LUBE PORT” for about 5 to 7 seconds while the unit is running (see Figure 3). Allow machine to run additional 2 to 5 minutes under load to flush off lubricant. - Page 23 Owner’s Guide. Records of maintenance must be kept and copies may be required to be furnished to HydraMaster before the warranty is honored. It is recommended that you affix a copy of the log on the vehicle door near your unit for convenience and to serve as a maintenance reminder.
-
Page 24: Operational Maintenance
• Inspect the truckmount for water and oil leaks, loose electrical connections, etc. and repair as needed. • Lubricate the blower lube port with HydraMaster-recommended spray lubricant. Weekly Maintenance • Inspect the recovery tank filters for tears, holes, etc. Repair or replace as needed. - Page 25 250 Hours • Check coupler (rubber sleeve) for cracks or wear. Replace as necessary. Replace as necessary (Coupler Sleeve Part Number: 000-152-015). • Check the engine valve clearance (intake and exhaust 0.004” - 0.006”) 500 Hours • Change the blower oil. •...
-
Page 26: High Pressure Pump Maintenance
HIGH PRESSURE PUMP MAINTENANCE Daily Check the oil level and the condition of the oil. The oil level should be up to the center of the sight glass on the rear of the pump or between the “MIN” and “MAX” lines on the dipstick. - Page 27 Valve Maintenance (See Figure 5) Using a 22-mm wrench or socket, remove all six valve caps on the manifold of the pump. Examine each valve cap O-ring for cuts or distortions and replace if worn. Using needle nose pliers, remove the suction and delivery check valves. The valve assembly usually stays together when removing.
- Page 28 Replace old valves with new valves by placing the assembly in the valve chamber. Press down firmly on the top of the valve assembly. Replace valve caps by applying LOCTITE® 243 to valve cap and torque to 33 ft- lbs. Removing and Replacing Pump Manifold Remove the manifold of the pump by taking a 5-mm Allen head wrench and removing the eight head bolts.
- Page 29 Servicing the Crankcase While the manifold and plungers are removed, rotate the crankshaft by hand. Closely examine the crankcase oil seals for drying, cracking or leaking. Consult the local HydraMaster distributor if crankcase servicing is necessary. Diamond Products GTXR+ - Owner’s Guide...
-
Page 30: Vacuum System Maintenance
Capping off the inlet(s) to the recovery tank. Spraying a HydraMaster-recommended spray lubricant into the “BLOWER LUBE PORT” for about 5 to 7 seconds while the unit is running. Uncapping the inlet(s) and run the unit for another minute to allow the blower to cool down. -
Page 31: Descaling Procedure (Required)
DESCALING PROCEDURE (REQUIRED) Scale deposits on the interior of the heating system can cause a noticeable loss in heating performance. Deposits of this kind result from hard water deposits. The frequency with which descaling procedures are required will vary. If the area has particularly hard water, you may have to descale often. -
Page 32: Freeze Guarding
FREEZE GUARDING To avoid permanent damage to the truckmount, it is imperative to follow the freeze guard procedure whenever the possibility of freezing temperatures exists. When disposing of antifreeze follow local laws and regulations. Do not discard into storm sewers, septic systems, or onto the ground. Antifreeze is harmful or fatal if swallowed. - Page 33 The reclaimed antifreeze solution may be used three times before being discarded. To freeze guard the hoses and wand perform step 7 with the items to be freeze guarded attached. Recovering Antifreeze for Re-Use Attach all hoses and wands which have been freeze guarded to the truckmount. Attach the incoming water source to the front of the truckmount.
-
Page 34: Tensioning The Pump Drive Belt
TENSIONING THE PUMP DRIVE BELT Remove the GTXR+ grill to gain access to the idler pulley. Loosen but do not remove the 2 ¼” long bolt (P/N 000-143-041) on the idler pulley. See section 9 in the Owner’s Manual. Remove the right cover of the machine to gain access to the tensioning screw. Adjust the tension of the belt by turning the 4”... - Page 35 Diamond Products GTXR+ - Owner’s Guide...
- Page 36 Weekly Maintenance Date Hour Meter Reading Technician Initials Inspect recovery tank filters and sac anodes for tears, holes, etc. Repair or replace as needed. Inspect the vacuum relief valve. Clean and ...
- Page 37 Quarterly Maintenance Check the fuel lines. Repair or replace as needed. Clean and gap the spark plugs to 0.030”. Replace if excessive carbon buildup is visible. Change the blower oil. Change the fuel filter. Change pump drive belt. ...
- Page 38 Weekly Maintenance Date Hour Meter Reading Technician Initials Inspect recovery tank filters and sac anodes for tears, holes, etc. Repair or replace as needed. Inspect the vacuum relief valve. Clean and ...
- Page 39 Quarterly Maintenance Check the fuel lines. Repair or replace as needed. Clean and gap the spark plugs to 0.030”. Replace if excessive carbon buildup is visible. Change the blower oil. Change the fuel filter. Change pump drive belt. ...
- Page 40 Weekly Maintenance Date Hour Meter Reading Technician Initials Inspect recovery tank filters and sac anodes for tears, holes, etc. Repair or replace as needed. Inspect the vacuum relief valve. Clean and ...
- Page 41 Quarterly Maintenance Check the fuel lines. Repair or replace as needed. Clean and gap the spark plugs to 0.030”. Replace if excessive carbon buildup is visible. Change the blower oil. Change the fuel filter. Change pump drive belt. ...
- Page 42 Weekly Maintenance Date Hour Meter Reading Technician Initials Inspect recovery tank filters and sac anodes for tears, holes, etc. Repair or replace as needed. Inspect the vacuum relief valve. Clean and ...
- Page 43 Quarterly Maintenance Check the fuel lines. Repair or replace as needed. Clean and gap the spark plugs to 0.030”. Replace if excessive carbon buildup is visible. Change the blower oil. Change the fuel filter. Change pump drive belt. ...
- Page 44 Weekly Maintenance Date Hour Meter Reading Technician Initials Inspect recovery tank filters and sac anodes for tears, holes, etc. Repair or replace as needed. Inspect the vacuum relief valve. Clean and ...
- Page 45 Quarterly Maintenance Check the fuel lines. Repair or replace as needed. Clean and gap the spark plugs to 0.030”. Replace if excessive carbon buildup is visible. Change the blower oil. Change the fuel filter. Change pump drive belt. ...
- Page 46 Inspect and clean the garden hose screen. Inspect the truckmount for water and oil leaks, loose electrical connections, etc. and repair as needed. Lubricate the blower lube port with HydraMaster-recommended spray lubricant. INTERVAL IN HOURS GTXR+ Engine oil and filter Change engine oil and filter after first 8 hours;...
- Page 47 Inspect and clean the garden hose screen. Inspect the truckmount for water and oil leaks, loose electrical connections, etc. and repair as needed. Lubricate the blower lube port with HydraMaster-recommended spray lubricant. INTERVAL IN HOURS GTXR+ Engine oil and filter Change engine oil and filter after first 8 hours;...
- Page 48 Diamond Products GTXR+ - Owner’s Guide: 46...
- Page 49 All material must be properly authorized by HydraMaster prior to being returned. When returning, please provide an explanation of the problem and include the serial number of the machine as well as the name of the selling organization. All defective material must be returned to HydraMaster within 60 days of authorization.
Need help?
Do you have a question about the Diamond Products GTXR+ and is the answer not in the manual?
Questions and answers