Advertisement
Advertisement

Subscribe to Our Youtube Channel
Related Manuals for Perfect Aire RG51F/EU1


Summary of Contents for Perfect Aire RG51F/EU1
- Page 1 OWNER’S MANUAL Portable Air Conditioner REMOTE CONTROL...
- Page 2 IMPORTANT: Thank you for your purchase. Please read this manual carefully before operating. Make sure to save this manual for future reference.
-
Page 3: Table Of Contents
TABLE OF CONTENTS Remote Control Specifications ...................... Handling the Remote Control ......................Remote Functions ......................... Remote Screen Icons ........................Operating Functions ........................FOR PORTABLE AIR CONDITIONER MODELS 2PORT9000A 2PORT10000A 2PORT12000 2PORT14000... -
Page 4: Remote Control Specifications
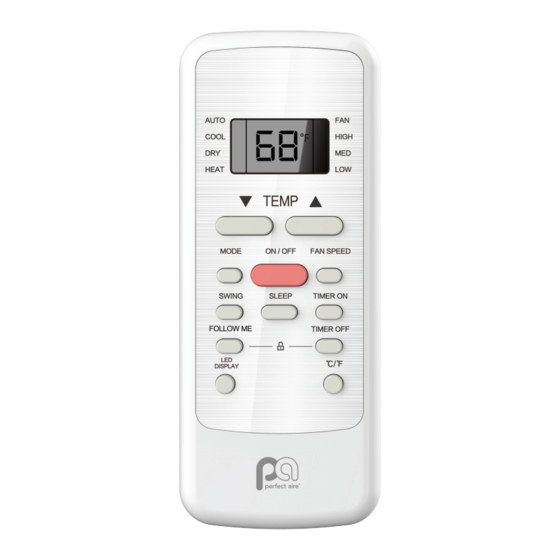
REMOTE CONTROL SPECIFICATIONS Model RG51F(2)/EU1 Rated Voltage 3.0V( Dry batteries R03/LR03×2) Signal Range 26 Ft. (8 Metres) Remote Operating Temperature 23°F~140°F (-5°C~60°C) Quick Start Guide AUTO COOL HEAT PLACE BATTERIES SELECT MODE SELECT TEMPERATURE AUTO HIGH PRESS POWER BUTTON POINT REMOTE TOWARD UNIT SELECT FAN SPEED ATTENTION Refer to Operating Functions section of this manual for a detailed description of each setting. -
Page 5: Handling The Remote Control
HANDLING THE REMOTE CONTROL Inserting and Replacing Batteries Note • 2 AAA batteries are included. • Remove batteries from packaging and place batteries into the remote. To insert batteries, slide down back cover of the remote controller to expose battery compartment. Insert batteries accordingly matching the (-) and (+) terminals of the battery Slide cover in the upward position to close battery compartment ATTENTION... - Page 6 HANDLING THE REMOTE CONTROL CONTINUED Battery Disposal Do not dispose of batteries as unsorted municipal waste. Refer to local laws for proper disposal of batteries. Tips • The remote control must be within 26 ft (8m) of the unit. • The unit will beep when remote signal is received. •...
-
Page 7: Remote Functions
REMOTE FUNCTIONS Before you begin using your new air conditioner, make sure to familiarize yourself with its remote control. The following is a brief introduction to the remote control itself. For instructions on how to operate your air conditioner, refer to the Operating Functions section of this manual. TEMP TEMP Decreases temperature in 1°F (1°C) increments. -
Page 8: Remote Screen Icons
REMOTE SCREEN ICONS CONTINUED The following icons will appear upon powering the remote. AUTO COOL HIGH HEAT Mode Display AUTO COOL HEAT Displayed when signal is being transmitted Displayed when unit is turned ON Displayed when TIMER ON time is set Displayed when TIMER OFF time is set Will show set temp, room temp, and desired timer increments The lock will appear when remote buttons are locked and cannot be used... -
Page 9: Operating Functions
OPERATING FUNCTIONS ATTENTION Before powering on, assure the unit is plugged in the correct outlet configuration. AUTO Mode Select AUTO mode MODE. Set your desired temperature. Turn on the air conditioner. ON / OFF MODE Note • In auto mode will, unit will automatically cycle through modes based on indoor and set temperature. Fan speed cannot be changed. - Page 10 TIMER MODE Set the desirable time in which the unit will automatically turn ON or OFF. TIMER ON setting Press TIMER ON button to initiate Using the temp up or down arrow Point remote to unit and wait 1sec, the the ON time sequence.
- Page 11 TIMER MODE CONTINUED Example: Figure above shows unit being set to TURN ON at 2.5Hr and TURN OFF at 5.0 Hr. If current time is 1:00PM, unit will TURN ON at 3:30 and TURN OFF at 6:00. Unit turns Unit turns Timer starts Current 3:30PM...
- Page 12 Perfect Aire, LLC 5401 Dansher Road Countryside, IL 60625 1020_M393 844-4PA-AIRE | 844-472-2473 www.perfectaire.us Printed in China...
Need help?
Do you have a question about the RG51F/EU1 and is the answer not in the manual?
Questions and answers