Advertisement
Quick Links
Front Base Assembly
Connect both arches (14 a, b) to form a complete arch. Then, connect the
12
bottom tips of the arch to the front base (13). Be sure to use gentle force when
snapping parts into place.
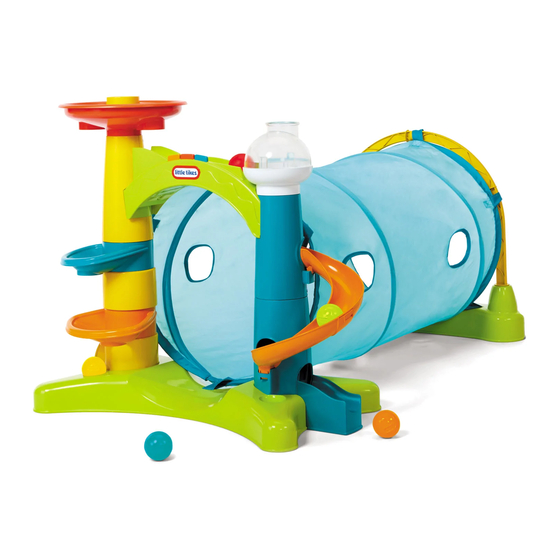
Position front and back base as pictured. Fully extend tunnel to prepare for
13
connection to both bases. The tunnel will be used to connect both bases.
Face the end of the tunnel (15) with five hook and loop fasteners towards the
14
front base. Tie the two straps located near the sew in label to the front base.
The end of the tunnel with four hook and loop fasteners should face the back
base. Slide fasteners through their appropriate slots on each base located as
pictured below.
8
TM
Thank you for choosing the Little Tikes® 2-in-1 Activity Tunnel.
We strive to provide a durable, easy-to-assemble toy that is made to last,
giving your child years of imaginative, engaging fun!
1
AGES 12-36 MONTHS
ADULT ASSEMBLY REQUIRED
ADULT BATTERY INSTALLATION REQUIRED
Advertisement

Related Manuals for Little Tikes 658365


Summary of Contents for Little Tikes 658365
- Page 1 Slide fasteners through their appropriate slots on each base located as pictured below. Thank you for choosing the Little Tikes® 2-in-1 Activity Tunnel. We strive to provide a durable, easy-to-assemble toy that is made to last, giving your child years of imaginative, engaging fun!
- Page 2 LIMITED WARRANTY The Little Tikes Company makes fun, high quality toys. We warrant to the original purchaser that this product is free of defects in materials or workmanship for one year * from the date of purchase (dated sales receipt is required for proof of purchase).
- Page 3 Battery Safety Information. This is serious! Connect the second tray 2 (5) to the middle tower piece. Ensuring they are properly aligned and securely connected. • Keep these instructions for future reference. • Requires 3 “AAA” (LR03) alkaline batteries (not included). (Rechargeable batteries may be substituted.) •...
- Page 4 CONTENTS Back Base Assembly 1. Back Base 6. Funnel 12. Spiral Ramps (2) To begin assembly, lay back base (1) on flat surface as pictured. Connect the 2. Left Tower Bottom 7. Right Tower Bottom 13. Front Base 3. Tray 1 8.
Need help?
Do you have a question about the 658365 and is the answer not in the manual?
Questions and answers