Table of Contents
Advertisement
Available languages
Available languages
Quick Links
Advertisement
Table of Contents

Related Manuals for Little Tikes Waterfall Island Water Table


Summary of Contents for Little Tikes Waterfall Island Water Table
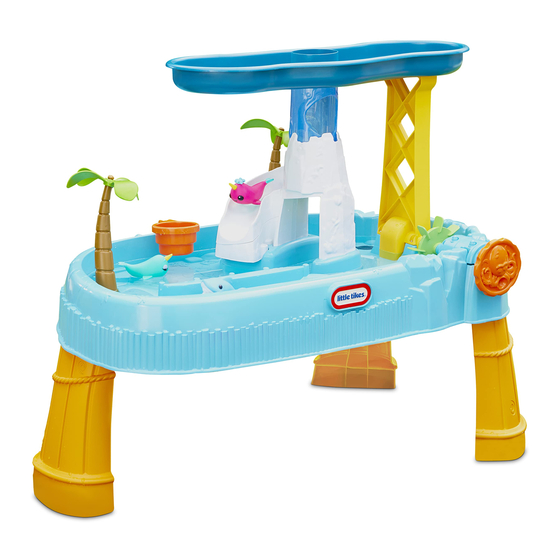
- Page 1 years Waterfall Island Water Table ™ ASSEMBLY INSTRUCTIONS #659157M8 Adult assembly required. Approx. assembly time: 30 min. Look for video of assembly on www.youtube.com/littletikes or our website at www.littletikes.com/videoinstructions XIM659157 - 11/21...
- Page 2 © Thank you for choosing the Little Tikes Waterfall Island Water Table. ™ We strive to provide a durable, easy-to-assemble toy that’s made to last, giving your child years of imaginative, engaging fun! Really important information you should know! • Read through all the instructions first.
-
Page 3: Consumer Service
The Little Tikes Company makes fun, high quality toys. We warrant to the original purchaser that this product is free of defects in materials or workmanship for one year * from the date of purchase (dated sales receipt is required... - Page 4 Table Top (1) Table Legs (3) Basin Support (1) Basin (1) Axle (1) Paddle Cover (1) Waterfall Tube Waterfall Tube (1) with Hole (1) Waterfall Base Waterfall Base - - Left (1) Right (1) Slide Bottom (1) Slide Top (1) Palm Tree Palm Tree Top (2) Base (2)
- Page 5 Pull the drain plug...all the way! First insert the drain plug (part Q) into opening on table top (part A). Push drain plug through the opening. Next, flip table over. Work the plug around the opening, pulling only the plug edge through. Recommended (not included) The plug edge...
-
Page 6: Attach The Legs
Attach the legs Insert 3 table legs (part B) into table Assembly Hint: 1 tbsp. top (part A), snap into place. of liquid soap Place on flat surface before you push legs in Attach the support Insert the basin support Secure using (2) "... - Page 7 It’s time for the palm trees! Snap palm tree top (M) onto palm tree base (N). Repeat for the second palm tree. Spins! Part is keyed to fit Align notches on palm tree assembly to notches on base. Press to fit each palm tree into table.
- Page 8 Build a waterfall, oh my! (2) 3/4" (1.9 cm) Fit together the waterfall tube with the hole (part F) to the the waterfall tube (part G). Install (2) 3/4" (1.9 cm) screws to secure. Fit it together... Fit the notches on the waterfall base-RIGHT Fit the assembled waterfall tube (part J) to the holes in the waterfall tube.
- Page 9 Fit it together... (8) 3/4" (1.9 cm) Install (8) 3/4" (1.9 cm) screws to secure. Time for the slide (2) 3/4" (1.9 cm) Install (2) 3/4" (1.9 cm) screws to secure. Press slide top (part K) onto slide bottom (part L).
- Page 10 Slide on... Align the slide assembly with the indent on the waterfall assembly and fit into place. Look underneath, slide edge should be fitted inside tabbed ridge. Let's SNAP it together! Place the waterfall/slide assembly onto the center slots on the table top.
-
Page 11: Top View
Add the basin..(1) 3/4" (1.9 cm) TOP VIEW Place the basin (part D) onto the tops of the waterfall and basin support. Install (1) 3/4" (1.9 cm) screw to secure. Time to spin around and around! SNAP the paddle (part O) onto one end of the axle (part E). SNAP the squid cap (part P) onto the other end of the axle (part E). - Page 12 PADDLE SQUID CAP Place the assembled spinner onto the table (as shown). The squid cap should be facing outward. The paddle should be on the inside the table. Cover it! Ridge MUST FACE outer edge. Place paddle cover (part H) over spinner assembly.
-
Page 13: Let's Play
Let's play! Fill with approximately 5.27 gallons (19.95 liters) of water when ready to play! The treasure chest can fit in either the in boat deck area or under the waterfall/slide assembly. Boat deck cover (part R) fits over opening on table. Treasure chest cover (part S) fits over opening under waterfall/slide assembly. -
Page 14: Instructions De Montage
Jeu d’eau Waterfall Island ™ INSTRUCTIONS DE MONTAGE Montage par un adulte requis. Durée de montage approximative : 30 min. Merci d’avoir choisi l’ensemble de jeu d’eau Waterfall Island de Little ™ Tikes © . Nous sommes déterminés à fournir un jouet durable et facile à monter, procurant à... -
Page 15: Service Consommateurs
Little Tikes aux États-Unis et dans d’autres pays. Tous les logos, noms, caractères, similitudes, images, slogans et apparence d’ e mballage sont la propriété de Little Tikes. Merci de conserver cette adresse et 3. Installez des vis (8) de ¾ po (1,9 cm) pour fixer. -
Page 16: Instrucciones De Montaje
INSTRUCCIONES DE MONTAJE El montaje debe realizarlo un adulto. Tiempo aproximado de montaje: 30 min. Gracias por elegir Waterfall Island Mesa de Agua de Little Tikes . Nos esforzamos © ™ por crear juguetes perdurables, fáciles de ensamblar y creados para durar, que brindan a sus niños años de diversión creativa y estimulante. -
Page 17: Servicio Al Cliente
Paso 6a : ¡Es la hora del tobogán! Impreso en E.U.A. © The Little Tikes Company, una compañía de MGA Entertainment. LITTLE TIKES® es una marca 1. Presione la parte superior del tobogán (parte K) sobre registrada de Little Tikes en EE.UU. y otros países. Todos los logotipos, nombres, personajes, la parte inferior del mismo (parte L). - Page 18 Tisch umdrehen. kann vom tatsächlichen Inhalt abweichen. 2. Mit (2) 1,9-cm-Schrauben befestigen. HINWEIS: Diese 2 Schrauben • Fragen? Wir helfen gerne. Wenden Sie sich an Ihren Little Tikes- haben einen größeren Schraubenkopf. WICHTIG: Die Schrauben Kundendienst. müssen fest angezogen sein, Der Beckenpfeiler darf nicht wackeln.
-
Page 19: Instrukcja Montażu
© The Little Tikes® Company, ein Unternehmen von MGA Entertainment. LITTLE TIKES® ist ein Markenzeichen Kilka wskazówek przed rozpoczęciem! von Little Tikes in den USA und anderen Ländern. Alle Logos, Namen, Gestalten, Abbilder, Images, Slogans und Verpackungsdesigns sind das Eigentum von Little Tikes. Diese Verpackung bitte für mögliche Rückfragen •... -
Page 20: Montage-Instructies
© The Little Tikes® Company należy do koncernu MGA Entertainment. LITTLE TIKES® jest znakiem towarowym condities, zoals bijvoorbeeld kleine voorwerpen of scherpe randen, Little Tikes w Stanach Zjednoczonych i innych krajach. Wszystkie logo, nazwy, znaki, wizerunki, obrazy, hasła i ontstaan op het tijdstip waarop alles wordt weggegooid. -
Page 21: Istruzioni Di Montaggio
Gedrukt in V.s.a. (onderdeel A). Keer de tafel om. © The Little Tikes Company, onderdeel van MGA Entertainment. LITTLE TIKES® is een handelsmerk van Little Tikes in 2. Maak met (2) schroeven van 1,9 cm (¾") vast. OPMERKING: Deze de V.S. en andere landen. Alle logo’ s , namen, symbolen, gelijkenissen, afbeeldingen, slogans en verpakkingsvormen 2 schroeven hebben een grotere kop. - Page 22 Fasi di assemblaggio Informazioni molto importanti da considerare! • Leggere prima tutte le istruzioni. Fase 1: Tirare il tappo di scarico... completamente! • Liberare una superficie piana per disporre tutti i materiali in modo che 1. Innanzitutto, inserire il tappo di scarico (parte Q) nell’apertura sulla tutto sia a portata di mano.
-
Page 23: Instruções De Montagem
© The Little Tikes Company, una società di MGA Entertainment. LITTLE TIKES® è un marchio di fabbrica di Little Tikes negli USA e altri Paesi. Tutti i logo, i nomi, i caratteri, le rassomiglianze, le immagini, gli slogan e i tipi di Algumas coisas antes de começar! -
Page 24: Atendimento Ao Cliente
E-mail: apoyo@mgae.biz Empresso nos E.U.A. © The Little Tikes Company, uma companhia da MGA Entertainment. LITTLE TIKES® é uma marca comercial da Little Tikes nos EUA e em outros países. Todos os logotipos, nomes, identidades visuais, imagens, slogans e aparência das embalagens são de propriedade da Little Tikes.
Need help?
Do you have a question about the Waterfall Island Water Table and is the answer not in the manual?
Questions and answers