Table of Contents
Advertisement
Available languages
Available languages
Advertisement
Table of Contents

Related Manuals for DynaVox E-SA18


Summary of Contents for DynaVox E-SA18
- Page 1 E-SA18_A6_quer 2013_Layout 1 03.06.13 10:08 Seite 1 E-SA18 E-SA18 E-SA18 Stereo-Mini-Verstärker Bedienungsanleitung deutsch Stereo-mini-amplifier Instructions for use english Stereo-mini-amplificateur Manuel d‘utilisation français Nur die Besten “tragen” diesen Namen...
- Page 2 E-SA18_A6_quer 2013_Layout 1 03.06.13 10:08 Seite 2...
-
Page 3: Table Of Contents
Technical Specifications english Consignes de sécurité / Informations complémentaires 44 / 46 Façade avant / Façade arriere 48 / 50 Dynavox E-SA18 / Système Karaoké typique 52 / 54 Raccordement et mise en service Utilisation de l’appareil Caracteristiques techniques français... - Page 4 E-SA18_A6_quer 2013_Layout 1 03.06.13 10:08 Seite 4 SICHERHEITSHINWEISE Alle Betriebsmittel, die an die Netzspannung des Haushalts angeschlossen sind, können dem Benutzer bei unsachgemäßer Behandlung gefährlich werden. Das Gerät darf nicht geöffnet werden! Gefahr des elektrischen Schocks! Überprüfen Sie regelmäßig die technische Sicherheit Überlassen Sie die Wartung qualifiziertem Fach per - des Gerätes.
- Page 5 E-SA18_A6_quer 2013_Layout 1 03.06.13 10:08 Seite 5 SICHERHEITSHINWEISE Ziehen Sie stets am Netzstecker und nie am Netz - Achten Sie darauf, dass das Gerät nicht mit Flüssig - kabel, wenn Sie die Verbindung zum Stromnetz tren - keiten, Feuchtig keit, Regen oder Wasserdampf in nen wollen.
-
Page 6: Sicherheitshinweise / Weitere Hinweise
E-SA18_A6_quer 2013_Layout 1 03.06.13 10:08 Seite 6 WEITERE HINWEISE Elektronik Altgeräte CE-Zeichen Dieses Gerät unterliegt den Bestimmungen der EU- Dieses Gerät erfüllt die gültigen EU-Richtlinien zur Richt linie 2002/96/EC, deren gesetzliche Umsetzung Erlangung des CE-Zeichens und entspricht damit in Deutsch land durch das Elektro- und Elektronik - den Anforderungen an elektrische und elektronische geräte-Gesetz (ElektroG) geregelt ist. - Page 7 E-SA18_A6_quer 2013_Layout 1 03.06.13 10:08 Seite 7 WEITERE HINWEISE Dynavox arbeitet ständig an der Verbesserung und Dynavox ist ein eingetragenes Warenzeichen der Weiter entwicklung seiner Produkte. Deshalb bleiben Sintron Vertriebs GmbH, 76473 Iffezheim. Änderungen an Design und technischer Konstruk - tion des Gerätes, sofern sie dem Fortschritt dienen,...
-
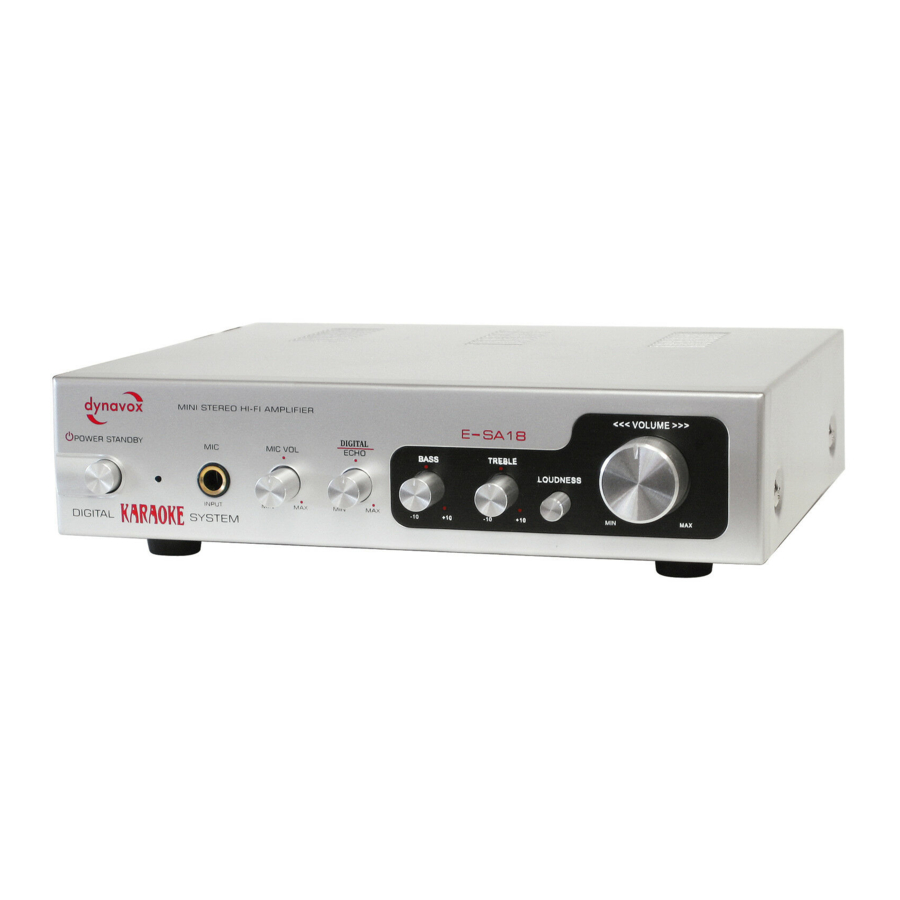
Page 8: Frontansicht / Rückansicht
E-SA18_A6_quer 2013_Layout 1 03.06.13 10:08 Seite 8 VORDERANSICHT... - Page 9 E-SA18_A6_quer 2013_Layout 1 03.06.13 10:08 Seite 9 POWER STANDBY 4. DIGITAL ECHO Schaltet das Gerät ein und aus, das Gerät ist im An diesem Drehknopf stellen Sie die Stärke des ausgeschalteten Zustand vom Netz getrennt. Im ein- nur auf das Mikrofon signal wirkenden Nachhalls geschalteten Zustand leuchtet die neben dem (Echo) ein.
- Page 10 E-SA18_A6_quer 2013_Layout 1 03.06.13 10:08 Seite 10 RÜCKANSICHT...
- Page 11 E-SA18_A6_quer 2013_Layout 1 03.06.13 10:08 Seite 11 9. AUDIO INPUT 12. TO SPEAKER Hier können ein oder zwei Quell geräte mit Stereo - Ausgangsbuchsen mit Schraub klem men zum An - ton-Hochpegel aus gang angeschlossen werden, de ren schluss eines Lauts precher paars. Es können Laut- Signale im Verstärker zusammengemischt werden.
-
Page 12: Dynavox E-Sa18 / Typisches Karaoke-System
E-SA18_A6_quer 2013_Layout 1 03.06.13 10:08 Seite 12 DYNAVOX E-SA18 Wir danken Ihnen für das Vertrauen, welches Sie uns durch die Ent - Für Sach- oder Personenschäden, die durch unsach- schei dung für dieses Audio-Produkt entgegenbrin- gemäße Hand habung oder Nichtbeachten der gen. - Page 13 E-SA18_A6_quer 2013_Layout 1 03.06.13 10:08 Seite 13 Der E-SA18 ist ein kompakter HiFi-Verstärker für zwei regelung (Bass, Treble), Loudness und ein Um schal - Stereo-Eingangsquellen und ein Mikrofon. Sind zwei ter zur Signalanpassung der Eingangsquellen. Am Quellen an den Cinch-Eingängen angeschlossen, wird Auf nahmeausgang kann das Signal, welches auch deren Signal gemischt;...
- Page 14 E-SA18_A6_quer 2013_Layout 1 03.06.13 10:08 Seite 14 TYPISCHES KARAOKE-SYSTEM Für ein typisches Karaokesystem verbinden Sie den Wenn der Karaokemix aufgenommen werden soll, Hochpegelausgang eines Wiedergabegerätes für die verbinden Sie den Aufnahmeausgang „REC OUT“ Hintergrundmusik (CD-Player, Computer, portabler mit dem Hochpegeleingang eines Aufnahmegerätes Player etc.) unter Verwendung eines Cinchkabels mit (Tape, CD-Recorder etc.).
- Page 15 E-SA18_A6_quer 2013_Layout 1 03.06.13 10:08 Seite 15 Aufnahmegerät Musikquelle IiIIiIIi IiIIiIIi Lautsprecher dynamisches Mikrofon...
-
Page 16: Anschluss Und Inbetriebnahme
E-SA18_A6_quer 2013_Layout 1 03.06.13 10:08 Seite 16 ANSCHLUSS UND INBETRIEBNAHME Stellen Sie die Kabelverbindung in der nachfolgend Hochpegelausgang an die beiden Stereo-Cinch-Ein - genannten Reihenfolge her. Nehmen Sie niemals gänge „AUDIO INPUT“ (9) angeschlossen werden. Än derungen an den Kabelverbindungen vor, wäh- Verwenden Sie handelsübliche Cinchkabel. - Page 17 Kurzschlüsse und Beschädigung der Laut - IN“, „TAPE IN“ oder „REC IN“) des Aufnahmegerätes. sprecher oder des Verstärkers. Benutzen Sie für die Verbindung Ihrer Lautsprecher mit dem E-SA18 ein Anschluss eines Mikrofons Kabel mit ausreichendem Querschnitt. Sorgen Sie An diese 6,3 mm Klinkenbuchse kann, wenn ge - dafür, dass blanke Lautsprecherdrähte sich niemals...
- Page 18 E-SA18_A6_quer 2013_Layout 1 03.06.13 10:08 Seite 18 werden. Am Lautsprecher gibt es gleichartige oder angebracht werden sollen, entfernen Sie ein ca. 1 ähnliche Anschlüsse, auch hier ist die Polarität cm langes Stück der Isolierung von jedem Endstück angegeben. Hier wird das andere Ende des dem des Lautsprecher drahtes.
-
Page 19: Bedienung Des Gerätes
E-SA18_A6_quer 2013_Layout 1 03.06.13 10:08 Seite 19 BEDIENUNG DES GERÄTES Aktion Taste(n) Beschreibung Ein- und Ausschalten POWER Das Gerät wird an der Gerätevorderseite ein- und ausgeschaltet. Ist der Schalter in der Ausschaltposition, ist das Gerät vom Strom - netz getrennt. Im eingeschalteten Zustand leuchtet die neben dem Netzschalter angeordnete LED. - Page 20 E-SA18_A6_quer 2013_Layout 1 03.06.13 10:08 Seite 20 Aktion Taste(n) Beschreibung Verstärkung zu verringern. Vor dem Umschalten sollte vorsichtshal- ber die Lautstärke (8) verringert werden. HIGH = normale, für Hochpegelquellen geeignete Empfindlichkeit LOW = niedrigere Empfindlichkeit für kräftigere Eingangssignale TREBLE Höhenanteile des Mit dem Drehregler „TREBLE“...
- Page 21 E-SA18_A6_quer 2013_Layout 1 03.06.13 10:08 Seite 21 Aktion Taste(n) Beschreibung Ausgangs „REC OUT“ (10) bleibt davon unbeeinflusst. Klangkorrektur für LOUDNESS Diese Funktion ist ein Leistungsmerkmal von Audio-Verstärkern, das geringe Lautstärke es dem Bediener ermöglicht, per Knopfdruck tiefe und hohe ein- und ausschalten Frequenzen gegenüber den Mittenfrequenzen anzuheben.
- Page 22 E-SA18_A6_quer 2013_Layout 1 03.06.13 10:08 Seite 22 Aktion Taste(n) Beschreibung Das Mikrofonsignal DIGITAL ECHO Wird dieser Drehknopf im Uhrzeigersinn bewegt, wird dem Mikro - mit Nachhall (Echo) fonsignal in zunehmendem Maße Nachhall (Echo) hinzugefügt. versehen Wird kein Echo gewünscht, muss der Knopf in Gegenuhr zeiger - richtung bis zur Endposition gedreht werden.
-
Page 23: Technische Daten
E-SA18_A6_quer 2013_Layout 1 03.06.13 10:08 Seite 23 TECHNISCHE DATEN Frequenzgang: 20 Hz - 20 kHz (3dB) Nennausgangsleistung (Musikleistung) an 4Ω: 2 x 75 W Eingangsempfindlichkeit (Cincheingang): 200 mV („SIGNAL IN“=HIGH) 750 mV („SIGNAL IN“=LOW) Eingangsempfindlichkeit (Mikrofoneingang): 3 mV Klirrfaktor: < 0.1% Signal-Rausch-Abstand: >... -
Page 24: Security Precautions / User Information
E-SA18_A6_quer 2013_Layout 1 03.06.13 10:08 Seite 24 SECURITY PRECAUTIONS All equipment that is connected to the domestic mains voltage can be dangerous to the user if not handled properly. Do not open the appliance! Risk of electric shock! Regularly check the technical safety of the device. Leave the maintenance to qualified staff. - Page 25 E-SA18_A6_quer 2013_Layout 1 03.06.13 10:08 Seite 25 SECURITY PRECAUTIONS Always pull the plug and never the power cable if Contact of electrically operated equipment with you want to disconnect the appliance from the liquids, moisture, rain or water vapour is dangerous mains power.
- Page 26 E-SA18_A6_quer 2013_Layout 1 03.06.13 10:08 Seite 26 USER INFORMATION Old electronic equipment CE-Sign This appliance is subject to the conditions set out This appliance complies with the current EU directi- in the European Directive 2002/96/EC, whose imple- ves about attaining the CE mark and thus meets the mentation is regulated in Germany by the Electrical requirements for electrical and electronic equipment and Electronic Equipment Act (ElektroG).
- Page 27 E-SA18_A6_quer 2013_Layout 1 03.06.13 10:08 Seite 27 USER INFORMATION Dynavox works continually to improve and develop Dynavox is a registered trademark of Sintron Vertriebs its products. Therefore, the appearance and techni- GmbH, 76473 Iffezheim. cal design of the appliance are subject to changes, as long as they are in the interest of progress.
-
Page 28: Front View / Rear View
E-SA18_A6_quer 2013_Layout 1 03.06.13 10:08 Seite 28 FRONT VIEW... - Page 29 E-SA18_A6_quer 2013_Layout 1 03.06.13 10:08 Seite 29 POWER STANDBY 5. BASS Switches the device on and off. When switched off, For setting the bass proportions (low frequencies) the device is disconnected from the mains. The LED of the sound. located next to the switch lights up when the devi- ce is switched on.
- Page 30 E-SA18_A6_quer 2013_Layout 1 03.06.13 10:08 Seite 30 REAR VIEW...
- Page 31 E-SA18_A6_quer 2013_Layout 1 03.06.13 10:08 Seite 31 9. AUDIO INPUT 12. TO SPEAKER Here you can connect one or two source devices Output sockets with screw clamps for connecting with stereo audio high level output and their one pair of loudspeakers. Loudspeaker cables with signals are mixed in the amplifier.
-
Page 32: Dynavox E-Sa18 / Typical Karaoke-System
The E-SA18 is a compact HiFi amplifier for two ste- ce. We accept no liability for damage to property or reo input sources and a microphone. If two sources... - Page 33 E-SA18_A6_quer 2013_Layout 1 03.06.13 10:08 Seite 33 mixed. There is no option to switch between the ording output the signal that can be heard via the two sources. If a dynamic microphone is connected, loudspeakers can be transmitted to a recording its signal will be mixed with the signal from the two device (tape recorder etc.).
- Page 34 E-SA18_A6_quer 2013_Layout 1 03.06.13 10:08 Seite 34 TYPICAL KARAOKE SYSTEM For a typical karaoke system connect the high level connect the recording output “REC OUT” to the high output of an audio source for the playback music level input of a recording device (tape, CD recorder (CD player, computer, portable player etc.) using an etc.).
- Page 35 E-SA18_A6_quer 2013_Layout 1 03.06.13 10:08 Seite 35 Recording device Playback source IiIIiIIi IiIIiIIi Loudspeakers Dynamic microphone...
-
Page 36: Connection And Placing Into Operation
E-SA18_A6_quer 2013_Layout 1 03.06.13 10:08 Seite 36 CONNECTION AND PLACING INTO OPERATION Make the cable connections in the order specified The output connectors of the source devices are below. Never make changes to the cable connecti- often labelled “LINE OUT”. The input connectors of ons while the devices are switched on! Mechanically this amplifier (9) are electrically identical high level identical RCA plugs are available for input and out-... - Page 37 RCA cable to the signal input (“LINE IN”, “TAPE IN” your loudspeakers with the E-SA18. Make sure that or “REC IN”) of the recording device. The Mic signal bare loudspeaker cables can never touch each other...
- Page 38 E-SA18_A6_quer 2013_Layout 1 03.06.13 10:08 Seite 38 Connection of the mains cable connect only the two plugs of each loudspeaker cable with the two associated clamps and the screw Do not connect the mains cable until last. Connect cover of the clamp should be turned in a clockwise its power plug to a mains socket which is supplied direction.
-
Page 39: Operating The Appliance
E-SA18_A6_quer 2013_Layout 1 03.06.13 10:08 Seite 39 OPERATING THE APPLIANCE Operation Button(s) Description Switch on and off POWER The amplifier is switched on and off using this button at the front panel. When switched off the device is internally separated from the AC power. - Page 40 E-SA18_A6_quer 2013_Layout 1 03.06.13 10:08 Seite 40 Operation Button(s) Description The volume (8) should be reduced for safety reasons before switching. HIGH = normal, sensitivity suitable for high level sources LOW = lower sensitivity for more powerful input signals TREBLE Change the treble With the “TREBLE”...
- Page 41 E-SA18_A6_quer 2013_Layout 1 03.06.13 10:08 Seite 41 Operation Button(s) Description affects the loudspeaker signals, the signal of the output “REC OUT” (10) is independent of this. Switch the sound LOUDNESS This function is a feature of audio amplifiers that permits the user correction for low to strengthen low and high frequencies compared with middle fre- volume on and off...
- Page 42 E-SA18_A6_quer 2013_Layout 1 03.06.13 10:08 Seite 42 Operation Button(s) Description Add echo to the DIGITAL ECHO If this dial is turned in a clockwise direction, echo will be added to microphone signal the microphone signal with increasing intensity. If no echo is desi- red, then this dial must be turned in anticlockwise direction right to its end position.
-
Page 43: Technical Specifications
E-SA18_A6_quer 2013_Layout 1 03.06.13 10:08 Seite 43 TECHNICAL SPECIFICATIONS Frequency Response: 20 Hz - 20 kHz (3dB) Nominal output power (music power) into 4Ω: 2 x 75 W Input Impedance (RCA inputs): 200 mV („SIGNAL IN“=HIGH) 750 mV („SIGNAL IN“=LOW) Input Impedance (microphone input): 3 mV Total Harmonic Distortion:... -
Page 44: Consignes De Sécurité / Informations Complémentaires
E-SA18_A6_quer 2013_Layout 1 03.06.13 10:08 Seite 44 CONSIGNES DE SECURITE Tous les moyens d'exploitation raccordés au secteur du foyer peuvent représenter un danger pour l'utilisateur en cas d'usage non conforme. Ne pas ouvrir l'appareil! Danger de décharge électrique! Vérifiez périodiquement la sécurité technique de Faites toujours effectuer l'entretien par un person- l’appareil. - Page 45 E-SA18_A6_quer 2013_Layout 1 03.06.13 10:08 Seite 45 CONSIGNES DE SECURITE Lorsque vous débranchez l'appareil du secteur, reti- Le contact d'appareils électriques avec des liquides, rez-le en le tenant par la prise, mais jamais en tirant l'humidité, la pluie ou la vapeur d'eau représente sur le câble.
- Page 46 E-SA18_A6_quer 2013_Layout 1 03.06.13 10:08 Seite 46 AUTRES CONSIGNES Appareils électroniques usagés Sigle CE Cet appareil est soumis aux dispositions fixées dans la L'appareil répond aux directives UE pour l'obtenti- directive européenne 2002/96/CE. L'identification est on du sigle CE et par conséquent aux exigences fournie sur l'appareil par le symbole représentant une concernant les appareils et électroniques (directives poubelle rayée.
- Page 47 E-SA18_A6_quer 2013_Layout 1 03.06.13 10:08 Seite 47 AUTRES CONSIGNES Dynavox travaille en permanence à l'amélioration et Dynavox est une marque enregistrée de la société au développement de ses produits. Pour cette rai- Sintron Vertriebs GmbH, 76473 Iffezheim. son, des modifications de design et de constructi- on technique liées au progrès sont possibles.
-
Page 48: Façade Avant / Façade Arriere
E-SA18_A6_quer 2013_Layout 1 03.06.13 10:08 Seite 48 FACADE AVANT... - Page 49 E-SA18_A6_quer 2013_Layout 1 03.06.13 10:08 Seite 49 POWER STANDBY 4. DIGITAL ECHO Met l’appareil en MARCHE ou à l’ARRET, à l’ARRET, A l’aide de ce bouton tournant vous réglez unique- l’appareil est coupé de l’alimentation secteur. ment l’écho agissant sur le seul signal du microphone. En l’état de MARCHE, la LED située à...
- Page 50 E-SA18_A6_quer 2013_Layout 1 03.06.13 10:08 Seite 50 FACADE ARRIERE...
- Page 51 E-SA18_A6_quer 2013_Layout 1 03.06.13 10:08 Seite 51 9. AUDIO INPUT 12. TO SPEAKER Vous pouvez raccorder ici un ou deux appareils Douilles de sortie avec serrage à vis pour le raccor- source avec sortie son stéréo de haut niveau, dont dement d’une ou de deux paires de haut-parleurs.
-
Page 52: Dynavox E-Sa18 / Système Karaoké Typique
DYNAVOX E-SA18 Nous vous remercions de la confiance que vous nous témoignez en ache- E-SA18 est un amplificateur Hi-fi compact pour deux tant ce produit de haute qualité. Cet appareil entrées de sources stéréo et d’un microphone. répond à toutes les normes internationales de sécu- Si deux sources sont raccordées aux entrées RCA,... - Page 53 E-SA18_A6_quer 2013_Layout 1 03.06.13 10:08 Seite 53 via les haut-parleurs, peut être transmis à un appa- reil enregistreur (enregistreur de cassettes etc.) Grâce à ses dimensions réduites, l’amplificateur est particulièrement adapté comme système de Karaoké transportable, mais également pour la reproduction audio avec un ordinateur ou comme amplificateur, suffisant pour une petite installation stéréo et de fai- ble encombrement.
- Page 54 E-SA18_A6_quer 2013_Layout 1 03.06.13 10:08 Seite 54 SYSTEME KARAOKE TYPIQUE Pour un système Karaoké typique, raccordez la sor- Lorsque le mixage Karaoké doit être enregistré, rac- tie haut niveau d’un appareil de reproduction pour cordez la sortie d’enregistrement „REC OUT“ avec la musique de fond (lecteur de CD, ordinateur, lec- l’entrée haut niveau d’un appareil d’enregistrement teur portable etc.) à...
- Page 55 E-SA18_A6_quer 2013_Layout 1 03.06.13 10:08 Seite 55 Appareil enregistreur Source musicale IiIIiIIi IiIIiIIi Haut-parleurs Microphone dynamique...
-
Page 56: Raccordement Et Mise En Service
E-SA18_A6_quer 2013_Layout 1 03.06.13 10:08 Seite 56 RACCORDEMENT ET MISE EN SERVICE Réalisez les raccordements de câbles dans l’ordre sui- réo „AUDIO INPUT“ (9). Utilisez des câbles de raccor- vant. Ne modifiez jamais les raccordements de câbles, dement RCA du commerce. Les prises de sorties des pendant que les appareils sont sous tension ! Des appareils sources sont souvent désignées par „LINE branchements RCA mécaniquement identiques exi-... - Page 57 Utilisez un câble de section suffisante pour le raccor- A cette prise Jack de 6,3 mm, on peut si on le souhai- dement de vos haut-parleurs à l’appareil E-SA18. te, raccorder un microphone dynamique. Les micropho- Assurez-vous que les fils des haut-parleurs dénudés nes à...
- Page 58 E-SA18_A6_quer 2013_Layout 1 03.06.13 10:08 Seite 58 quel côté (droit ou gauche) correspond la paire de est bien serré et qu’aucune partie métallique dénudée bornes. Les mêmes bornes ou des bornes similaires de la cosse ne soit en contact avec la paroi arrière ou se trouvent sur le haut-parleur, avec également la une autre borne de raccordement.
-
Page 59: Utilisation De L'appareil
E-SA18_A6_quer 2013_Layout 1 03.06.13 10:08 Seite 59 UTILISATION DE L’APPAREIL Action Touche(s) Description Mise en marche POWER L’appareil n‘a pas de mise en veille, il est mis en marche et arrêté et arrêt par le commutateur en façade avant. En position arrêt, il n‘est plus sous tension. - Page 60 E-SA18_A6_quer 2013_Layout 1 03.06.13 10:08 Seite 60 Action Touche(s) Description le bas de la plage), on peut essayer, en plaçant l’inverseur sur la position „LOW“, de réduire l’amplification. Avant de commuter l’in- verseur, prenez la précaution de réduire le volume (8). HIGH = Sensibilité...
- Page 61 E-SA18_A6_quer 2013_Layout 1 03.06.13 10:08 Seite 61 Action Touche(s) Description des haut-parleurs. Le signal de la sortie „REC OUT“ (10) n’est pas modifié. La fonction "Loudness" est une caractéristique de puissance des amplifica- Activer et désactiver LOUDNESS teurs audio qui permet à l'utilisateur d'augmenter les fréquences basses et la correction du son hautes par simple pression sur un bouton.
- Page 62 E-SA18_A6_quer 2013_Layout 1 03.06.13 10:08 Seite 62 Action Touche(s) Description Donner de l’écho au DIGITAL ECHO En tournant ce bouton dans le sens horaire, on ajoute de plus en signal de microphone plus d’écho au signal du microphone. Si aucun écho n’est souhaité, ce bouton doit être tourné...
-
Page 63: Caracteristiques Techniques
E-SA18_A6_quer 2013_Layout 1 03.06.13 10:08 Seite 63 CARACTERISTIQUES TECHNIQUES Plage de transmission : 20 Hz - 20 kHz (3dB) Puissance nominale (puissance efficace musicale) 4Ω : 2 x 75 W Sensibilité d’entrée (RCA) : 200 mV („SIGNAL IN“=HIGH) 750 mV („SIGNAL IN“=LOW) Sensibilité... - Page 64 E-SA18_A6_quer 2013_Layout 1 03.06.13 10:08 Seite 64 www.dynavox-audio.de Internationaler Distributor: Importeur/Importateur/Importer: Sintron Vertriebs GmbH · Elektronic Import & Export · Südring 14 D-76473 Iffezheim WEEE-Reg.Nr.: DE76956435...
Need help?
Do you have a question about the E-SA18 and is the answer not in the manual?
Questions and answers